Bosch WTMC6321US User Guide - Page 20
Cleaning, exhaust, moisture, sensor, bearing, shield, Change, light
 |
View all Bosch WTMC6321US manuals
Add to My Manuals
Save this manual to your list of manuals |
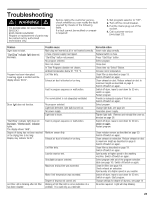
Page 20 highlights
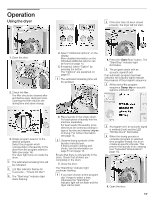
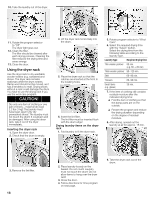
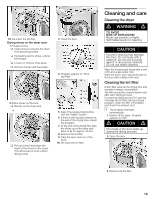
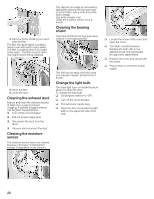
4. Remove lint by stroking your hand over the filter. The filter should be lightly scrubbed twice a year with warm soapy water. The filter is cleaned when it no longer holds water. The filter must be dried thoroughly before being replaced. 5. Insert the filter. 6. Close the door. Cleaning the exhaust duct Inspect and clean the exhaust ducting at least once a year to prevent clogging. A partially clogged exhaust can lengthen the drying time. q Turn off the circuit breaker q Pull out power supply plug q Disconnect the duct from the dryer. q Vacuum and reconnect the duct. Cleaning the moisture sensor The moisture sensor has to be cleaned because a fine layer of transparent buildup is deposited on the sensors. This deposit can easily be removed by wiping the sensors (the two bars next to the lint filter) with a cloth and a little white vinegar. Use white vinegar only! Clean the moisture sensor once a month. Cleaning the bearing shield Over time, fluff from the drying process collects in the bearing shield. This fluff can be easily removed using your vacuum cleaner, at least once a month. Change the light bulb The dryer light turns on inside the drum when you open the door. To change the light bulb: q Set program selector to Off". q Turn off the circuit breaker. q Pull out power supply plug. q Open the door and locate the light bulb on the upper left side of the seal. q Loosen the screw of the cover and open the cover. q Turn bulb counterclockwise. Replace the bulb with a new appliance bulb only (obtainable through parts department). q Replace the cover and secure with the screw. q Plug in dryer or reconnect power supply. 20
-
 1
1 -
2
-
3
-
4
-
5
-
6
-
7
-
8
-
9
-
10
-
11
-
12
-
13
-
14
-
 15
15 -
 16
16 -
 17
17 -
 18
18 -
 19
19 -
 20
20 -
 21
21 -
 22
22 -
 23
23 -
 24
24 -
 25
25 -
26
-
27
-
28
-
29
-
30
-
31
-
32
-
33
-
34
-
35
-
36
-
37
-
38
-
39
-
40
-
41
-
42
-
43
-
44
-
45
-
46
-
47
-
48
-
49
-
50
-
51
-
52
-
53
-
54
-
55
-
56
-
57
-
58
-
59
-
60
-
61
-
62
-
63
-
64
-
65
-
66
-
67
-
68
-
69
-
70
-
71
-
72
 |
 |
