Brother International 4234DT Users Manual - English and Spanish - Page 14
Chart of thread tension adjustment, One-needle Three-thread, Chart of thread tension adjustment, One
 |
View all Brother International 4234DT manuals
Add to My Manuals
Save this manual to your list of manuals |
Page 14 highlights
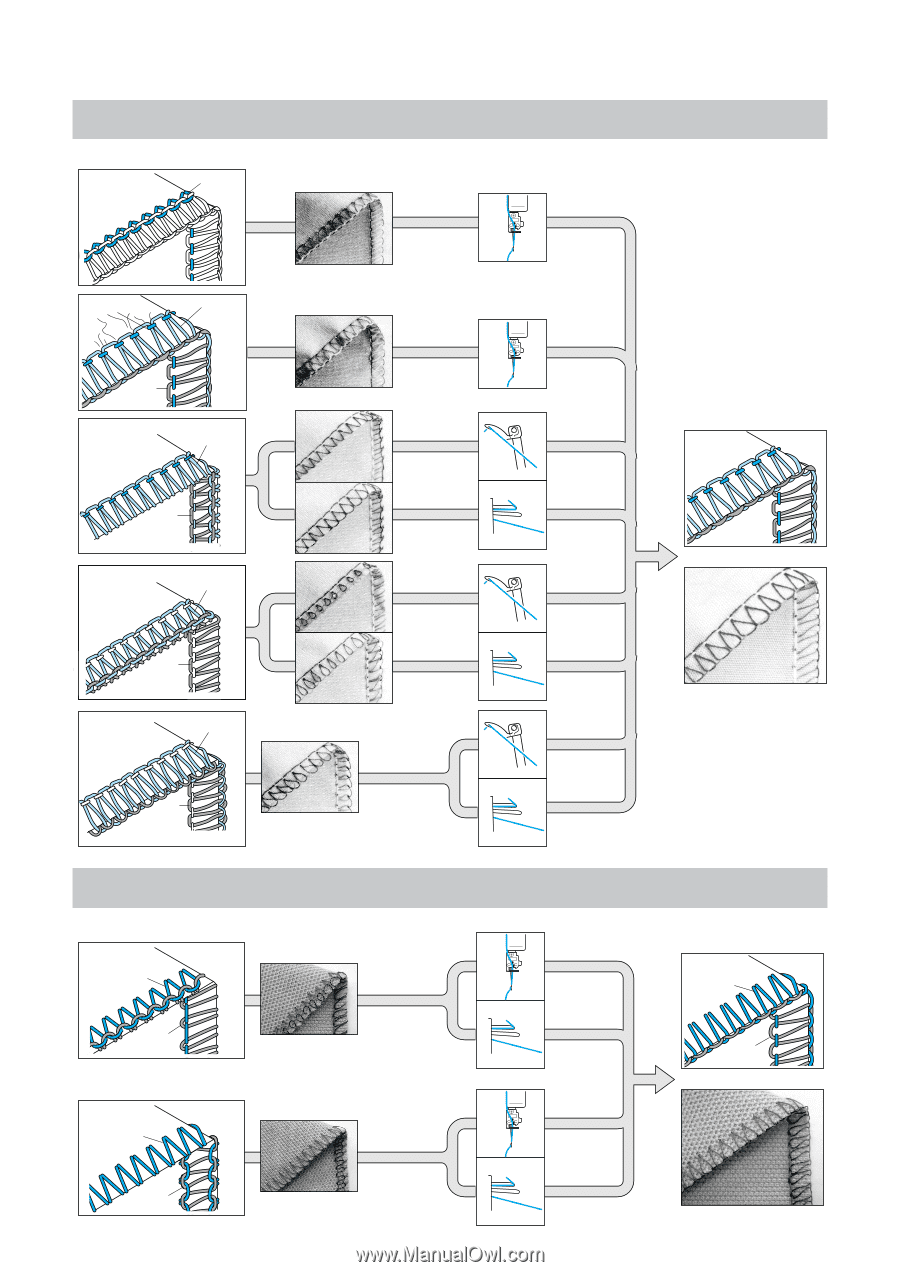
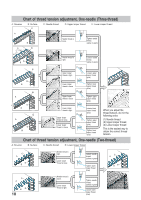
Chart of thread tension adjustment, One-needle (Three-thread) A: Reverse B: Surface C: Needle thread D: Upper looper thread E: Lower looper thread C A B C E Needle thread is loose. Tighten needle thread. (yellow or green) A D B Needle thread is tight. Loosen needle thread. (yellow or green) E A D B Upper looper thread is tight. Lower looper thread is loose. Loosen upper looper thread (pink) Tighten lower looper thread (blue) E A Upper looper Tighten upper thread is loose. looper thread (pink) D B E A D B Lower looper thread is tight. Upper looper thread is loose. Lower looper thread is loose. Loosen lower looper thread (blue) Tighten upper looper thread (pink) Tighten lower looper thread (blue) When you adjust the thread tension, do it in the following order: (1) Needle thread (2) Upper looper thread (3) Lower looper thread This is the easiest way to obtain the correct thread tension. Chart of thread tension adjustment, One-needle (Two-thread) A: Reverse B: Surface C: Needle thread D: Lower looper thread C A D B C A BD 10 Needle thread is tight. Lower looper thread is loose. Needle thread is loose. Lower looper thread is tight. Loosen needle thread. (yellow or green) Tighten lower looper thread (blue) Tighten needle thread. (yellow or green) Loosen lower looper thread (blue) C A BD
-
 1
1 -
2
-
3
-
4
-
5
-
6
-
7
-
8
-
 9
9 -
 10
10 -
 11
11 -
 12
12 -
 13
13 -
 14
14 -
 15
15 -
 16
16 -
 17
17 -
 18
18 -
 19
19 -
20
-
21
-
22
-
23
-
24
-
25
-
26
-
27
-
28
-
29
-
30
-
31
-
32
-
33
-
34
-
35
-
36
-
37
-
38
-
39
-
40
-
41
-
42
-
43
-
44
-
45
-
46
-
47
-
48
-
49
-
50
-
51
-
52
-
53
-
54
-
55
-
56
-
57
-
58
-
59
-
60
-
61
-
62
-
63
-
64
-
65
-
66
-
67
-
68
-
69
-
70
-
71
-
72
-
73
-
74
-
75
-
76
-
77
-
78
-
79
-
80
 |
 |