Brother International BAS-300G Basic Instruction Manual - English - Page 19
Installing the treadle unit (motor-driven work clamp specifications)
 |
View all Brother International BAS-300G manuals
Add to My Manuals
Save this manual to your list of manuals |
Page 19 highlights
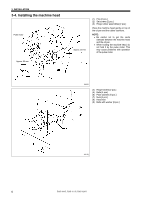
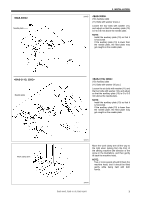
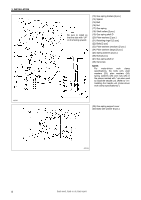
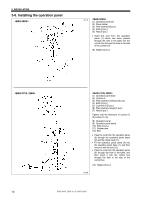
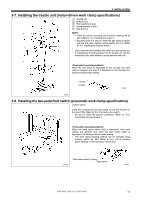
3. INSTALLATION 3-7. Installing the treadle unit (motor-driven work clamp specifications) (1) Treadle unit (2) Bolts [3 pcs.] (3) Plain washers [3 pcs.] (4) Spring washers [3 pcs.] (5) Nuts [3 pcs.] NOTE: • Install the bolt for mounting hole A before installing the oil pan. (Refer to "3-3. Installing the oil pan.") • Mounting hole B is used to install the gas spring supports with the bolt, plain washer, spring washer and nut. (Refer to "3-4. Installing the machine head".) * Use a commercially-available foot switch and connecting rod. * If changing the mounting position for the treadle unit, use the accessory bolts, plain washers, spring washers and nuts. When the foot switch is depressed to the 1st step, the work clamp is lowered, and when it is depressed to the 2nd step, the sewing machine starts sewing. 1st step 2nd step 4441Q 4921Q 3-8. Installing the two-pedal foot switch (pneumatic work clamp specifications) (1) Foot switch Insert the connector for the foot switch (1) into P6 (FOOT) on the main PCB. (Refer to "3-9. Connecting the cords".) * Be sure to make the ground connection. (Refer to "3-10. Connecting the ground wire".) When the work clamp switch (left) is depressed, both work clamps are lowered, and when the start switch (right) is depressed, the sewing machine starts sewing. * The work clamp lowering method can be changed using memory switch No. 002. (Refer to "6-3. List of memory switch settings" in the instruction manual CD.) 2972B Work clamp switch (2-step) Start switch 4923Q BAS-300G, BAS-311G, BAS-326G 11
-
 1
1 -
2
-
3
-
4
-
5
-
6
-
7
-
8
-
9
-
10
-
11
-
12
-
13
-
 14
14 -
 15
15 -
 16
16 -
 17
17 -
 18
18 -
 19
19 -
 20
20 -
 21
21 -
 22
22 -
 23
23 -
 24
24 -
25
-
26
-
27
-
28
-
29
-
30
-
31
-
32
-
33
-
34
-
35
-
36
-
37
-
38
-
39
-
40
-
41
-
42
-
43
-
44
 |
 |
