Brother International BAS-300G Basic Instruction Manual - English - Page 8

Contents, Using The Operation Panel - cf card

Page 8 highlights

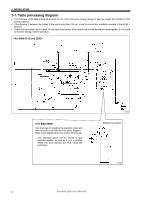
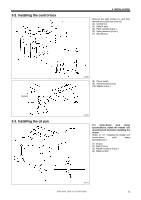
CONTENTS 1. NAMES OF MAJOR PARTS 1 2. USEFUL FUNCTIONS FOR OPTIMUM SEWING 2 3. INSTALLATION 3 3-1. Table processing diagram 4 3-2. Installing the control box 5 3-3. Installing the oil pan 5 3-4. Installing the machine head 6 3-5. Tilting the sewing machine head 9 3-6. Installing the operation panel 10 3-7. Installing the treadle unit (motor-driven work clamp specifications) ......... 11 3-8. Installing the two-pedal foot switch (pneumatic work clamp specifications 11 3-9. Connecting the cords 12 3-10. Connecting the ground wire 14 3-11. Connecting the power cord 15 3-12. Installing the cotton stand 15 3-13. Installing the pneumatic unit (pneumatic work clamp specifications 16 3-14. Installing the eye guard 17 3-15. Installing the motor cover 17 3-16. Lubrication 18 4. PREPARATION BEFORE SEWING.....19 4-1. Installing the needle 19 4-2. Threading the upper thread 19 4-3. Winding the lower thread 21 4-4. Installing the bobbin case 22 4-5. Thread tension 23 4-5-1. Lower thread tension 23 4-5-2. Upper thread tension 23 4-6. Home position detection 24 5. USING THE OPERATION PANEL (BASIC OPERATIONS 25 5-1. Name and function of each operation panel item 25 5-2. Loading sewing data 27 5-3. Setting the program number 27 5-4. Setting the X-scale and Y-scale 28 5-5. Setting the sewing speed 28 5-6. Checking the sewing pattern 29 5-7. Setting the work clamp lift amount 30 5-8. Notes on handling CF cards (sold separately) ...32 6. SEWING 33 6-1. Sewing 33 6-2. Using the STOP switch 34 6-3. Using the thread wiper switch 34 Document CD 36 BAS-300G, BAS-311G, BAS-326G

  • 1
  • 2
  • 3
  • 4
  • 5
  • 6
  • 7
  • 8
  • 9
  • 10
  • 11
  • 12
  • 13
  • 14
  • 15
  • 16
  • 17
  • 18
  • 19
  • 20
  • 21
  • 22
  • 23
  • 24
  • 25
  • 26
  • 27
  • 28
  • 29
  • 30
  • 31
  • 32
  • 33
  • 34
  • 35
  • 36
  • 37
  • 38
  • 39
  • 40
  • 41
  • 42
  • 43
  • 44

BAS-300G, BAS-311G, BAS-326G
CONTENTS
1. NAMES OF MAJOR PARTS
................
1
2. USEFUL FUNCTIONS FOR
OPTIMUM SEWING
..............................
2
3. INSTALLATION
....................................
3
3-1. Table processing diagram
................................
4
3-2. Installing the control box
...................................
5
3-3. Installing the oil pan
..........................................
5
3-4. Installing the machine head
..............................
6
3-5. Tilting the sewing machine head
......................
9
3-6. Installing the operation panel
............................
10
3-7. Installing the treadle unit
(motor-driven work clamp specifications)
.........
11
3-8. Installing the two-pedal foot switch
(pneumatic work clamp specifications)
..............
11
3-9. Connecting the cords
........................................
12
3-10. Connecting the ground wire
............................
14
3-11. Connecting the power cord
.............................
15
3-12. Installing the cotton stand
...............................
15
3-13. Installing the pneumatic unit
(pneumatic work clamp specifications)
............
16
3-14. Installing the eye guard
..................................
17
3-15. Installing the motor cover
...............................
17
3-16. Lubrication
......................................................
18
4. PREPARATION BEFORE SEWING
.....
19
4-1. Installing the needle
..........................................
19
4-2. Threading the upper thread
..............................
19
4-3. Winding the lower thread
..................................
21
4-4. Installing the bobbin case
.................................
22
4-5. Thread tension
..................................................
23
4-5-1. Lower thread tension
..............................
23
4-5-2. Upper thread tension
..............................
23
4-6. Home position detection
...................................
24
5. USING THE OPERATION PANEL
(BASIC OPERATIONS)
.......................
25
5-1. Name and function of each operation
panel item
..........................................................
25
5-2. Loading sewing data
.........................................
27
5-3. Setting the program number
.............................
27
5-4. Setting the X-scale and Y-scale
........................
28
5-5. Setting the sewing speed
..................................
28
5-6. Checking the sewing pattern
.............................
29
5-7. Setting the work clamp lift amount
....................
30
5-8. Notes on handling CF cards (sold separately) ...32
6. SEWING
...............................................
33
6-1. Sewing
..............................................................
33
6-2. Using the STOP switch
.....................................
34
6-3. Using the thread wiper switch
...........................
34
Document CD
...........................................
36