Brother International DCP-J140W Quick Setup Guide - English - Page 12
Finish - driver download
 |
View all Brother International DCP-J140W manuals
Add to My Manuals
Save this manual to your list of manuals |
Page 12 highlights
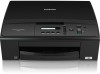
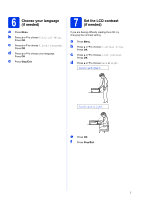
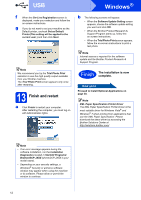
USB Windows® f When the On-Line Registration screen is displayed, make your selection and follow the on-screen instructions. g If you do not want to set your machine as the Default printer, uncheck Set as Default Printer(This setting will be applied to the current user.) and then click Next. Note We recommend you try the Trial Photo Print selection to see the high quality output available from your Brother machine. The Trial Photo Print screen appears only once after restarting. 13 Finish and restart a Click Finish to restart your computer. After restarting the computer, you must log on with Administrator rights. b The following screens will appear. • When the Software Update Setting screen appears, choose the software update setting you want and click OK. • When the Brother Product Research & Support Program starts up, follow the on-screen instructions. • When the Trial Photo Print screen appears, follow the on-screen instructions to print a test photo. Note Internet access is required for the software update and the Brother Product Research & Support Program. Finish The installation is now complete. Now go to Proceed to Install Optional Applications on page 30. Note XML Paper Specification Printer Driver The XML Paper Specification Printer Driver is the most suitable driver for Windows Vista® and Windows® 7 when printing from applications that use the XML Paper Specification. Please download the latest driver by accessing the Brother Solutions Center at http://solutions.brother.com/. Note • If an error message appears during the software installation, run the Installation Diagnostics located in Start/All Programs/ Brother/DCP-JXXX (where DCP-JXXX is your model name). • Depending on your security settings, a Windows® Security or antivirus software window may appear when using the machine or its software. Please allow or permit the window to continue. 12
-
 1
1 -
2
-
3
-
4
-
5
-
6
-
 7
7 -
 8
8 -
 9
9 -
 10
10 -
 11
11 -
 12
12 -
 13
13 -
 14
14 -
 15
15 -
 16
16 -
 17
17 -
18
-
19
-
20
-
21
-
22
-
23
-
24
-
25
-
26
-
27
-
28
-
29
-
30
-
31
-
32
 |
 |