Brother International DCP-L5600DN Web Connect Guide - Page 49
Scan a Note Sheet to the Cloud
 |
View all Brother International DCP-L5600DN manuals
Add to My Manuals
Save this manual to your list of manuals |
Page 49 highlights
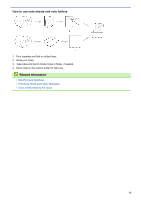
Home > NotePrint and NoteScan > NotePrint and NoteScan Overview > Scan a Note Sheet to the Cloud Scan a Note Sheet to the Cloud Related Models: DCP-L5500DN/DCP-L5600DN/DCP-L5650DN/MFC-L5700DW/MFC-L5800DW/ MFC-L5850DW/MFC-L5900DW/MFC-L6700DW/MFC-L6750DW/MFC-L6800DW/MFC-L6900DW Each page of your Note Sheet is saved as a separate JPEG file. 1. Load your document. 2. Swipe left or right or press d or c to display the [Apps] option. 3. Press [Apps]. • If information regarding the Internet connection appears on the machine's LCD, read the information and press [OK]. If you want to display this information again, press [Yes]. • Occasionally, updates or announcements about Brother Web Connect's features will appear on the LCD. Read the information, and then press [OK]. 4. Swipe left or right or press d or c to display [NoteScan], and then press it. 5. Press [Scan Notes]. 6. If information regarding [Scan Notes] appears, read the information and press [OK]. If you want to display this information again, press [Yes]. 7. Press [Yes] or [No]. 8. Swipe left or right or press d or c to display the service you want, and then press it. 9. Swipe up or down or press a or b to display your account name, and then press it. 10. If the PIN entry screen appears, enter the four-digit PIN and press [OK]. 11. Press [OK]. The machine scans the document and starts uploading. If you are using the machine's scanner glass, follow the LCD instructions to complete the scanning job. 12. When the machine finished uploading the image, press [OK]. 13. Press . Related Information • NotePrint and NoteScan Overview 44
-
 1
1 -
2
-
3
-
4
-
5
-
6
-
7
-
8
-
9
-
10
-
11
-
12
-
13
-
14
-
15
-
16
-
17
-
18
-
19
-
20
-
21
-
22
-
23
-
24
-
25
-
26
-
27
-
28
-
29
-
30
-
31
-
32
-
33
-
34
-
35
-
36
-
37
-
38
-
39
-
40
-
41
-
42
-
43
-
 44
44 -
 45
45 -
 46
46 -
 47
47 -
 48
48 -
 49
49 -
 50
50 -
 51
51 -
 52
52 -
 53
53 -
 54
54 -
55
-
56
-
57
-
58
-
59
-
60
 |
 |
