Brother International IntelliFax-2840 Software Users Manual - English - Page 42
Settings in the Scanner Setup dialog box, Scan (Image Type)
 |
View all Brother International IntelliFax-2840 manuals
Add to My Manuals
Save this manual to your list of manuals |
Page 42 highlights
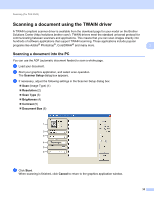
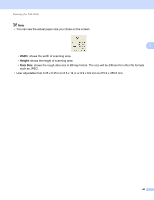
Scanning (For FAX-2940) d Press and hold down the left mouse button and drag it over the portion you want to scan. 3 1 1 Scanning area Note You can enlarge the image using the original size. icon, and then use the icon to restore the image to its e Load your document again. f Click Start. When scanning is finished, click Cancel to return to the graphics application window. This time only the chosen area of the document appears in your application window. g In your application window, use the options available to refine the image. Settings in the Scanner Setup dialog box 3 Scan (Image Type) 3 Choose the output image type from Photo, Web or Text. Resolution and Scan Type will be altered for each default setting. The default settings are listed in the table below: Scan (Image Type) Resolution Photo Use for scanning photo images. 300 x 300 dpi Web Use for attaching the scanned image to web pages. 100 x 100 dpi Text Use for scanning text documents. 200 x 200 dpi Scan Type True Gray True Gray Black & White 37
-
 1
1 -
2
-
3
-
4
-
5
-
6
-
7
-
8
-
9
-
10
-
11
-
12
-
13
-
14
-
15
-
16
-
17
-
18
-
19
-
20
-
21
-
22
-
23
-
24
-
25
-
26
-
27
-
28
-
29
-
30
-
31
-
32
-
33
-
34
-
35
-
36
-
 37
37 -
 38
38 -
 39
39 -
 40
40 -
 41
41 -
 42
42 -
 43
43 -
 44
44 -
 45
45 -
 46
46 -
 47
47 -
48
-
49
-
50
-
51
-
52
-
53
-
54
-
55
-
56
-
57
-
58
-
59
-
60
-
61
-
62
-
63
-
64
-
65
-
66
-
67
-
68
-
69
-
70
-
71
-
72
-
73
-
74
-
75
-
76
-
77
-
78
-
79
-
80
-
81
-
82
-
83
-
84
-
85
-
86
 |
 |
