Brother International XL-2121 Users Manual - English - Page 33
Please Read Before Sewing, Straight Stitching
 |
View all Brother International XL-2121 manuals
Add to My Manuals
Save this manual to your list of manuals |
Page 33 highlights
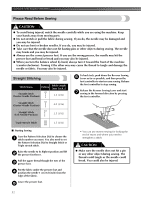
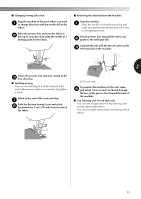
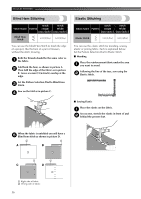
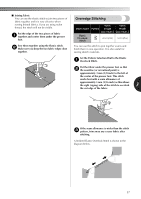
STRAIGHT AND ZIGZAG STITCHING Please Read Before Sewing CAUTION ● To avoid being injured, watch the needle carefully while you are using the machine. Keep your hands away from moving parts. ● Do not stretch or pull the fabric during sewing. If you do, the needle may be damaged and you may be injured. ● Do not use bent or broken needles. If you do, you may be injured. ● Take care that the needle does not hit basting pins or other objects during sewing. The needle may break and you may be injured. ● Always use the correct presser foot. If you use the wrong presser, the needle may hit the presser foot and bend or break and you may also be injured. ● When you turn the balance wheel by hand, always turn it toward the front of the machine (counterclockwise). Turning it the other way may cause the thread to tangle and damage the needle or fabric. You may also be injured. Straight Stitching Stitch Name Pattern Stitch Length [mm (inch.)] Straight Stitch (Center Needle Position) 2.5 (3/32) To back tack, push down the Reverse Sewing 6 Lever as far as possible, and then press the foot controller to start reverse sewing. Release the foot controller to stop sewing. Release the Reverse Sewing Lever and start 7 sewing in the forward direction by pressing the foot controller. Straight Stitch (Center Needle Position) 4.0 (3/16) Straight Stitch (Left Needle Position) 2.5 (3/32) Triple Stretch Stitch 2.5 (3/32) ■ Starting Sewing Turn the Pattern Selection Dial to choose the 1 stitch number you want. You also need to set the Pattern Selection Dial to Straight Stitch or Triple stretch stitch. Raise the needle to its highest position and lift 2 the presser foot lever. Pull the upper thread though the toes of the 3 presser foot. Put the fabric under the presser foot and 4 position the needle 1 cm (3/8 inch) from the edge of the fabric. Lower the presser foot. 5 • You can use reverse sewing for locking the end of seams and where you need to strengthen a stitch. CAUTION ● Make sure the needle does not hit a pin or any other object during sewing. The thread could tangle or the needle could break. You could also be injured. 32
-
 1
1 -
2
-
3
-
4
-
5
-
6
-
7
-
8
-
9
-
10
-
11
-
12
-
13
-
14
-
15
-
16
-
17
-
18
-
19
-
20
-
21
-
22
-
23
-
24
-
25
-
26
-
27
-
 28
28 -
 29
29 -
 30
30 -
 31
31 -
 32
32 -
 33
33 -
 34
34 -
 35
35 -
 36
36 -
 37
37 -
 38
38 -
39
-
40
-
41
-
42
-
43
-
44
-
45
-
46
-
47
-
48
-
49
-
50
-
51
-
52
-
53
-
54
-
55
-
56
-
57
-
58
-
59
-
60
-
61
-
62
-
63
 |
 |
