Brother International XL-2121 Users Manual - English - Page 37
Blind Hem Stitching, Elastic Stitching
 |
View all Brother International XL-2121 manuals
Add to My Manuals
Save this manual to your list of manuals |
Page 37 highlights
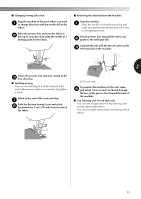
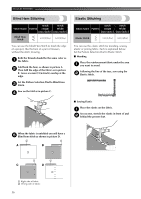
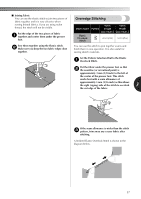
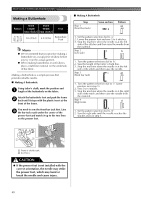
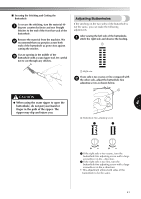
BUILT-IN STITCHES Blind Hem Stitching Stitch Stitch Stitch Name Pattern Length Width [mm (inch.)] [mm (inch.)] Blind Hem Stitch 2.0 (1/16) 5.0 (3/16) You can use the blind Hem Stitch to finish the edge of a project, like the hem of a pair of trousers, without the stitch showing. Both the threads should be the same color as 1 the fabric. Fold back the hem, as shown in picture A. 2 Then fold the edge of the fabric as in picture B. Leave a 6 mm (15/64 inch) overlap at the edge. Set the Pattern Selection Dial to Blind Hem 3 Stitch. Sew on the fold as in picture C. 4 Elastic Stitching Stitch Stitch Stitch Name Pattern Length Width [mm (inch.)] [mm (inch.)] Elastic Stitch 1.0 (1/16) 5.0 (3/16) You can use the elastic stitch for mending, sewing elastic or joining fabric. Each is explained below. Set the Pattern Selection Dial to Elastic Stitch. ■ Mending Place the reinforcement fabric under the area 1 you want to mend. Following the line of the tear, sew using the 2 Elastic Stitch. ■ Sewing Elastic Place the elastic on the fabric. 1 As you sew, stretch the elastic in front of and 2 behind the presser foot. When the fabric is unfolded you will have a 5 Blind hem stitch as shown in picture D. 2 1 A B 1 2 1 2 C D 2 1 1 Right side of fabric 2 Wrong side of fabric 36
-
 1
1 -
2
-
3
-
4
-
5
-
6
-
7
-
8
-
9
-
10
-
11
-
12
-
13
-
14
-
15
-
16
-
17
-
18
-
19
-
20
-
21
-
22
-
23
-
24
-
25
-
26
-
27
-
28
-
29
-
30
-
31
-
 32
32 -
 33
33 -
 34
34 -
 35
35 -
 36
36 -
 37
37 -
 38
38 -
 39
39 -
 40
40 -
 41
41 -
 42
42 -
43
-
44
-
45
-
46
-
47
-
48
-
49
-
50
-
51
-
52
-
53
-
54
-
55
-
56
-
57
-
58
-
59
-
60
-
61
-
62
-
63
 |
 |