Brother International XL-2121 Users Manual - English - Page 51
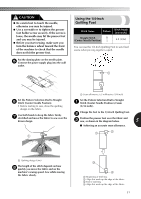
Using the Quilting Foot
 |
View all Brother International XL-2121 manuals
Add to My Manuals
Save this manual to your list of manuals |
Page 51 highlights
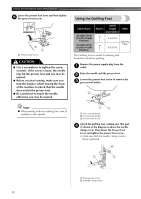
USING ATTACHMENTS AND APPLICATIONS Lower the presser foot lever and then tighten 5 the presser foot screw. Using the Quilting Foot 1 1 Presser-foot screw CAUTION ● Use a screwdriver to tighten the screw securely. If the screw is loose, the needle may hit the presser foot and you may be injured. ● Before you start sewing, make sure you turn the balance wheel toward the front of the machine to check that the needle does not hit the presser foot. ● Be careful not to touch the needle, otherwise you may be injured. Stitch Name Straight Stitch (Center Needle Position) Straight Stitch (Center Needle Position) Stitch Pattern Length Other [mm (inch.)] 2.5(3/32) 4.0(3/16) Darning Plate The Quilting Foot is useful for darning and freemotion machine quilting. Remove the power supply plug from the 1 outlet. Raise the needle and the presser foot. 2 Loosen the presser-foot screw to remove the 3 presser-foot holder. 2 Note ● When sewing with the walking foot, sew at medium to low speeds. 13 1 Use a screwdriver 2 Presser-foot holder 3 Presser-foot screw Attach the quilting foot, making sure that part 4 A shown in the diagram is above the needle clamp screw. Then lower the Presser Foot Lever and tighten the presser-foot screw. • Make sure that the needle clamp screw is firmly tightened. A 1 2 1 Presser-foot screw 2 Needle clamp screw 50
-
 1
1 -
2
-
3
-
4
-
5
-
6
-
7
-
8
-
9
-
10
-
11
-
12
-
13
-
14
-
15
-
16
-
17
-
18
-
19
-
20
-
21
-
22
-
23
-
24
-
25
-
26
-
27
-
28
-
29
-
30
-
31
-
32
-
33
-
34
-
35
-
36
-
37
-
38
-
39
-
40
-
41
-
42
-
43
-
44
-
45
-
 46
46 -
 47
47 -
 48
48 -
 49
49 -
 50
50 -
 51
51 -
 52
52 -
 53
53 -
 54
54 -
 55
55 -
 56
56 -
57
-
58
-
59
-
60
-
61
-
62
-
63
 |
 |
