Brother International XL-2121 Users Manual - English - Page 48
Monogramming and, Embroidering
 |
View all Brother International XL-2121 manuals
Add to My Manuals
Save this manual to your list of manuals |
Page 48 highlights
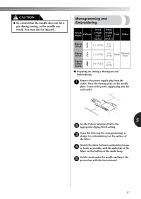
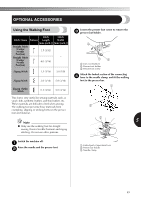
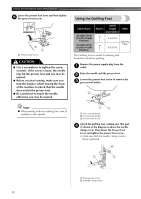
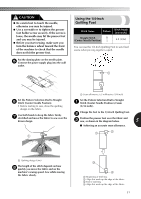
CAUTION ● Be careful that the needle does not hit a pin during sewing, as the needle can break. You may also be injured. Monogramming and Embroidering Stitch Name Pattern Stitch Length [mm (inch.)] Stitch Width [mm Foot (inch.)] Other Zigzag Stitch 1.5 (1/16) 3.0 (1/8) Zigzag Stitch 2.0 (1/16) 5.0 (3/16) None Darning Plate Zigzag (Satin) Stitch 0.5 (1/32) 5.0 (3/16) ■ Preparing for sewing a Monogram and Embroidering Remove the power supply plug from the 1 outlet. Place the darning plate on the needle plate. Connect the power supply plug into the wall outlet. 5 Set the Pattern Selection Dial to the 2 appropriate Zigzag Stitch setting. Draw the lettering (for monogramming) or 3 design (for embroidering) on the surface of the fabric. Stretch the fabric between embroidery hoops 4 as firmly as possible, with the underside of the fabric on the bottom of the inside hoop. Put the work under the needle and lower the 5 presser bar with the foot removed. 47
-
 1
1 -
2
-
3
-
4
-
5
-
6
-
7
-
8
-
9
-
10
-
11
-
12
-
13
-
14
-
15
-
16
-
17
-
18
-
19
-
20
-
21
-
22
-
23
-
24
-
25
-
26
-
27
-
28
-
29
-
30
-
31
-
32
-
33
-
34
-
35
-
36
-
37
-
38
-
39
-
40
-
41
-
42
-
 43
43 -
 44
44 -
 45
45 -
 46
46 -
 47
47 -
 48
48 -
 49
49 -
 50
50 -
 51
51 -
 52
52 -
 53
53 -
54
-
55
-
56
-
57
-
58
-
59
-
60
-
61
-
62
-
63
 |
 |
