Brother International XL-2121 Users Manual - English - Page 52
Using the 1/4-Inch, Quilting Foot
 |
View all Brother International XL-2121 manuals
Add to My Manuals
Save this manual to your list of manuals |
Page 52 highlights
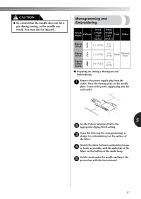
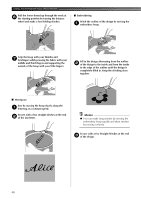
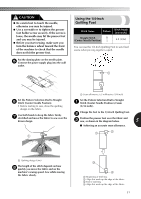
CAUTION ● Be careful not to touch the needle, otherwise you may be injured. ● Use a screwdriver to tighten the presser foot holder screw securely. If the screw is loose, the needle may hit the presser foot and you may be injured. ● Before you start sewing, make sure you turn the balance wheel toward the front of the machine to check that the needle does not hit the presser foot. Put the darning plate on the needle plate. 5 Connect the power supply plug into the wall outlet. Using the 1/4-Inch Quilting Foot Stitch Name Pattern Stitch length [mm(inch)] Straight Stitch (Center Needle Position) 2.5 (3/32) You can use the 1/4-Inch Quilting Foot to sew fixed seams when piecing together a quilt. 1 Set the Pattern Selection Dial to Straight 6 Stitch (Center Needle Position). • Before starting to sew, draw the quilting design on the fabric. Use both hands to keep the fabric firmly 7 stretched and move the fabric to sew over the drawn design. 1 1 Seam allowance 6.5 millimetres (1/4 inch) Set the Pattern Selection Dial to Straight 1 Stitch (Center Needle Position (2.5mm (3/32 inch)). Change the foot to the 1/4-Inch Quilting Foot. 2 Position the presser foot over the fabric and 3 sew, as shown in the diagram below. 5 ■ Achieving an accurate seam allowance. 1 2 1 Quilting design (Line) The length of the stitch depends on how 8 quickly you move the fabric and on the machine's sewing speed. Sew while moving the fabric slowly. 3 4 1 Beginning of stitching. 2 Align this mark up the edge of the fabric. 3 End of stitching 4 Align this mark up the edge of the fabric. 51
-
 1
1 -
2
-
3
-
4
-
5
-
6
-
7
-
8
-
9
-
10
-
11
-
12
-
13
-
14
-
15
-
16
-
17
-
18
-
19
-
20
-
21
-
22
-
23
-
24
-
25
-
26
-
27
-
28
-
29
-
30
-
31
-
32
-
33
-
34
-
35
-
36
-
37
-
38
-
39
-
40
-
41
-
42
-
43
-
44
-
45
-
46
-
 47
47 -
 48
48 -
 49
49 -
 50
50 -
 51
51 -
 52
52 -
 53
53 -
 54
54 -
 55
55 -
 56
56 -
 57
57 -
58
-
59
-
60
-
61
-
62
-
63
 |
 |
