Brother International XL-3025 Users Manual - English - Page 31
resultados
 |
View all Brother International XL-3025 manuals
Add to My Manuals
Save this manual to your list of manuals |
Page 31 highlights
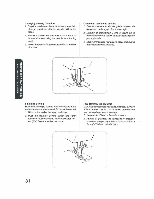
Twin Needle Sewing Costura con aguja doble Your sewing machine is designed for twin needle sewing which allows your machine to sow with two top threads. You can use the same color or two different colors of thread for decorative stitches. Twin needle sewing works well with these stitches: the Straight Stitch (3) (center needle position), the ZigzagStitch(4)(mostnarrow)and theTripleStretch Stitch (21). INSERTING THE TWIN NEEDLE Insert in the same way a single needle is inserted (refer to page 6). The flat side of the needle should face toward the back and the rounded side should face toward you. PLACING THE EXTRA SPOOL PIN Place the vertical spool pin in the hole found on top of the machine near the horizontal spool pin. Place the second spool of thread onto the vertical spool pin as shown in fig. A. TWIN NEEDLE THREADING Each needle should be threaded separately. 1. Threading the Right Needle Follow the same instructions for single needle threading using the thread from the spool on the extra spool pin. See page 23 for more details. 2. Threading the Left Needle Thread the left needle in the same manner that the right needle was threaded, but do not pass the thread through the thread guide above the needle beforepassingit through theeyeof theleftneedle as shown below in fig. B. CO Right needle thread passes through this guide. (2) Left needle thread in front of this guide. A Su maquina de cosy, ha sidoconcebrarr para poder utilizeruna aguja dobleypermitirla costura condos hilos superiores. Puede usar elmismo color de hilo o dos hi/os de colores distintos pans puntadas decorelives. Las cosluras con aguja doblo dan muy buenos resultados con las siguientes puntadas: la puntada recta (2) (aguja en la poskidn central), la puntadazigzag(3)(mssestrecha)yla triplepuntada elastica (12). Para Introducir la aguja doble. lntrodOzealo de la misma mantra quo una aguja simple (vease pagina 6). La pane plane de la aguja debe ester cam hacia ah-as mientras que la patio redonda esta care a usted. Colorado el eje de carrete suplementarlo Coloque el eje de carroty vertical en el officio provistaarriba de la maquina, terra delejehorizontal. Instate el segundo carrete de bile en el eje vertical, tal come ilustrado en la fig. A. Enhebrado de la aguja doble Cada una de las agujas debe ser enhebrada por separado. T. Enhebrado de la aguja derecha Observe las mismas instrucciones que para el enhebrado de una sole aguja, pero utilizando el bib del Garrote calmed° en el porta Garrotes extra. (veasopagina 23paramayores Maltese? respecto). 2. Enhebrado de la aguja izquierda Enhebre la aguja izquierda de la misma manera que la aguja derecha. Sin embargo, no hay que pasar elhiloper la guia que se silda arriba de la aguja. Convienepasarlo directamontepor elnjo dela aguja izquierda, tatcomoilustradoarriba en la fig. B. (I) El bib do la again dereche para pot la guia. (2) Elhuedela aguja izquierda ease detente de la oda. B 26
-
 1
1 -
2
-
3
-
4
-
5
-
6
-
7
-
8
-
9
-
10
-
11
-
12
-
13
-
14
-
15
-
16
-
17
-
18
-
19
-
20
-
21
-
22
-
23
-
24
-
25
-
 26
26 -
 27
27 -
 28
28 -
 29
29 -
 30
30 -
 31
31 -
 32
32 -
 33
33 -
 34
34 -
 35
35 -
 36
36 -
37
-
38
-
39
-
40
-
41
-
42
-
43
-
44
-
45
-
46
-
47
-
48
-
49
-
50
-
51
-
52
-
53
-
54
-
55
-
56
-
57
-
58
-
59
-
60
-
61
-
62
-
63
-
64
-
65
-
66
-
67
-
68
-
69
-
70
-
71
-
72
 |
 |
