Canon EOS Rebel T1i Picture Style Editor 1.5 for Macintosh Instruction Manual - Page 7
Enlarging a Specific Area, Adjusting While Comparing with the Original Image, In the main window
 |
View all Canon EOS Rebel T1i manuals
Add to My Manuals
Save this manual to your list of manuals |
Page 7 highlights
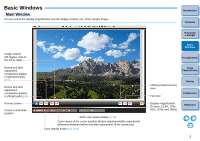
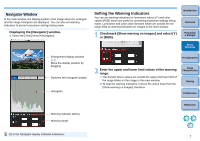
Enlarging a Specific Area You can enlarge a specific area in the main window to 100%. In the main window, double-click the area you want to enlarge. Adjusting While Comparing with the Original Image You can display before and after versions of an adjusted image in the same window and perform adjustments while checking the adjustment results. Select [ ] or [ ]. Introduction Contents Preparing a Sample Double-click Basic Windows ¿ The area you double-clicked is enlarged to 100% (actual pixel size). If you wait for a while, it changes to a clearer display. O To change the display position, drag on the image or drag the enlargement display position (p.7) in the [Navigator] window. O Double-click again to revert to the full view. ¿ The image is displayed split top and bottom or left and right. [ ] (Top/bottom split) display [ ] (Left/right split) display Pre-adjustments Image Characteristics Saving Preferences O The image is displayed before adjustment at the top, and after adjustment at the bottom. O The image is displayed before adjustment on the left, and after adjustment on the right. Reference 6
-
 1
1 -
 2
2 -
 3
3 -
 4
4 -
 5
5 -
 6
6 -
 7
7 -
 8
8 -
 9
9 -
 10
10 -
 11
11 -
 12
12 -
13
-
14
-
15
-
16
-
17
-
18
-
19
 |
 |
