Canon FAXPHONE 40 User Guide
Canon FAXPHONE 40 Manual
 |
View all Canon FAXPHONE 40 manuals
Add to My Manuals
Save this manual to your list of manuals |
Canon FAXPHONE 40 manual content summary:
- Canon FAXPHONE 40 | User Guide - Page 1
User's Guide User's Guide ENG Read this guide first. Please read this guide before operating this equipment. After you finish reading this guide, store it in a safe place for future reference. ENG - Canon FAXPHONE 40 | User Guide - Page 2
guide v Customer support v Important safety instructions vi Users in Canada viii Pre-Installation Requirements for Canon scan 3-1 Problem documents 3-1 Loading documents 3-2 Problems with multipage Direct sending 5-2 Memory sending 5-3 Manual sending 5-4 Canceling sending 5-5 Automatic - Canon FAXPHONE 40 | User Guide - Page 3
and cleaning the BJ cartridge print head 8-5 Replacing the BJ cartridge 8-6 Troubleshooting 8-8 Paper feeding problems 8-8 Faxing problems 8-9 Print quality problems 8-13 Telephone problems 8-13 Copying problems 8-14 General problems 8-14 LCD messages 8-15 In case of a power failure 8-19 - Canon FAXPHONE 40 | User Guide - Page 4
, magnetic, optical, chemical, manual, or otherwise, without the prior written permission of Canon U.S.A. Trademarks Canon, FAXPHONE, and BJ are registered trademarks. UHQ is a trademark of Canon Inc. All other product and brand names are registered trademarks, trademarks or service marks of their - Canon FAXPHONE 40 | User Guide - Page 5
technology to provide trouble-free operation. If you encounter a problem with the fax's operation, try to solve it by using the information in Chapter 8. If you cannot solve the problem or if you think your fax needs servicing, contact your local authorized Canon dealer or the Canon help line. v - Canon FAXPHONE 40 | User Guide - Page 6
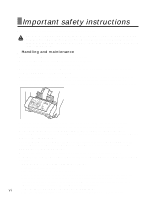
all service, contact your local authorized Canon dealer or the Canon help line. s Handling and maintenance • Follow all warnings and instructions have followed the instructions in this guide. Adjust only those controls that are covered by the instructions in this guide. Improper adjustment of - Canon FAXPHONE 40 | User Guide - Page 7
reach the outlet quickly. If you notice anything unusual (smoke, strange odors, noises) around the fax, unplug it immediately. Contact your local authorized Canon dealer or the Canon help line. • Do not allow anything to rest on the power cord, and do not place the fax where the cord will be walked - Canon FAXPHONE 40 | User Guide - Page 8
. Use one line per machine. DDD (DIRECT DISTANCE DIAL) LINE -orIDDD (INTERNATIONAL DIRECT DISTANCE DIAL) LINE IF YOU COMMUNICATE OVERSEAS n Canon recommends an individual line following industry standards [e.g. the 2500 (Touch Tone) or 500 (Rotary/Pulse Dial) telephones]. A dedicated extension off - Canon FAXPHONE 40 | User Guide - Page 9
Users Canon Canada Inc., offers a full range of customer technical support* options: • For interactive troubleshooting, e-mail technical support, the authorized service facility nearest you (1-800-652-2666) If the problem cannot be corrected by using one of the above technical support options, - Canon FAXPHONE 40 | User Guide - Page 10
- Canon FAXPHONE 40 | User Guide - Page 11
have the followings: • Power cord • Telephone line cord • Documentation • Warranty • Destination labels If any of these items are damaged or missing, contact your local authorized Canon dealer or the Canon help line immediately. 1-1 - Canon FAXPHONE 40 | User Guide - Page 12
Removing the shipping materials 1 Remove the shipping tapes q from the top of the fax and the protective piece w . 1 2 1 2 Open the printer cover by gently pulling it towards you. 3 Remove the shipping tapes q and the protective pieces w. Close the printer cover until it locks into place. 2 1 - Canon FAXPHONE 40 | User Guide - Page 13
SETTING UP Assembling the fax Attaching components 1 n For user convenience, the destination labels provided with your fax (in some countries) should be fitted over the one-touch speed dialing buttons on the left of the operation panel. 1 Insert the tabs on the multipurpose tray into the slots on - Canon FAXPHONE 40 | User Guide - Page 14
Making connections Connecting the telephone line and external devices There are three jacks on the left side of the fax for connection of the following: Optional handset Extension phone (a telephone that you may wish to have away from the fax to use at a different location) or answering machine - Canon FAXPHONE 40 | User Guide - Page 15
2 Connect an extension phone or answering machine to the t jack. 1 SETTING UP n • Due to the range of specifications, Canon cannot guarantee that all answering machines will be compatible with your fax. • If you have connected an external device to your fax, be sure to - Canon FAXPHONE 40 | User Guide - Page 16
dry location. • Store paper at 64.5°-75°F (18°-24°C), 40%-60% relative humidity. • To avoid paper jams and poor print or beyond the tab on the paper guide. Doing so may cause problems. Also, make sure there are in the multi-purpose tray. If you have trouble, feed one sheet at a time. • Depending - Canon FAXPHONE 40 | User Guide - Page 17
SETTING UP Loading paper in the multi-purpose tray ______ 1 If necessary, remove the document tray when loading paper. 1 Move the paper guide to the left. 2 Fan a stack of paper, then tap the edge of the stack on a flat surface to even the stack. 3 Insert the stack into - Canon FAXPHONE 40 | User Guide - Page 18
the BJ cartridge before you can begin receiving and copying documents. For information on replacing the BJ cartridge, see p. 8-6. Guidelines • Use only a Canon BX-3 Black BJ cartridge in your fax. • Store BJ cartridges at room temperature. • When the BJ cartridge print head is left exposed, it - Canon FAXPHONE 40 | User Guide - Page 19
SETTING UP Installing the BJ cartridge in your fax ________ 1 When there is no BJ cartridge installed in your fax, PUT IN CARTRIDGE is displayed on the LCD. 1 Make sure the fax is plugged in. 2 Load the paper in the multi-purpose tray. 3 Open the printer cover by gently pulling it towards you (see - Canon FAXPHONE 40 | User Guide - Page 20
by changing the AUTO TEST PRINT setting. See SYSTEM SETTINGS, p. 7-5. c • Do not try to manually move or stop the cartridge holder. • Do not touch the components shown below or any metal parts. Ribbon cable Guide rail Round shaft Circuit board Testing the fax After you have assembled the fax - Canon FAXPHONE 40 | User Guide - Page 21
PREPARING TO USE YOUR FAX 2 PREPARING TO USE YOUR FAX Main components of your fax Document tray 2 Multi-purpose tray Document guide Operation panel Printer cover Document release button Cartridge holder 2-1 - Canon FAXPHONE 40 | User Guide - Page 22
Fax controls - the operation panel LCD 01 02 03 Report Cleaning Send Options 04 05 06 Space Clear 07 08 09 Polling Ink Saver Receive Mode Resolution Function Redial/ Pause Coded Dial/ Directory Hook Start/ Copy Stop One-touch speed dialing/Special function buttons (see below) - Canon FAXPHONE 40 | User Guide - Page 23
PREPARING TO USE YOUR FAX Scroll/Cursor buttons (see pp. 2-5, 7-1) 2 Redial/ Pause Coded Dial/ Directory Hook Start/ Copy Stop Redial/ Pause Redial/Pause button (see pp. 5-7, 5-8) Coded Dial/ Directory Coded Dial/Directory button (see pp. 5-5, 5-6) Stop button Start/Copy button Hook button ( - Canon FAXPHONE 40 | User Guide - Page 24
Guidelines for entering numbers, letters, and symbols When you come to a step that requires you to enter a name or number, see the table below to determine which numeric button to press for the letter you want. Button Letter Mode (:A) Number Mode (:1) 1 ABC 2 DEF 3 GHI 4 JKL 5 MNO 6 PRS 7 TUV 8 - Canon FAXPHONE 40 | User Guide - Page 25
letters: 1 Use [3] or [4] to move the cursor under the incorrect letter. CANEN :A 2 Use the numeric buttons to enter the correct letter over the incorrect letter. CANON :A 3 When you have finished making corrections, press [Start/Copy] to register your new entry. 2-5 - Canon FAXPHONE 40 | User Guide - Page 26
Setting the TEL LINE TYPE Before using your fax, make sure it is set for the telephone line type of your telephone system. If you are unsure of your telephone line type, check with your local telephone company. See pp. 2-2, 2-3 for the buttons on the operation panel. 1 Press [Function]. w Press [ - Canon FAXPHONE 40 | User Guide - Page 27
your fax messages at a glance. The illustration below shows a sample document with the identifying information. 12/27/2002 10:12 FAX 123 4567 CANON CANON CANADA 01 The page number THE SLEREXE COMPANY LIMITED SAPORS LANE•BOOLE•DORSET•BH25 8ER TELEPHONE BOOLE (945 13) 51617 - FAX 123456 Our Ref - Canon FAXPHONE 40 | User Guide - Page 28
read. To enter a plus sign (+), press [#]. TEL= 123 xxxx w Press [Start/Copy] twice. 4 Enter your name (up to 16 letters) using the numeric buttons (see p. 2-4). CANON : A w Press [Start/Copy]. 5 Press [Stop]. Registration ends and the fax returns to standby mode. 2-8 - Canon FAXPHONE 40 | User Guide - Page 29
PREPARING TO USE YOUR FAX Setting the daylight saving time Some countries adopt the daylight saving time system that shifts the clock time ahead or back according to the change in seasons. You can select if the time information in your fax changes to 2 match your country's daylight saving - Canon FAXPHONE 40 | User Guide - Page 30
8 Use [3] or [4] to select the week in which the daylight saving time starts. w Press [Start/Copy]. WEEK 9 Use [3] or [4] to select DAY. w Press [Start/Copy]. SUNDAY 10 Use [3] or [4] to select the day of the week on which the daylight saving time starts. w Press [Start/Copy]. DAY 11 Use [3] - Canon FAXPHONE 40 | User Guide - Page 31
. 03= 2 50xxx_ w Press [Start/Copy] to register the number. 6 Enter the party's name (up to 16 letters) using the numeric buttons (see p. 2-4). CANON :A w Press [Start/Copy] to register the name. 7 To assign additional one-touch speed dialing numbers, start from step 4 . To finish, press [Stop - Canon FAXPHONE 40 | User Guide - Page 32
Registering coded speed dialing numbers and names Use coded speed dialing to dial a fax number at the press of three buttons. A fax/telephone number up to 50 digits can be registered under each two-digit speed dialing code (01-50) and you can register up to 50 locations. You can also register the - Canon FAXPHONE 40 | User Guide - Page 33
in. (2.0 ±3.5 mm) The margin on either side of the sheet and the margin on the top and bottom are not picked up by the scanner. Problem documents • To prevent document jams in the document tray, do not attempt to load the following types of documents into the fax: - Wrinkled or creased - Canon FAXPHONE 40 | User Guide - Page 34
Loading documents 1 Adjust the document guide to the width of the document, and gently insert the of the paper stack must be less than 0.08 in. (2mm). Problems with multipage documents _________ If you have trouble feeding multipage documents from the document tray into the fax, remove the stack - Canon FAXPHONE 40 | User Guide - Page 35
Paper requirements You can use regular copier paper, cotton bond paper, or typical letterhead. Your fax does not require special ink jet paper. Always use paper without curls, folds, staples, or damaged edges. Look at the label on the package to see if the paper has a preferred side for printing. n - Canon FAXPHONE 40 | User Guide - Page 36
- Canon FAXPHONE 40 | User Guide - Page 37
FINE result in the same resolution when making copies. • If MEMORY FULL appears on the LCD when making multiple copies, see Copying problems, p. 8-14. 4 MAKING COPIES 1 Load the document face up into the document tray. See Loading documents, p. 3-2. 2 Press [Resolution]. You can select STANDARD - Canon FAXPHONE 40 | User Guide - Page 38
- Canon FAXPHONE 40 | User Guide - Page 39
5 SENDING DOCUMENTS Preparing to send a document Before you send a document, see Chapter 3: DOCUMENTS AND PAPER. Adjusting the quality of your documents _____ s Setting the scanning resolution Resolution is a measure of the fineness or clarity of a printout. Low resolutions may cause text and - Canon FAXPHONE 40 | User Guide - Page 40
Sending methods s Direct sending (see below) s Memory sending (see p. 5-3) s Manual sending (see p. 5-4) Dialing methods There are several methods of dialing the receiving party's number, depending on how your fax is set up. s Regular dialing s One- - Canon FAXPHONE 40 | User Guide - Page 41
Memory sending The fax normally uses direct sending to send your document, but you can send it with memory sending (see below). In this case, the fax quickly scans the document into memory. Then it sends the document from memory. This means you do not have to wait for the fax to finish sending - Canon FAXPHONE 40 | User Guide - Page 42
If you would like to first speak with the person you are sending the document to, use manual sending. You need to connect the optional handset or extension phone to the fax for manual sending. 1 Load the document face up into the document tray. See Loading documents, p. 3-2. You can set the - Canon FAXPHONE 40 | User Guide - Page 43
Canceling sending 1 Press [Stop]. n When you cancel sending, you may need to press [Start/Copy] for a few seconds, then the fax will feed out the document. SENDING DOCUMENTS Automatic dialing Sending a document using one-touch speed dialing or coded speed dialing numbers ______ 5 To use this - Canon FAXPHONE 40 | User Guide - Page 44
Dial/Directory] twice. DIRECTORY DIAL 3 Press a numeric button to enter the first letter of the name of the party you are searching for. A01 Canon CANADA 4 Press [3] or [4] to display the other names and numbers registered for the button letter group. • The names for one-touch speed dialing numbers - Canon FAXPHONE 40 | User Guide - Page 45
SENDING DOCUMENTS Special dialing Long-distance dialing When you register a long-distance number, you may have to insert a pause within or after the number. For long-distance dialing, the location and length of the pause may differ depending on the telephone system. To enter a pause, press [ - Canon FAXPHONE 40 | User Guide - Page 46
last number you dialed with the numeric buttons. (This starts redialing regardless of whether automatic redialing is enabled.) s Canceling manual redialing To cancel manual redialing, press [Stop]. Automatic redialing s What is automatic redialing? When you are sending a document and the receiving - Canon FAXPHONE 40 | User Guide - Page 47
s Setting the options for automatic redialing You can set the following options for automatic redialing: • Whether or not the fax redials automatically. • The number of times the fax attempts to redial. • The time interval between redialing attempts. 1 Press [Function]. w Press [Start/Copy]. USER - Canon FAXPHONE 40 | User Guide - Page 48
Delayed sending Your fax can send a document automatically at a preset time. This allows you to take advantage of lower late-night long-distance rates offered by some telephone companies. The fax can only register one preset sending operation at a time. 1 Load the document face up into the document - Canon FAXPHONE 40 | User Guide - Page 49
To send or copy other documents after setting the fax for delayed sending, simply send or copy using any other sending procedure in this guide. n Delayed sequential broadcasting is applicable for sending one document to more than one location at a later time when multiple fax numbers are dialed (see - Canon FAXPHONE 40 | User Guide - Page 50
Sequential broadcasting Sending a document to more than one location Sequential broadcasting sends one document to more than one location. You can send to a total of 60 locations as follows: • One-touch speed dialing = 9 locations • Coded speed dialing = 50 locations • Regular dialing ( - Canon FAXPHONE 40 | User Guide - Page 51
Documents stored in memory Printing a list of documents in memory ______ Your fax can print a list of documents stored in memory, along with the transaction number (TX/ RX NO.) of each document. Once you know the transaction number of a document in memory, you can print it or delete it. 1 Press [ - Canon FAXPHONE 40 | User Guide - Page 52
6 Press [:] to print the first page only, or press [#] to print all pages of the document. The fax prints the document. Deleting a document from memory __________ 1 Press [Function]. 2 Use [3] or [4] to select MEMORY REFERENCE. w Press [Start/Copy]. DOC. MEMORY LIST 3 Use [3] or [4] to select - Canon FAXPHONE 40 | User Guide - Page 53
to the fax. call. For a fax call, you have to manually activate 6 reception of the fax. RECEIVING DOCUMENTS ANS.MACHINE MODE Fax/ a call is a fax or voice call. Subscription to a DRPD p. 6-5 service. Optional handset or extension phone connected to the fax. FAX ONLY MODE Fax Answers - Canon FAXPHONE 40 | User Guide - Page 54
Setting the receive mode Once you have decided which mode is suitable for your needs, set the mode by pressing [Receive Mode]. 1 Press [Receive Mode]. Every time you press [Receive Mode], the mode changes cyclically. w Press [Start/Copy]. The fax returns to standby mode. Receiving both documents and - Canon FAXPHONE 40 | User Guide - Page 55
4 Press [Start/Copy]. 8SEC 5 Use the numeric buttons to enter the time the fax waits before ringing when it receives a call. You can select from 0 to 30 seconds (see p. 7-4). w Press [Start/Copy] twice. 15SEC 6 Use the numeric buttons to enter the time the fax rings while waiting for someone to - Canon FAXPHONE 40 | User Guide - Page 56
is displayed on the LCD (see p. 6-2). 12/20 Manual 2 Check that the optional handset or extension phone is connected to the fax (see p. 1-4). 3 When you hear the handset or extension phone rings, pick up - Canon FAXPHONE 40 | User Guide - Page 57
fax ring pattern that matches the pattern assigned by your telephone company. n Contact your local telephone company for detailed information on this service. 1 Press [Function]. w Press [Start/Copy]. 6 USER SETTINGS 2 Use [3] or [4] to select RX SETTINGS. w Press [Start/Copy]. ECM RX 3 Use [3] or - Canon FAXPHONE 40 | User Guide - Page 58
memory if a problem occurs during supports polling. • If the other party is using a Canon fax machine which has the Polling ID function, ask them to set the Polling ID of their fax machine to 255 (11111111 binary number). • For details on the Polling ID, see the other party's fax machine manual - Canon FAXPHONE 40 | User Guide - Page 59
1 Press [Function]. w Press [Polling]. w Press [Start/Copy]. 2 Dial the fax number of the fax machine you wish to poll. Use one of the dialing methods described on page 5-2. TEL= 3456xxxx 3 Press [Start/Copy]. Your fax begins receiving the document. 6 Canceling receiving 1 Press [Stop]. - Canon FAXPHONE 40 | User Guide - Page 60
- Canon FAXPHONE 40 | User Guide - Page 61
7 SETTINGS AND ACTIVITY REPORTS Selecting a menu The USER SETTINGS, REPORT SETTINGS, TX SETTINGS, RX SETTINGS, PRINTER SETTINGS, and SYSTEM SETTINGS menus allow you to customize the way your fax works. Each menu contains settings that control different functions of your fax. 1 Press [Function]. w - Canon FAXPHONE 40 | User Guide - Page 62
USER SETTINGS Name DATE & TIME UNIT TELEPHONE # UNIT NAME TX TERMINAL ID TTI POSITION TELEPHONE # MARK SCAN CONTRAST OFFHOOK ALARM VOLUME CONTROL LINE MONITOR VOL CALLING VOLUME ALARM VOLUME KEYPAD VOLUME RX CALL LEVEL TEL LINE TYPE Description Set the date and time (24-hour clock) using the - Canon FAXPHONE 40 | User Guide - Page 63
REPORT SETTINGS Name TX REPORT RX REPORT ACTIVITY REPORT Description Enable/disable automatic printing of the transmission report. OUTPUT NO: Turn off the transmission report feature. OUTPUT YES: Set the fax to print a transmission report every time you send a document. PRINT ERROR ONLY: Print - Canon FAXPHONE 40 | User Guide - Page 64
the fax answers. Determine if the fax switches to document receive mode after the fax rings for a specified time when the fax is in the manual receive mode. 2 times (1 to 99) ON/OFF Set the amount of time the fax will ring before switching to document receive mode. Enables/disables remote - Canon FAXPHONE 40 | User Guide - Page 65
SYSTEM SETTINGS Name AUTO TEST PRINT DATE SETUP DISPLAY LANGUAGE TX START SPEED RX START SPEED DAYLGHT SAV TIME Description Enable/disable auto test printing whenever the BJ cartridge is replaced. Set the date format. Set the language of the LCD messages. Set the speed at which the fax starts - Canon FAXPHONE 40 | User Guide - Page 66
Activity reports Your fax keeps track of most of its sending and receiving operations. These operations can be printed out in the form of activity reports that can help you check the dates and times of fax transmissions and whether or not each transaction was successful. How to print a report - Canon FAXPHONE 40 | User Guide - Page 67
SETTINGS AND ACTIVITY REPORTS Activity report Summarizes the information for the sending and receiving activities of your fax after 20 transactions. For automatic printing, see ACTIVITY REPORT, p. 7-3. Transactions in an activity report are listed chronologically. One-touch speed dialing list - Canon FAXPHONE 40 | User Guide - Page 68
- Canon FAXPHONE 40 | User Guide - Page 69
8 SOLUTIONS TO COMMON PROBLEMS Clearing jams Jams in the document tray When a document jams or misfeeds in the document tray, open the printer cover and see locks into place, or the fax will not function properly. 5 Press [Stop]. The fax returns to standby mode. 8-1 SOLUTIONS TO COMMON PROBLEMS - Canon FAXPHONE 40 | User Guide - Page 70
Jams in the multi-purpose tray If paper jams in the multi-purpose tray, CLEAR PAPER JAM is displayed on the LCD. If necessary, remove the document tray when clearing paper jams. n You do not need to unplug the fax when clearing paper jams. 1 Remove the paper stack from the multi-purpose tray. 2 - Canon FAXPHONE 40 | User Guide - Page 71
and dust particles that collect on the underside of the printer cover affect the quality of the documents you copy or send. SOLUTIONS TO COMMON PROBLEMS Pinch rollers 8-3 Be careful not to touch the BJ cartridge or its holder. - Canon FAXPHONE 40 | User Guide - Page 72
4 When you are finished, close the printer cover. Be sure to close the printer cover until it locks into place. 5 Reconnect the power cord. s Cleaning the scanner components n • If the scanner components are dirty, the documents you send or copy will also be dirty. • Use a soft, lint-free cloth. c - Canon FAXPHONE 40 | User Guide - Page 73
the BJ cartridge print head (see p. 8-6). n Print the nozzle check pattern again after cleaning the BJ cartridge print head to check if cleaning corrected the problem. SOLUTIONS TO COMMON - Canon FAXPHONE 40 | User Guide - Page 74
cleaning, print the nozzle check pattern to check if cleaning corrected the problem (see p. 8-5). • If cleaning does not improve print quality, replace fax is plugged in. 2 Open the printer cover. c • Do not try to manually move or stop the cartridge holder. • Do not touch the components shown or any - Canon FAXPHONE 40 | User Guide - Page 75
cartridge holder q. Lower the cartridge lock 8 lever w until you hear a click to lock the cartridge in place. SOLUTIONS TO COMMON PROBLEMS 2 1 The yellow post (BJ cartridge guide) should be visible through the slot. The BJ cartridge tilts slightly to the left in the loaded position. 6 Close the - Canon FAXPHONE 40 | User Guide - Page 76
Troubleshooting Paper feeding problems ❏ Paper does not load. The multi-purpose tray may contain . • Make sure the paper stack is loaded properly in the multi-purpose tray, and that the paper guide is adjusted correctly (see p. 1-7). Sheets of paper may be sticking together. • Be sure to fan the - Canon FAXPHONE 40 | User Guide - Page 77
may not be a G3 fax machine. • Make sure the receiving fax machine is compatible with the fax (which is a G3 fax machine). SOLUTIONS TO COMMON PROBLEMS ❏ Documents sent from the fax are spotted or dirty. The receiving fax machine may not be working properly. • Check the fax by making a copy (see - Canon FAXPHONE 40 | User Guide - Page 78
ECM). The receiving party's fax machine may not support ECM. • If the receiving party's fax machine does not support ECM, then the document is sent in normal Lower the transmission speed (see TX START SPEED, p. 7-5). Receiving problems ❏ Cannot receive a document automatically. The fax may not be set - Canon FAXPHONE 40 | User Guide - Page 79
from a fax machine. In such cases, you will have to receive the document manually (see p. 6-4). ❏ Cannot receive a document manually. You may have disconnected the call by pressing [Start/Copy] or dialing the remote . • Make sure ECM is on (see ECM RX, p. 7-4). SOLUTIONS TO COMMON PROBLEMS 8-11 - Canon FAXPHONE 40 | User Guide - Page 80
p. 8-6). The BJ cartridge may need to be replaced. • Determine if the problem is with the BJ cartridge and replace it if necessary (see p. 8-6). ❏ Fax Mode (ECM). The sending fax machine may not support ECM. • If the sending fax machine does not support ECM, then the document is received in normal - Canon FAXPHONE 40 | User Guide - Page 81
Print quality problems ❏ The print quality is not what you expect; print is not clear, is splashed, has missing dots or white streaks. The paper you are using may not be supported by the fax. • Make sure you are using the recommended paper (see p. 3-3). You may be printing on the wrong side of - Canon FAXPHONE 40 | User Guide - Page 82
the pages into smaller stacks. If not, make the desired number of copies one at a time as needed. n For additional troubleshooting, see Print quality problems, p. 8-13. General problems ❏ The fax has no power. The power cord may not be plugged in securely. • Check that the power cord is plugged - Canon FAXPHONE 40 | User Guide - Page 83
send or receive the document using a G3 8 machine. SOLUTIONS TO COMMON PROBLEMS The touch tone/rotary pulse setting on your fax is incorrect. Set your Stop] and start again. Do not attempt to move the cartridge holder manually. The scanner unit may not be in the fully upright position. Press - Canon FAXPHONE 40 | User Guide - Page 84
a new one (see p. 8-6). The waste ink tank (which holds the ink used for print head cleaning) may be full. Contact your local authorized Canon dealer or the Canon help line to have the waste ink tank replaced immediately. During printing, the BJ Allow the fax to cool down. cartridge print head - Canon FAXPHONE 40 | User Guide - Page 85
multiple pages are loaded, separate the pages into smaller stacks. If not, try sending the document by direct sending (see p. 5-2). SOLUTIONS TO COMMON PROBLEMS The one-touch speed dialing button or coded speed dialing code you entered has not been registered. Register the one-touch speed dialing - Canon FAXPHONE 40 | User Guide - Page 86
Message REC'D IN MEMORY TX/RX CANCELLED TX/RX NO. nnnn Cause Action The fax received the document in memory because paper or ink ran out, a paper jam occurred, or the incorrect BJ cartridge was installed. Load paper in the multipurpose tray (see p. 1-7), replace the BJ cartridge (see p. 8-6) or - Canon FAXPHONE 40 | User Guide - Page 87
when power is restored, the memory clear report will not be printed even after the cartridge is replaced or paper is loaded. SOLUTIONS TO COMMON PROBLEMS 8-19 - Canon FAXPHONE 40 | User Guide - Page 88
- Canon FAXPHONE 40 | User Guide - Page 89
) Auto dial functions: One-touch speed dialing (Registration for 9 numbers) Coded speed dialing (Registration for 50 numbers) Ink cartridge: Canon BX-3 Black BJ cartridge Power source: 120 V/60 Hz Power consumption: Standby: Approx. 4.4 W Operation: Approx. 9.9 W, maximum 32 W Operating - Canon FAXPHONE 40 | User Guide - Page 90
- Canon FAXPHONE 40 | User Guide - Page 91
VOLUME setting 7-2 Canceling automatic redialing 5-8 delayed sending 5-10 manual redialing 5-8 receiving 6-7 sending 5-5 Cartridge (See BJ cartridge documents 4-1 problems 8-14 setting scanning contrast 5-1 Cord, power 1-5 Correcting mistakes 2-5 Cursor buttons 2-3, 2-5 Customer support v D DATE - Canon FAXPHONE 40 | User Guide - Page 92
Fax/Tel mode description 6-1 setting 6-2 Fax/Telephone number, registering 2-8 Faxing problems 8-9 Function button 2-2 G General problems 8-14 Guide document 2-1 H Handling and maintenance, safety instructions vi Hook button 2-3, 5-4 I INCOMING RING setting 7-4 Ink Saver button 2-2, 6-6 Installing - Canon FAXPHONE 40 | User Guide - Page 93
instructions vii Long-distance dialing 5-7 M Main unit 1-1 MAN/AUTO SWITCH setting 7-4 MANUAL MODE description 6-1 receiving in 6-4 setting 6-4 Manual redialing 5-8 canceling 5-8 Manual 2-3 P Paper guide 1-7 guidelines 1-6 instructions vii Print head cleaning 8-6 testing 8-5 Print quality problems - Canon FAXPHONE 40 | User Guide - Page 94
RX SETTINGS menu 7-4 RX START SPEED setting 7-5 S Safety instructions handling and maintenance vi location vii power supply vii SCAN CONTRAST canceling 5-5 delayed 5-11 documents 5-2 manual 5-4 memory 5-3 methods 5-2 preparing for 5-1 problems 8-9 sequential broadcasting 5-12 setting scanning - Canon FAXPHONE 40 | User Guide - Page 95
MARK setting 7-2 Telephone line 1-1 connecting 1-4 setting type 2-6 Telephone problems 8-13 Testing BJ cartridge print head 8-5 fax 1-10 Time, setting list 7-2 USER DATA LIST description 7-7 printing 7-6 USER'S GUIDE using this guide v V Volume ALARM VOLUME setting 7-2 CALLING VOLUME setting 7-2 - Canon FAXPHONE 40 | User Guide - Page 96
AMERICA, INC. 703 Waterford Way, Suite 400, Miami, Florida 33126, U.S.A. CANON AUSTRALIA PTY. LTD 1 Thomas Holt Drive, North Ryde, Sydney, N.S.W. 2113, Australia CANON SINGAPORE PTE. LTD. 79 Anson Road #09-01/06, Singapore 079906 CANON HONGKONG CO., LTD 9/F, The Hong Kong Club Building, 3A Chater
-
 1
1 -
 2
2 -
 3
3 -
 4
4 -
 5
5 -
 6
6 -
 7
7 -
8
-
9
-
10
-
11
-
12
-
13
-
14
-
15
-
16
-
17
-
18
-
19
-
20
-
21
-
22
-
23
-
24
-
25
-
26
-
27
-
28
-
29
-
30
-
31
-
32
-
33
-
34
-
35
-
36
-
37
-
38
-
39
-
40
-
41
-
42
-
43
-
44
-
45
-
46
-
47
-
48
-
49
-
50
-
51
-
52
-
53
-
54
-
55
-
56
-
57
-
58
-
59
-
60
-
61
-
62
-
63
-
64
-
65
-
66
-
67
-
68
-
69
-
70
-
71
-
72
-
73
-
74
-
75
-
76
-
77
-
78
-
79
-
80
-
81
-
82
-
83
-
84
-
85
-
86
-
87
-
88
-
89
-
90
-
91
-
92
-
93
-
94
-
95
-
96
 |
 |
User
’
s Guide
User
’
s Guide
Read this guide first.
Please read this guide before operating this equipment.
After you finish reading this guide, store it in a safe place for future reference.
ENG
ENG
User
’
s Guide