Canon MF4690 imageCLASS MF4690 Starter Guide - Page 11
Set the Machine for Receiving Faxes, Select the Receive Mode that Suits Your Needs - service manual
 |
UPC - 013803076820
View all Canon MF4690 manuals
Add to My Manuals
Save this manual to your list of manuals |
Page 11 highlights
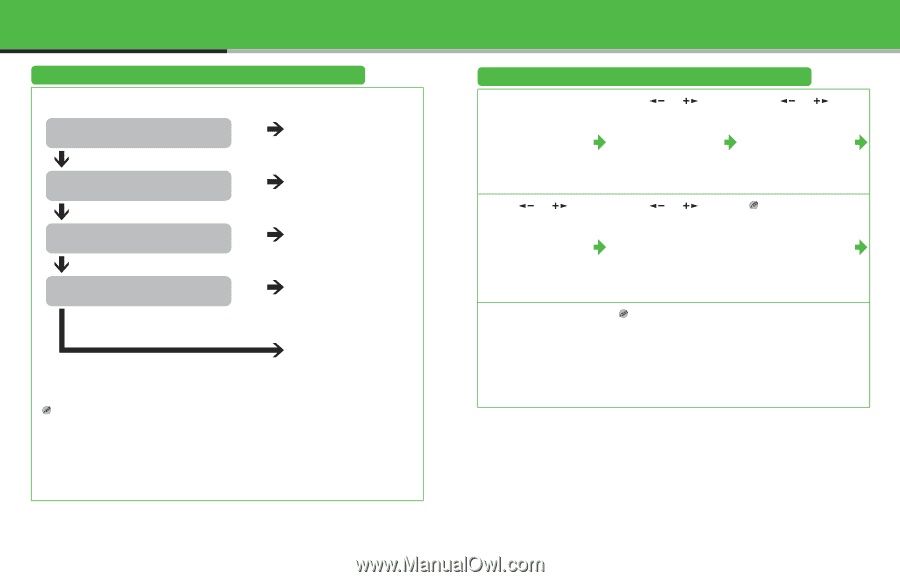
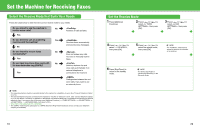
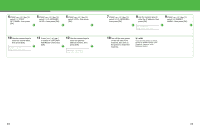
Set the Machine for Receiving Faxes Select the Receive Mode that Suits Your Needs Follow the chart below to determine the correct receive mode for your needs. Do you intend to use the machine to No receive voice calls? Answers all calls as faxes. Yes Do you intend to use an answering Yes machine with the machine? No Do you intend to receive faxes No automatically? Yes Do you have two phone lines, each with No it's own distinctive ring (DRPD)? Yes Receives faxes automatically and records voice messages. Does not answer any calls. You have to manually receive faxes. Switches between fax and voice calls automatically if an external telephone is connected to the machine. Distinguishes between fax and voice calls, if you want to use an external phone. NOTE - The answering machine must be connected directly to the machine for to work. (See "Connect Telephone Cables," on p. 12.) - The external telephone must be connected to the machine for or to work. (See "Connect Telephone Cables," on p. 12.) By default, if is selected in and external telephone is connected to the machine, the external telephone rings. If you want to turn off the ring, press [Additional Functions] → → → → then select . - Voice mail is not supported with . - The mode requires subscription to a DRPD (Distinctive Ring Pattern Detection) service. Contact your telephone company for availability. Set the Receive Mode 1 Press [Additional Functions]. 2 Press [ ] or [ ] to select , then press [OK]. 3 Press [ ] or [ ] to select , then press [OK]. 4 Press [ ] or [ ] to select , then press [OK]. 5 Press [ ] or [ ] to select the receive mode, then press [OK]. NOTE For , make sure an answering machine is connected to the machine. 6 Press [Stop/Reset] to return to the standby mode. NOTE For details, see Chapter 4, "Sending and Receiving" in the Reference Guide. 19 20
-
 1
1 -
2
-
3
-
4
-
5
-
 6
6 -
 7
7 -
 8
8 -
 9
9 -
 10
10 -
 11
11 -
 12
12 -
 13
13 -
 14
14 -
 15
15 -
 16
16 -
17
-
18
-
19
-
20
-
21
-
22
 |
 |