Canon MF4690 imageCLASS MF4690 Starter Guide - Page 12
Set the Machine for Network Usage, Connect the Machine to a Network, Specify the IP Address Settings - printer
 |
UPC - 013803076820
View all Canon MF4690 manuals
Add to My Manuals
Save this manual to your list of manuals |
Page 12 highlights
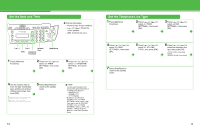
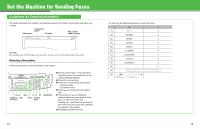
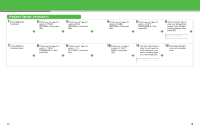
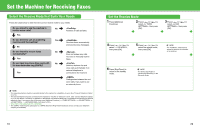
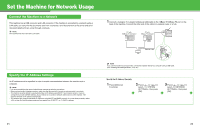
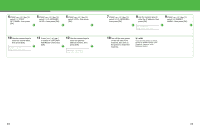
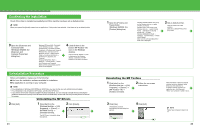
Set the Machine for Network Usage Connect the Machine to a Network This machine has a USB connector and LAN connector. If the machine is connected to a network using a LAN cable, you can print the documents sent from a computer, send documents to a file server and send document attached to an e-mail through a network. NOTE The machine does not come with a LAN cable. 1 Connect a Category 5 or greater twisted pair LAN cable to the 10Base-T/100Base-TX port on the back of the machine. Connect the other end of the cable to a network router or a hub. PC with 100Base-TX Connector PC with 10Base-T Connector Specify the IP Address Settings An IP address must be specified in order to enable communication between the machine and a computer. NOTE - It is recommended that the network administrator perform the following procedures. - Before performing the following procedure, make sure that the machine is turned on and connected to a network. - This machine is set by default to automatically draw an IP address using DHCP. If your network server or router is configured to provide a DHCP address, all you need to do is connect a network cable and turn on the machine. The machine will draw an IP address automatically. - This machine also supports automatic IP addresses using BOOTP and RARP protocols. If you use these protocols, select at step 6 of the following procedures, then specify the or settings. Ethernet Cable Hub NOTE If you use the machine as a local printer, connect the machine directly to a computer using a USB cable. (See "Installing/Uninstalling Software," on p. 25.) Specify the IP Address Manually 1 Press [Additional Functions]. 2 Press [ ] or [ ] to select , then press [OK]. 3 Press [ ] or [ ] to select , then press [OK]. 21 22
-
 1
1 -
2
-
3
-
4
-
5
-
6
-
 7
7 -
 8
8 -
 9
9 -
 10
10 -
 11
11 -
 12
12 -
 13
13 -
 14
14 -
 15
15 -
 16
16 -
 17
17 -
18
-
19
-
20
-
21
-
22
 |
 |
