Canon MF4690 imageCLASS MF4690 Starter Guide - Page 17
Confirming the installation, Uninstallation Procedure, Uninstalling the MF Toolbox - fax driver
 |
UPC - 013803076820
View all Canon MF4690 manuals
Add to My Manuals
Save this manual to your list of manuals |
Page 17 highlights
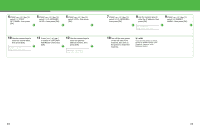
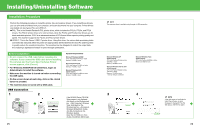
Confirming the installation Check if the driver is installed successfully and if this machine has been set as default printer. NOTE When you opened the [printer] screen from an application, if this product was selected, it has been set up as default printer. 3 Open the [Scanners and Cameras] folder (Windows 98/2000: the [Scanners and Cameras Properties] dialog box). Windows XP/Server2003: Click [start] on the Windows task bar → select [Control Panel] → [Printers and Other Hardware] → [Scanners and Cameras]. Windows Vista: Click [start] on the Windows task bar → select [Control Panel] → [Hardware and Sound] → double-click → [Scanners and Cameras]. Windows 98/Me/2000: [Start] → [Settings] → [Control Panel] → doubleclick [Scanners and Cameras]. Make sure the corresponding scanner driver icon is displayed. 4 Check if there is the [Canon MF Toolbox 4.9] icon on the Windows desktop. If the [Canon MF Toolbox 4.9] icon is displayed on the Windows desktop, installation of the MF Toolbox 4.9 has been successful. Uninstallation Procedure Before uninstallation, make sure of the following: ● You have the installation software available for installation. ● No application is running on your computer. NOTE - For uninstallation in Windows 2000/XP/Server 2003/Vista, you must be the user with administrative privileges. - For uninstallation, first uninstall the MF Toolbox, and then the MF drivers. - If you want to remove the manuals installed from [Easy Installation], you can manually uninstall them by selecting the [Additional Software Programs] on the MF4600 Series CD-ROM Setup screen and click the [Uninstall] button for Manual Uninstaller. Uninstalling the MF Drivers 3 Click [Exit]. 1 Click [start] on the Windows task bar → [(All) Programs] → [Canon] → [MF4600 Series] → [Uninstall Drivers]. The [MF Drivers Uninstaller] dialog box appears. 2 Click [Delete]. 31 1 Open the [Printers and Faxes] folder (Windows 98/2000: the [Printers] dialog box). Windows XP/Server2003: Click [start] on the Windows task bar → select [Printers and Faxes]. Windows Vista: Click [start] on the Windows task bar → select [Control Panel] → [Hardware and Sound] → double-click → [Printer]. Windows 98/Me/2000: [Start] → [Settings] → [Control Panel] → doubleclick [Printers]. Make sure the corresponding printer driver icon is displayed. 2 Set as default printer. Click the printer icon of this machine. Click [Set as Default Printer] from [File] menu. Uninstalling the MF Toolbox 1 Click [start] on the Windows task bar → [(All) Programs] → [Canon] → [MF Toolbox 4.9] → [Toolbox Uninstall]. 2 Follow the on-screen instructions. 3 Click [Yes]. Uninstallation proceeds automatically and next dialog box appears. 4 Click [Exit]. When the Repair or Remove program selection screen is displayed, check [Remove], then click [Next >]. If asked to confirm removal of an application etc., click [Remove]. Restart your computer if asked to do so. NOTE Restart your computer if asked to do so. 32
-
 1
1 -
2
-
3
-
4
-
5
-
6
-
7
-
8
-
9
-
10
-
11
-
 12
12 -
 13
13 -
 14
14 -
 15
15 -
 16
16 -
 17
17 -
 18
18 -
 19
19 -
 20
20 -
 21
21 -
 22
22
 |
 |