Canon PIXMA MP495 MP495 series Getting Started - Page 43
A continuación, vaya a, Instalación del, software 2 en, la página 44., Next, go to, Software
 |
UPC - 660685024540
View all Canon PIXMA MP495 manuals
Add to My Manuals
Save this manual to your list of manuals |
Page 43 highlights
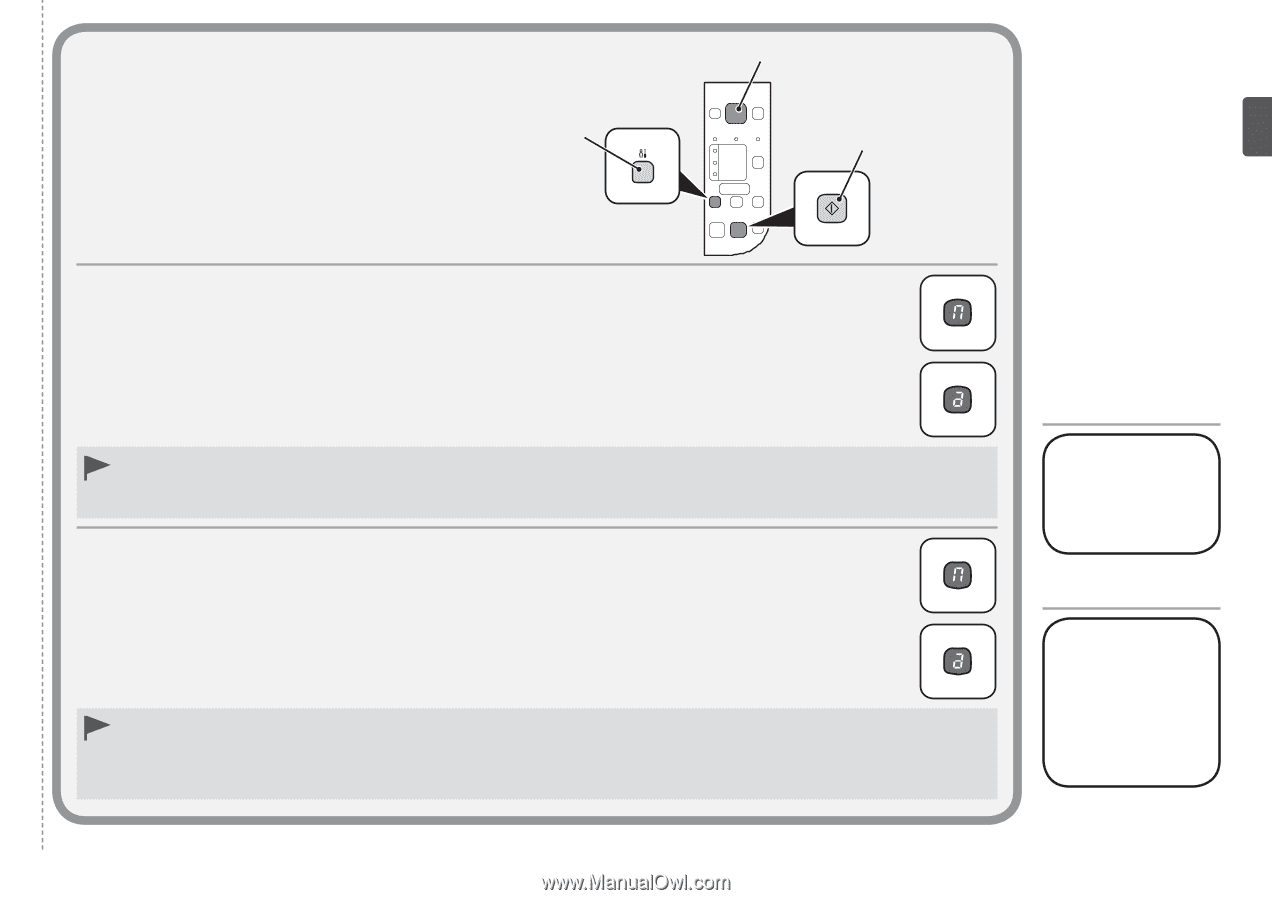
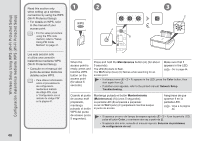
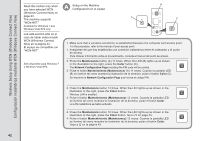
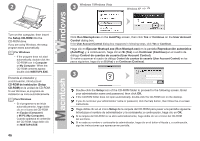
Setup Using PIN Code Method Configuración con el método de código PIN A B C 1. Press the Maintenance button (A) 11 times. When the LED (B) lights up as shown in the illustration to the right, press the Color button (C). The Network Configuration Page including the PIN code will be printed. 2. Set the PIN code to the access point. For the procedure, refer to the manual of the access point. When the access point is ready, press the Maintenance button 12 times. When the LED lights up as shown in the illustration to the right, press the Color button. • If a timeout error (E > 2 > 2) appears in the LED, press the Color button, then perform 2 again. As for the PIN code, use the same number as that in the Network Configuration Page printed in 1. • If another error appears, refer to the printed manual: Network Setup Troubleshooting. 1. Pulse el botón Mantenimiento (Maintenance) (A) 11 veces. Cuando la pantalla LED (B) se ilumine tal como muestra la ilustración de la derecha, pulse el botón Color (C). Se imprimirá la Network Configuration Page que incluye el código PIN. 2. Establezca el código PIN en el punto de acceso. Para obtener información sobre este procedimiento, consulte el manual del punto de acceso. Cuando el punto de acceso esté preparado, pulse el botón Mantenimiento (Maintenance) 12 veces. Cuando la pantalla LED se ilumine tal como muestra la ilustración de la derecha, pulse el botón Color. • Si aparece un error de tiempo de espera agotado (E > 2 > 2) en la pantalla LED, pulse el botón Color y vuelva a ejecutar 2. En lo que se refiere al código PIN, utilice el mismo número que aparece en la Network Configuration Page impresa en 1. • Si aparece otro error, consulte el manual impreso: Solución de problemas de configuración de red. Next, go to "Software Installation (2)" on page 44! A continuación, vaya a "Instalación del software (2)" en la página 44. 41
-
 1
1 -
2
-
3
-
4
-
5
-
6
-
7
-
8
-
9
-
10
-
11
-
12
-
13
-
14
-
15
-
16
-
17
-
18
-
19
-
20
-
21
-
22
-
23
-
24
-
25
-
26
-
27
-
28
-
29
-
30
-
31
-
32
-
33
-
34
-
35
-
36
-
37
-
 38
38 -
 39
39 -
 40
40 -
 41
41 -
 42
42 -
 43
43 -
 44
44 -
 45
45 -
 46
46 -
 47
47 -
 48
48 -
49
-
50
-
51
-
52
-
53
-
54
-
55
-
56
-
57
-
58
-
59
-
60
-
61
-
62
-
63
-
64
-
65
-
66
-
67
-
68
 |
 |