Canon PIXMA MP495 MP495 series Getting Started - Page 44
Wireless Setup Using WCN (Windows Connect Now),
 |
UPC - 660685024540
View all Canon PIXMA MP495 manuals
Add to My Manuals
Save this manual to your list of manuals |
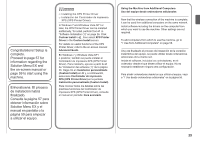
Page 44 highlights
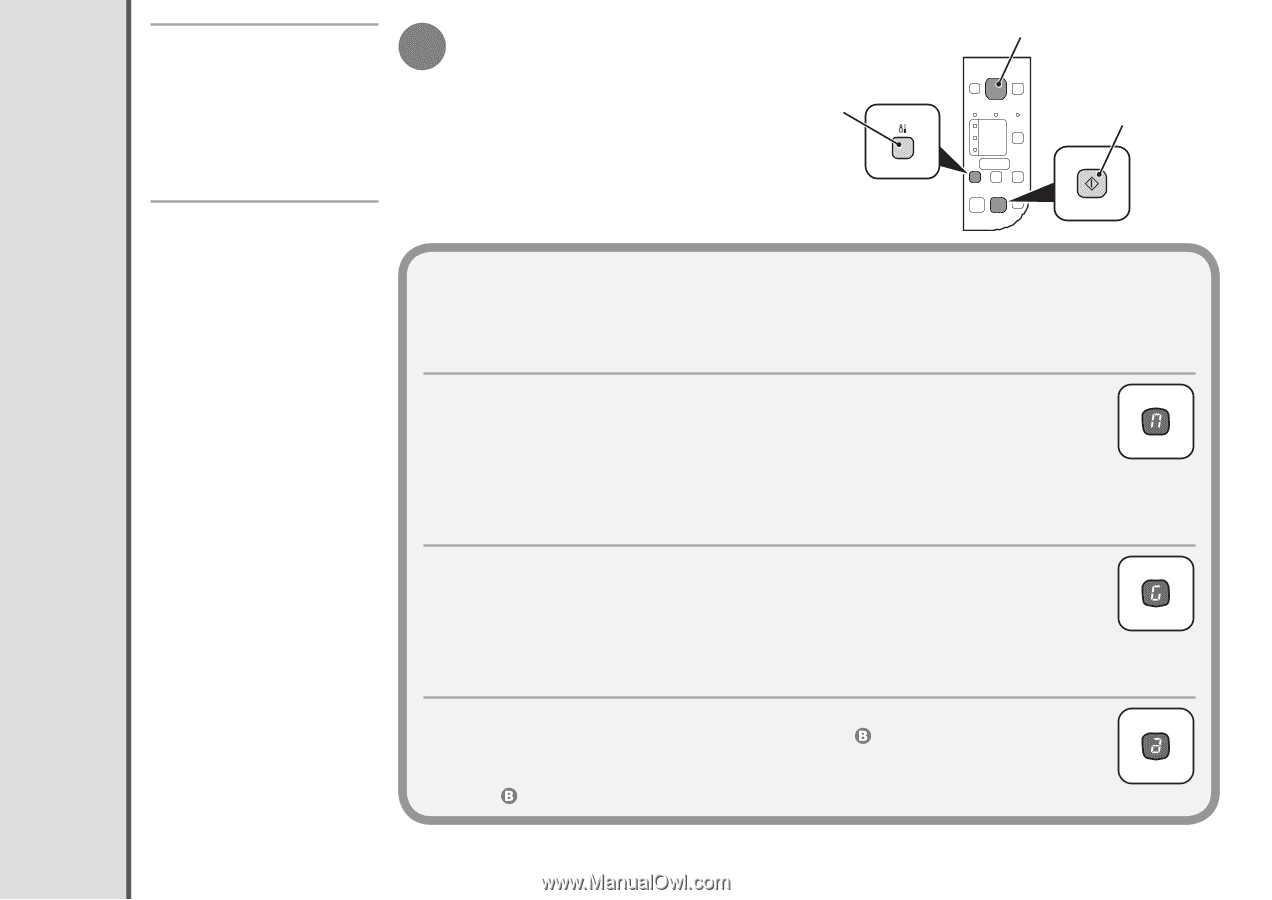
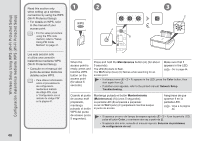
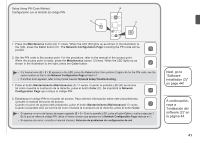
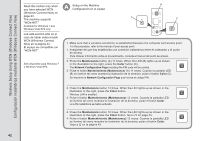
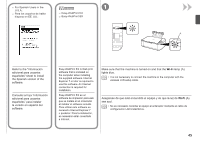
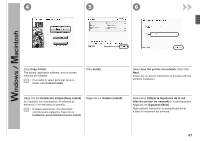
Wireless Setup Using WCN (Windows Connect Now) Configuración inalámbrica mediante WCN (Windows Connect Now) Read this section only when you have selected WCN (Windows Connect Now) on page 23. The machine supports "WCN-NET." Available for Windows 7 and Windows Vista SP2 only. Lea esta sección sólo en el caso de haber seleccionado WCN (Windows Connect Now) en la página 23. El equipo es compatible con "WCN-NET". Sólo disponible para Windows 7 y Windows Vista SP2. A Setup on the Machine Configuración en el equipo A B C 1. Make sure that a wireless connection is established between the computer and access point. For the procedure, refer to the manual of your access point. 1. Asegúrese de que hay establecida una conexión inalámbrica entre el ordenador y el punto de acceso. Para obtener información sobre el procedimiento, consulte el manual del punto de acceso. 2. Press the Maintenance button (A) 11 times. When the LED (B) lights up as shown in the illustration to the right, press the Color button (C). The Network Configuration Page including the PIN code will be printed. 2. Pulse el botón Mantenimiento (Maintenance) (A) 11 veces. Cuando la pantalla LED (B) se ilumine tal como muestra la ilustración de la derecha, pulse el botón Color (C). Se imprimirá la Network Configuration Page que incluye el código PIN. 3. Press the Maintenance button 13 times. When the LED lights up as shown in the illustration to the right, press the Color button. Wireless LAN is enabled. 3. Pulse el botón Mantenimiento (Maintenance) 13 veces. Cuando la pantalla LED se ilumine tal como muestra la ilustración de la derecha, pulse el botón Color. La LAN inalámbrica se habrá activado. 4. Press the Maintenance button 12 times. When the LED lights up as shown in the illustration to the right, press the Color button. Go to on page 43. 4. Pulse el botón Mantenimiento (Maintenance) 12 veces. Cuando la pantalla LED se ilumine tal como muestra la ilustración de la derecha, pulse el botón Color. Vaya a en la página 43. 42
-
 1
1 -
2
-
3
-
4
-
5
-
6
-
7
-
8
-
9
-
10
-
11
-
12
-
13
-
14
-
15
-
16
-
17
-
18
-
19
-
20
-
21
-
22
-
23
-
24
-
25
-
26
-
27
-
28
-
29
-
30
-
31
-
32
-
33
-
34
-
35
-
36
-
37
-
38
-
 39
39 -
 40
40 -
 41
41 -
 42
42 -
 43
43 -
 44
44 -
 45
45 -
 46
46 -
 47
47 -
 48
48 -
 49
49 -
50
-
51
-
52
-
53
-
54
-
55
-
56
-
57
-
58
-
59
-
60
-
61
-
62
-
63
-
64
-
65
-
66
-
67
-
68
 |
 |