Canon PIXMA MX882 MX882 series Getting Started - Page 15
Instalación de los depósitos de tinta, Install the Ink Tanks
 |
View all Canon PIXMA MX882 manuals
Add to My Manuals
Save this manual to your list of manuals |
Page 15 highlights
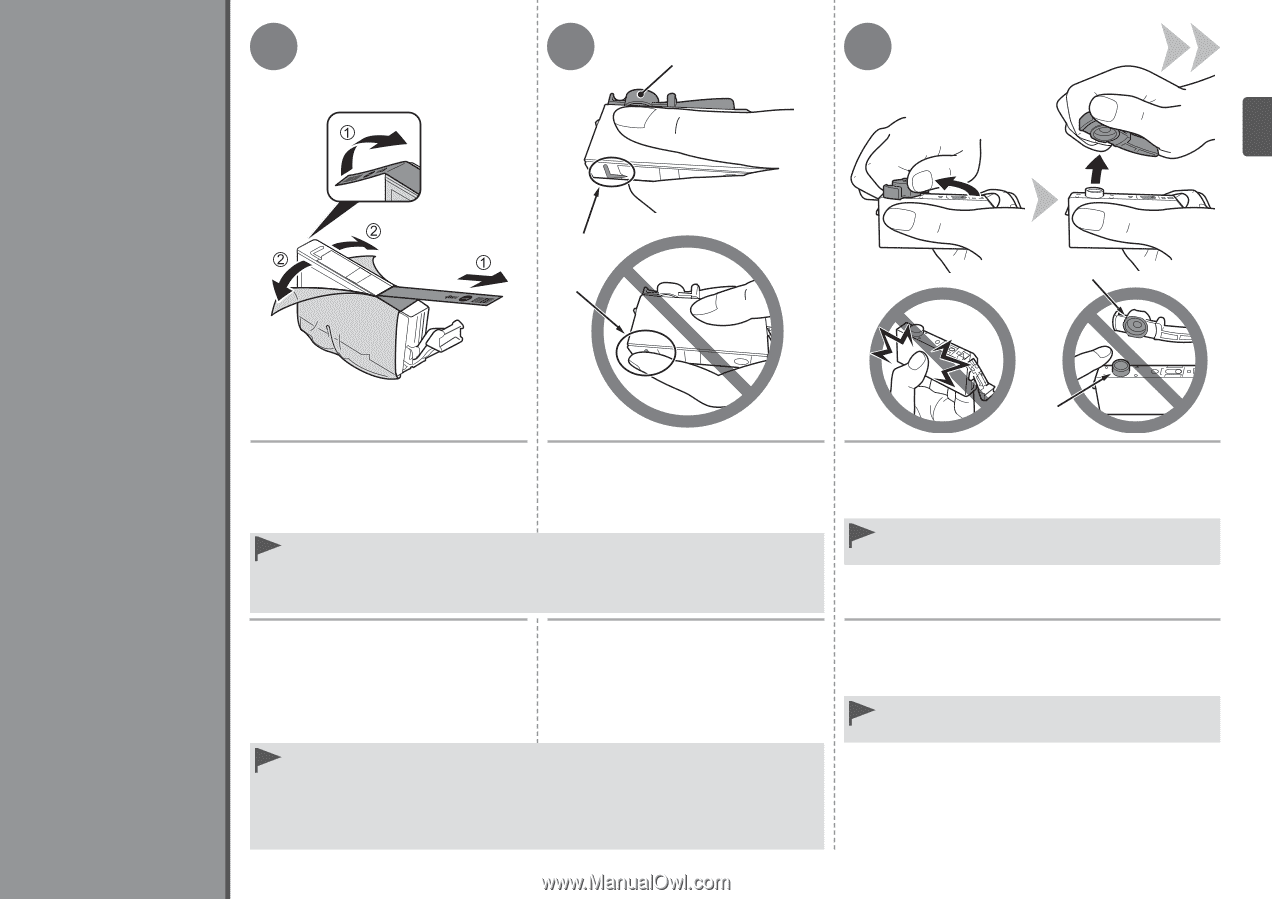
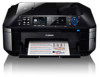
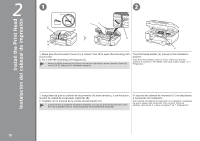
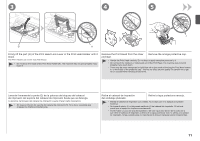
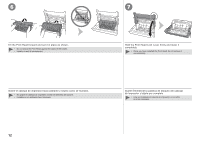
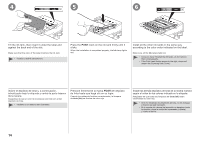
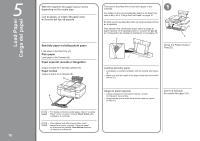
31 2 A 3 Install the Ink Tanks Instalación de los depósitos de tinta B C B 1. Remove the orange tape completely. 2. Remove the protective film completely. 1. Hold the ink tank with the orange protective cap (A) pointing up. 2. Hold the ink tank being careful not to cover the area (B) including the L-shape air hole. • Handle the ink tanks carefully. Do not drop or apply excessive pressure to them. • Be sure to use the supplied ink tanks. • If the orange tape remains on the L-shape air hole, ink may splash or the machine may not print properly. • If you push the sides of the ink tank with the L-shape air hole blocked, ink may splash. 1. Retire totalmente la cinta naranja. 2. Retire totalmente la película protectora. 1. Mantenga el depósito de tinta con la tapa protectora (A) naranja hacia arriba. 2. Sujete el depósito de tinta con cuidado para no tapar el área (B), en la que está el orificio de ventilación con forma de L. • Maneje los depósitos de tinta con cuidado. No los deje caer ni les aplique una presión excesiva. • Asegúrese de usar los depósitos de tinta suministrados. • Si queda cinta naranja en el orificio de ventilación con forma de L, la tinta podría salpicar o el equipo podría no imprimir correctamente. • Si se aprietan los laterales de un depósito de tinta con el orificio de ventilación en forma de L bloqueado, la tinta podría salpicar. D Hold the ink tank by its sides and slowly twist the orange protective cap 90 degrees horizontally to remove it off. Do not push the sides of the ink tank. • Do not touch the inside (C) of the orange protective cap or the open ink port (D). The ink may stain your hands if you touch them. Sujete el depósito de tinta por los laterales y gire lentamente la tapa protectora naranja 90 grados en horizontal para retirarla. No apriete los laterales del depósito de tinta. • No toque el interior (C) de la tapa protectora naranja ni la salida de tinta abierta (D). Si los toca, podría mancharse las manos de tinta. 13
-
 1
1 -
2
-
3
-
4
-
5
-
6
-
7
-
8
-
9
-
 10
10 -
 11
11 -
 12
12 -
 13
13 -
 14
14 -
 15
15 -
 16
16 -
 17
17 -
 18
18 -
 19
19 -
 20
20 -
21
-
22
-
23
-
24
-
25
-
26
-
27
-
28
-
29
-
30
-
31
-
32
-
33
-
34
-
35
-
36
-
37
-
38
-
39
-
40
-
41
-
42
-
43
-
44
-
45
-
46
-
47
-
48
-
49
-
50
-
51
-
52
-
53
-
54
-
55
-
56
-
57
-
58
-
59
-
60
-
61
-
62
-
63
-
64
-
65
-
66
-
67
-
68
 |
 |