Canon PowerShot A510 PowerShot A520/A510 Camera User Guide - Page 94
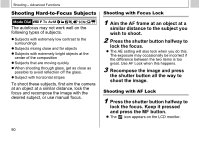
Focus using the, button, and shoot the image., In the, Set up], menu, select, Auto Rotate., Select [
 |
View all Canon PowerShot A510 manuals
Add to My Manuals
Save this manual to your list of manuals |
Page 94 highlights
Shooting - Advanced Functions 2 Focus using the or button and shoot the image. z Adjust the focus using the or button until the image appears focused on the LCD monitor. z Pressing the MF button again cancels the manual focus mode. z You can use manual focus in the macro focal distance 5 to 45 cm (2.0 in. to 1.5 ft.) at wide angle end and 30 to 45 cm (11.8 in. to 1.5 ft.) at telephoto end. In this case, the scale of the MF indicator will be changed. z You can change the MF indicator displayed distance units (p. 72). 92 Setting the Auto Rotate Function This camera is equipped with an Intelligent Orientation sensor that detects the orientation of an image shot with the camera held vertically and automatically rotates it to the correct viewing orientation in the display. You can set this function on/off. 1 In the [ (Set up)] menu, select (Auto Rotate). z See Selecting Menus and Settings (p. 66). 2 Select [On] and press the MENU button. z When this function is [On], an icon showing the orientation of the camera appears at the upper right corner of the LCD monitor (when information display is on). Normal Right end down Left end down
-
 1
1 -
2
-
3
-
4
-
5
-
6
-
7
-
8
-
9
-
10
-
11
-
12
-
13
-
14
-
15
-
16
-
17
-
18
-
19
-
20
-
21
-
22
-
23
-
24
-
25
-
26
-
27
-
28
-
29
-
30
-
31
-
32
-
33
-
34
-
35
-
36
-
37
-
38
-
39
-
40
-
41
-
42
-
43
-
44
-
45
-
46
-
47
-
48
-
49
-
50
-
51
-
52
-
53
-
54
-
55
-
56
-
57
-
58
-
59
-
60
-
61
-
62
-
63
-
64
-
65
-
66
-
67
-
68
-
69
-
70
-
71
-
72
-
73
-
74
-
75
-
76
-
77
-
78
-
79
-
80
-
81
-
82
-
83
-
84
-
85
-
86
-
87
-
88
-
 89
89 -
 90
90 -
 91
91 -
 92
92 -
 93
93 -
 94
94 -
 95
95 -
 96
96 -
 97
97 -
 98
98 -
 99
99 -
100
-
101
-
102
-
103
-
104
-
105
-
106
-
107
-
108
-
109
-
110
-
111
-
112
-
113
-
114
-
115
-
116
-
117
-
118
-
119
-
120
-
121
-
122
-
123
-
124
-
125
-
126
-
127
-
128
-
129
-
130
-
131
-
132
-
133
-
134
-
135
-
136
-
137
-
138
-
139
-
140
-
141
-
142
-
143
-
144
-
145
-
146
-
147
-
148
-
149
-
150
-
151
-
152
-
153
-
154
-
155
-
156
-
157
-
158
-
159
-
160
-
161
-
162
-
163
 |
 |
