Canon imageFORMULA ScanFront 300 ScanFront 300/300P Instructions - Page 24
Names and Functions of Parts, Front and Document Feed and Eject Trays
 |
View all Canon imageFORMULA ScanFront 300 manuals
Add to My Manuals
Save this manual to your list of manuals |
Page 24 highlights
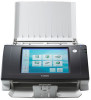
Chapter 1 Before Use 3. Names and Functions of Parts The names and functions of the parts of the ScanFront are shown below. ❏ Front and Document Feed and Eject Trays * The illustration above shows the ScanFront 300P. In this manual, the ScanFront 300P is used in the illustrations of the scanner. Please note that the appearance of some parts of the ScanFront 330 differs. a Tray Extension Open this to prevent scanned documents from slipping off. b Document Eject Tray Open this tray when using the ScanFront. If scanned documents curl in the document eject tray, remove the entire tray. (See p. 2-4.) c Panel Unit Open this when there is a paper jam or to perform maintenance. (See p. 2-10.) d Touch Panel Touch this screen to operate the ScanFront. e Lock Lever Locks the panel unit. Pull the lever toward you to unlock the panel unit. (See p. 2-10.) f Document Guides Adjust these to match the width of the document. (See p. 2-6.) g Document Feed Tray Place documents here. (See p. 2-4.) h USB Port (Front) Connect a USB1.1/Hi-Speed USB2.0 compatible USB memory device, USB keyboard, or USB mouse. i Power Switch Use this to turn the power ON. (See p. 3-4.) * Use the Power OFF button on the touch panel to turn the power OFF. j Feed Selection Lever Use this lever to change the feed method for documents. (See p. 2-5.) k Power Indicator Lights when the power is ON. (See p. 3-4.) l Fingerprint Authentication Sensor (Only Available with the ScanFront 300P) This fingerprint sensor is for fingerprint registration and authentication. (See p. 2-11.) 1-9
-
 1
1 -
2
-
3
-
4
-
5
-
6
-
7
-
8
-
9
-
10
-
11
-
12
-
13
-
14
-
15
-
16
-
17
-
18
-
 19
19 -
 20
20 -
 21
21 -
 22
22 -
 23
23 -
 24
24 -
 25
25 -
 26
26 -
 27
27 -
 28
28 -
 29
29 -
30
-
31
-
32
-
33
-
34
-
35
-
36
-
37
-
38
-
39
-
40
-
41
-
42
-
43
-
44
-
45
-
46
-
47
-
48
-
49
-
50
-
51
-
52
-
53
-
54
-
55
-
56
-
57
-
58
-
59
-
60
-
61
-
62
-
63
-
64
-
65
-
66
-
67
-
68
-
69
-
70
-
71
-
72
-
73
-
74
-
75
-
76
-
77
-
78
-
79
-
80
-
81
-
82
-
83
-
84
-
85
-
86
-
87
-
88
-
89
-
90
-
91
-
92
-
93
-
94
-
95
-
96
-
97
-
98
-
99
-
100
-
101
-
102
-
103
-
104
-
105
-
106
-
107
-
108
-
109
-
110
-
111
-
112
-
113
-
114
-
115
-
116
-
117
-
118
-
119
-
120
-
121
-
122
-
123
-
124
-
125
-
126
-
127
-
128
-
129
-
130
-
131
-
132
-
133
-
134
-
135
-
136
-
137
-
138
-
139
-
140
-
141
-
142
-
143
-
144
-
145
-
146
-
147
-
148
-
149
-
150
-
151
-
152
-
153
-
154
-
155
-
156
-
157
-
158
-
159
-
160
-
161
-
162
-
163
-
164
-
165
-
166
-
167
-
168
-
169
-
170
-
171
-
172
-
173
-
174
-
175
-
176
-
177
-
178
-
179
-
180
-
181
-
182
-
183
-
184
-
185
-
186
-
187
-
188
-
189
-
190
-
191
-
192
-
193
-
194
-
195
-
196
-
197
-
198
-
199
-
200
-
201
 |
 |
