Canon imagePROGRAF GP-300 imagePROGRAF GP-300 / GP-200 Setup Guide - Page 10
Pull the print head locking cover down toward you to lock
 |
View all Canon imagePROGRAF GP-300 manuals
Add to My Manuals
Save this manual to your list of manuals |
Page 10 highlights
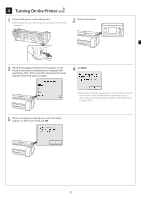
7 8 Pull the print head locking cover down toward you to lock the print head in place. Push the print head lock lever all the way to the end. 9 Check that the triangle mark on the angle adjustment lever is aligned with the red ■. If they are not aligned, move the angle adjustment lever up or down to align it with the ■. 10 Close the top cover. Red ■ Triangle mark 9
-
 1
1 -
2
-
3
-
4
-
 5
5 -
 6
6 -
 7
7 -
 8
8 -
 9
9 -
 10
10 -
 11
11 -
 12
12 -
 13
13 -
 14
14 -
 15
15 -
16
-
17
-
18
-
19
-
20
-
21
-
22
-
23
-
24
-
25
-
26
-
27
-
28
-
29
-
30
-
31
-
32
-
33
-
34
-
35
-
36
-
37
-
38
-
39
-
40
-
41
-
42
-
43
-
44
-
45
-
46
-
47
-
48
-
49
-
50
-
51
-
52
-
53
-
54
-
55
-
56
-
57
-
58
-
59
-
60
-
61
-
62
-
63
 |
 |

9
7
Pull the print head locking cover down toward you to lock
the print head in place.
8
Push the print head lock lever all the way to the end.
9
Check that the triangle mark on the angle adjustment
lever is aligned with the red
■
. If they are not aligned,
move the angle adjustment lever up or down to align it
with the
■
.
Triangle mark
Red
■
10
Close the top cover.