Canon imagePROGRAF GP-300 imagePROGRAF GP-300 / GP-200 Setup Guide - Page 8
Close the ink tank lock lever until it clicks., Check that the color of the ink tank that was set is
 |
View all Canon imagePROGRAF GP-300 manuals
Add to My Manuals
Save this manual to your list of manuals |
Page 8 highlights
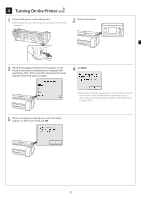
6 Close the ink tank lock lever until it clicks. 7 Repeat steps 2 to 6 to install each of the ink tanks. Important ● Take particular care with the BK and MBK ink tanks that are easy to confuse. 8 Close the ink tank cover. 9 Check that the color of the ink tank that was set is displayed on the touch screen, and tap OK. Important ● If the touch screen does not show the color, repeat steps 2 and 6. 7
-
 1
1 -
2
-
 3
3 -
 4
4 -
 5
5 -
 6
6 -
 7
7 -
 8
8 -
 9
9 -
 10
10 -
 11
11 -
 12
12 -
 13
13 -
14
-
15
-
16
-
17
-
18
-
19
-
20
-
21
-
22
-
23
-
24
-
25
-
26
-
27
-
28
-
29
-
30
-
31
-
32
-
33
-
34
-
35
-
36
-
37
-
38
-
39
-
40
-
41
-
42
-
43
-
44
-
45
-
46
-
47
-
48
-
49
-
50
-
51
-
52
-
53
-
54
-
55
-
56
-
57
-
58
-
59
-
60
-
61
-
62
-
63
 |
 |

7
6
Close the ink tank lock lever until it clicks.
Important
●
Take particular care with the BK
and MBK ink tanks that are easy
to confuse.
7
Repeat steps 2 to 6 to install each of the ink tanks.
8
Close the ink tank cover.
9
Check that the color of the ink tank that was set is
displayed on the touch screen, and tap
OK
.
Important
●
If the touch screen does not show the color, repeat steps 2 and
6.