Casio WK 1630 User Guide - Page 51
No rma l, Save?, Global, E l eme n t
 |
UPC - 787063003963
View all Casio WK 1630 manuals
Add to My Manuals
Save this manual to your list of manuals |
Page 51 highlights
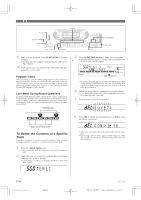
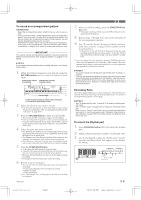
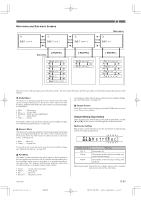
Pattern Sequencer Modes Press PATTERN. /P SNB M Normal Unlit PATTERN Pattern Create Mode Lit PATTERN Press ENTER. Press PATTERN. ʦ˝ʧ &TDBQFFD ʦ˛ʧ ʦ˝ʧ (M PCB M FD ʦ˛ʧ Press PATTERN. 4BWF Press PATTERN. The Pattern Sequencer has two modes: a Pattern Create Mode for recording a new pattern, and a Pattern Edit Mode for changing the settings of a pattern. After you finish creating or editing a pattern, you store it in memory and assign it a number for later recall. The following procedure provides the basics for navigating between Pattern Sequencer modes. To navigate between Pattern Sequencer modes 1. Before turning on the Pattern Sequencer, select the rhythm you want to use as a base for your original rhythm. 2. Press the PATTERN button. • This enters the Pattern Create Mode, which is indicated when the indicator lamp above the PATTERN button is lit. The indicator "Ptn" in the tone/rhythm number area of the display (item 3 on page E-10) also indicates that the Pattern Create Mode. • Entering the Pattern Create Mode copies the rhythm you selected in Step 1 into the Song Sequencer work area. Operations you perform with the Pattern Sequencer affect the pattern that is currently in the work area. • If the rhythm pattern you selected in step 1 is too large to fit in the work area, the Message "Ptn Mem Full" appears on the display for about three seconds. After that, the keyboard enters to the Pattern Create Mode with the work area empty. To make more room in the work area for the rhythm pattern, delete user rhythm patterns stored in the user area (pattern numbers 100 through 109) that you no longer need. • In the Pattern Create Mode, you can play back the accompaniment pattern in the work area and even record along with the playback. See "Using the Pattern Create Mode" on page E-50 for full details on using the Pattern Create Mode. 733A-E-051A ʦ˝ʧ & M FNF O U D ʦ˛ʧ 1B S U 3FD Pattern Edit Mode Flash PATTERN Flash PATTERN 3. Press the PATTERN button again. • This enters the Pattern Edit Mode, which is indicated when the indicator lamp above the PATTERN button is flashing. The indicator "Edt" in the tone/rhythm number area of the display (item 3 on page E-10) also indicates the Pattern Edit Mode. • The Pattern Edit Mode screen can be scrolled between the following three menus with the [̆] and [̄] cursor keys: "Global", "Element", and "Part". In addition to the menus, there is also an Escape screen for exiting the Pattern Edit Mode. Each contains parameters for making settings for the accompaniment pattern in the Pattern Sequencer work area. See "Using the Pattern Edit Mode" on page E-52 for full details on using the Pattern Edit Mode. • Displaying the Pattern Edit Mode's "Escape" screen and then pressing the ENTER button returns to the Pattern Create Mode in step 2. 4. Press the PATTERN button again. • The indicator lamp above the PATTERN button continues to flash, and the message "Save?" appears on the display. See "Exiting the Pattern Sequencer Mode" on page E-56 for details on how to save Pattern Sequencer data. * Work Area • The work area is an area of memory where rhythm pattern data is stored temporarily during recording and editing. After you are finished recording or editing, you can specify whether you want to save work area contents or delete them without saving. E-49 WK-1800/1600(E)-48~57 Page 49 03.7.31, 5:21 PM Adobe PageMaker 6.5J/PPC
-
 1
1 -
2
-
3
-
4
-
5
-
6
-
7
-
8
-
9
-
10
-
11
-
12
-
13
-
14
-
15
-
16
-
17
-
18
-
19
-
20
-
21
-
22
-
23
-
24
-
25
-
26
-
27
-
28
-
29
-
30
-
31
-
32
-
33
-
34
-
35
-
36
-
37
-
38
-
39
-
40
-
41
-
42
-
43
-
44
-
45
-
 46
46 -
 47
47 -
 48
48 -
 49
49 -
 50
50 -
 51
51 -
 52
52 -
 53
53 -
 54
54 -
 55
55 -
 56
56 -
57
-
58
-
59
-
60
-
61
-
62
-
63
-
64
-
65
-
66
-
67
-
68
-
69
-
70
-
71
-
72
-
73
-
74
-
75
-
76
-
77
-
78
-
79
-
80
-
81
-
82
-
83
-
84
-
85
-
86
-
87
-
88
-
89
-
90
-
91
-
92
-
93
-
94
-
95
-
96
 |
 |
