Cisco AIR-CB21AG-A-K9 Quick Start Guide - Page 2

Install, Installation, ation, ation on Win XP or Win 2000, on Win XP or Win 2000 - windows 7

Page 2 highlights

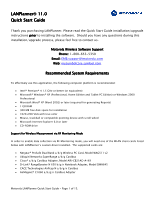
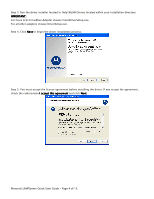
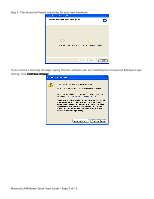
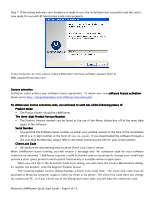
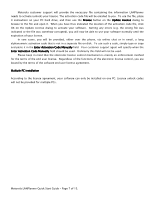
Note about Microsoft Windows Vista®: Currently, LANPlanner 11.0 is unsupported on Windows Vista. An update to enable Windows Vista compatibility is being worked on for LANPlanner. Installation on Win XP or Win 2000 Installing LANPlanner is much like installing any other Microsoft Windows software. However, LANPlanner uses electronic license control, so an extra activation step will be required. In order to install LANPlanner, you will need your installation CD and some way to transfer files to your PC or receive email directly on your PC. Preparation It is very important to perform the following preparatory steps to ensure your installation goes smoothly: • Administrative Privileges Are Required for Install: a user with local administrative privileges must install LANPlanner. Non-administrative users may use the software once it has been installed. • Internet Explorer 6.0 or better is required to properly run LANPlanner 11.0. • Windows Service Packs: Your software will work best running with the most recent updates of Windows 2000 or Windows XP. These upgrades are available through the Microsoft Windows Update web site. Installation procedure To install LANPlanner, please follow these steps in the order presented: 1. Close any programs running within Windows before starting the installation process. 2. Log on as 'Administrator' or as a user with administrative or power user privileges. 3. Insert the LANPlanner product CD into the CD drive. 4. If Autorun is activated on your computer, the setup program will start automatically. Otherwise, run SETUP.EXE from the root folder on the product CD. 5. Read the warnings and the license agreement. You must accept the license agreement to continue. 6. Enter the user information, including your name, the name of your company and your serial number. You will find the Software Serial number on either your printed manual or the face of the installation CD (it is a 9-digit number in the form of xxx-xx-xxxx). If you downloaded the software through a link provided by Motorola, please refer to the email containing the link for your serial number. 7. Choose the destination folder where the program files will be stored on the hard drive. We recommend you accept the default folder name. If you choose a hard drive other than the default C: drive, be sure to also type in a directory name; e.g. click on your D: drive and then type in \Program Files\LANPlanner\. 8. Click Next to begin the installation process. 9. When setup is complete, you are ready to run the software by going to the Windows Start Menu and selecting Programs > LANPlanner> LANPlanner. Motorola LANPlanner Quick Start Guide - Page 2 of 15.

  • 1
  • 2
  • 3
  • 4
  • 5
  • 6
  • 7
  • 8
  • 9
  • 10
  • 11
  • 12
  • 13
  • 14
  • 15

Motorola LANPlanner Quick Start Guide - Page 2 of 15.
Note about
Note about
Note about
Note about Microsoft
Microsoft
Microsoft
Microsoft Windows Vista
Windows Vista
Windows Vista
Windows Vista®:
Currently, LANPlanner 11.0 is unsupported on Windows Vista.
An
update to enable Windows Vista compatibility is being worked on for LANPlanner.
Install
Install
Install
Installation
ation
ation
ation on Win XP or Win 2000
on Win XP or Win 2000
Installing LANPlanner is much like installing any other Microsoft Windows software.
However, LANPlanner
uses electronic license control, so an extra activation step will be required.
In order to install LANPlanner,
you will need your installation CD and some way to transfer files to your PC or receive email directly on your
PC.
Preparation
Preparation
Preparation
Preparation
It is very important to perform the following preparatory steps to ensure your installation goes smoothly:
Administrative Privileges
Administrative Privileges Are
Are
Are
Are Required for Install:
Required for Install:
Required for Install: a user with local administrative privileges must
install LANPlanner. Non-administrative users may use the software once it has been installed.
Internet Explorer
Internet Explorer
Internet Explorer
Internet Explorer 6.0
.0
.0
.0 or better
or better
or better
or better is required to properly run LANPlanner 11.0.
Windows Servi
Windows Servi
Windows Servi
Windows Service Packs:
ce Packs:
ce Packs:
ce Packs: Your software will work best running with the most recent updates of
Windows 2000 or Windows XP. These upgrades are available through the Microsoft Windows Update
web site.
Installation procedure
To install LANPlanner, please follow these steps in the order presented:
1.
Close any programs running within Windows before starting the installation process.
2.
Log on as ‘Administrator’ or as a user with administrative or power user privileges.
3.
Insert the LANPlanner product CD into the CD drive.
4.
If Autorun is activated on your computer, the setup program will start automatically. Otherwise, run
SETUP.EXE from the root folder on the product CD.
5.
Read the warnings and the license agreement.
You must accept the license agreement to continue.
6.
Enter the user information, including your name, the name of your company and your serial number.
You will find the Software Serial number on either your printed manual or the face of the installation
CD (it is a 9-digit number in the form of xxx-xx-xxxx).
If you downloaded the software through a
link provided by Motorola, please refer to the email containing the link for your serial number.
7.
Choose the destination folder where the program files will be stored on the hard drive. We
recommend you accept the default folder name.
If you choose a hard drive other than the default C:
drive, be sure to also type in a directory name; e.g. click on your D: drive and then type in \Program
Files\LANPlanner\.
8.
Click Next to begin the installation process.
9.
When setup is complete, you are ready to run the software by going to the Windows Start Menu and
selecting Programs > LANPlanner> LANPlanner.