Cisco SR224 User Guide - Page 20
Advanced Switch Configuration, Password Configuration, Enable, Disable, Direct Map - web interface
 |
UPC - 745883556526
View all Cisco SR224 manuals
Add to My Manuals
Save this manual to your list of manuals |
Page 20 highlights
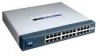
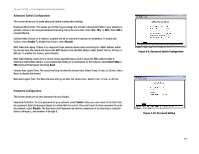
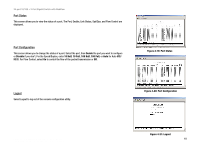
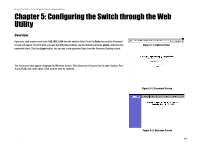
24-port 10/100 + 2-Port Gigabit Switch with WebView Advanced Switch Configuration This screen allows you to make advanced switch configuration settings. Broadcast Storm Filter. This allows you to filter by percentage the amount of broadcast traffic to your network to prevent a storm of too many broadcasts from being sent at the same time. Select 5%, 10%, or 20%. Select Off to prevent filtering. Collision Retry Forever. In a collision, a packet will be re-sent until it reaches its destination. To enable this feature, select Enable. To disable this feature, select Disable. MAC Table Auto-Aging. If there is no response froma network device when searching for a MAC address within the chosen time, the switch will remove the MAC address from the MAC address table. Select 150 sec, 300 sec, or 600 sec. To disable this feature, select Disable. MAC Table Hashing. Select from a choice of two algorithm types used to check the MAC address table to determine which MAC address is associated with what port or destination on the network. Select Direct Map or CRC (Cyclical Redundancy Checking) Hash. Console Auto Logout Time. The console will log out after the chosen time. Select 5 min, 10 min, or 20 min. Select Never to disable the feature. Web Auto Logout Time. The Web interface will log out after the chosen time. Select 5 min, 10 min, or 20 min. Password Configuration This screen allows you to set a password for your Switch. Password Protection. To set a password for your network, select Enable. Enter your user name in the field, then the password. Enter the password again to confirm that it is correct. If you don't want to have a password to enter the network, select Disable. The Username and Password can only be a maximum of six characters, using the letters a through z, and numbers 0 through 9. Figure 4-9: Advanced Switch Configuration Figure 4-10: Password Setting Chapter 4: Configuration using the Console Interface 14 Configuring the Switch through the Console Interface
-
 1
1 -
2
-
3
-
4
-
5
-
6
-
7
-
8
-
9
-
10
-
11
-
12
-
13
-
14
-
 15
15 -
 16
16 -
 17
17 -
 18
18 -
 19
19 -
 20
20 -
 21
21 -
 22
22 -
 23
23 -
 24
24 -
 25
25 -
26
-
27
-
28
-
29
-
30
-
31
-
32
-
33
-
34
-
35
-
36
-
37
-
38
-
39
-
40
-
41
-
42
-
43
-
44
-
45
-
46
-
47
 |
 |
