Craftsman 27673 Operation Manual - Page 13
Warning
 |
View all Craftsman 27673 manuals
Add to My Manuals
Save this manual to your list of manuals |
Page 13 highlights
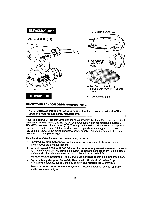
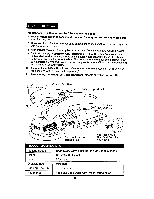
WARNING: Your sander should NEVER be connected to the power source when you are assembling parts, making adjustments, installingor removing sandpaper, cleaning or when it is not in use. Disconnecting the sander will prevent accidental starting, that could cause serious personal injury. INSTALLING THE SANDPAPER (See Fig. 3) ALWAYS inspect the sandpaper before installing. DO NOT use if broken or defective. 1. Unplug the sander. I sZt_artiWngARcNaIuNsGin:g posFsaiibluleresteoriouunsplupgertshoenaslanindjeurryc. ould result in accidental I NOTE: Remove cyclonic dust box assembly when installingsandpaper. ALWAYS remember to reattach the cyclonic dust box assembly before beginning sanding operation (see page 14, Fig. 4). 2. Align the holes in the sanding disc with the holes in the hook and loop backing pad. I thOeTdEu:sHt coolellsecintiosnafnedaitnugrediosfcthmeustalninderutpo wfuitnhchtioolnesprionptehrelyb. acking pad in order for II 3. Press the sanding disc against the backing pad as firmly as possible. J sNaOnTdEin:gFdoirscbebsatcakdinhgesoicocna,swioenraellcyobmymberunsdhtihnagtthyoemu dleigahntlythweitbhaacksinmgalpl abdruasnhd. the I Fig 3 5-in. Hook and Loop Backing Pad 5-in. Hook and Loop Sanding Disc with Pre-Punched holes 13
-
 1
1 -
2
-
3
-
4
-
5
-
6
-
7
-
 8
8 -
 9
9 -
 10
10 -
 11
11 -
 12
12 -
 13
13 -
 14
14 -
 15
15 -
 16
16 -
 17
17 -
 18
18 -
19
-
20
-
21
-
22
-
23
-
24
-
25
-
26
-
27
-
28
-
29
-
30
-
31
-
32
-
33
-
34
-
35
-
36
-
37
-
38
-
39
-
40
-
41
-
42
-
43
-
44
-
45
-
46
-
47
-
48
-
49
-
50
-
51
 |
 |
