Craftsman 30084N Operation Manual - Page 11
Installing Welding Gun, Setting Gun Polarity
 |
UPC - 055249070420
View all Craftsman 30084N manuals
Add to My Manuals
Save this manual to your list of manuals |
Page 11 highlights
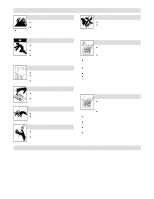
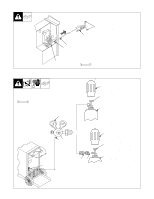
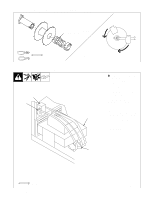
2-7. Installing Welding Gun 1 2 3 4 1 Drive Assembly 2 Gun Securing Knob 3 Gun End Loosen securing knob. Insert gun end through opening until it bottoms against drive assembly. Tighten nut. 4 Gun Trigger Plug Insert plug into receptacle, and tighten threaded collar. Close door. 2-8. Setting Gun Polarity Ref. ST-801 567 1 Polarity Changeover Label Always read and follow manufacture's recommended polarity. 1 Tools Needed: 3/4, 11/16 in Ref. 190 821-A OM-194 199 Page 8
-
 1
1 -
2
-
3
-
4
-
5
-
 6
6 -
 7
7 -
 8
8 -
 9
9 -
 10
10 -
 11
11 -
 12
12 -
 13
13 -
 14
14 -
 15
15 -
 16
16 -
17
-
18
-
19
-
20
-
21
-
22
-
23
-
24
-
25
-
26
-
27
-
28
-
29
-
30
-
31
-
32
-
33
-
34
-
35
-
36
-
37
-
38
-
39
-
40
-
41
-
42
-
43
-
44
-
45
-
46
-
47
-
48
-
49
-
50
-
51
-
52
-
53
-
54
-
55
-
56
-
57
-
58
-
59
-
60
-
61
-
62
-
63
-
64
-
65
-
66
-
67
-
68
 |
 |

OM-194 199 Page 8
2-7.
Installing Welding Gun
Ref. ST-801 567
1
Drive Assembly
2
Gun Securing Knob
3
Gun End
Loosen securing knob. Insert gun
end through opening until it bottoms
against drive assembly. Tighten
nut.
4
Gun Trigger Plug
Insert plug into receptacle, and
tighten threaded collar.
Close door.
2
1
3
4
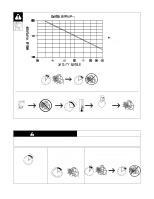
2-8.
Setting Gun Polarity
1
Polarity Changeover Label
Always read and follow manufac-
ture’s recommended polarity.
3/4, 11/16 in
Tools Needed:
Ref. 190 821-A
1