D-Link DAP-1320 DAP-1320 User Manual - Page 10
Installation, Connect your DAP-1320 to your Router - d link setup
 |
View all D-Link DAP-1320 manuals
Add to My Manuals
Save this manual to your list of manuals |
Page 10 highlights
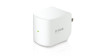
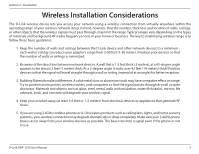
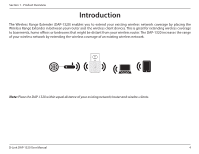
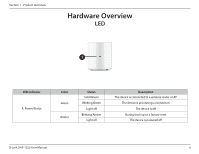
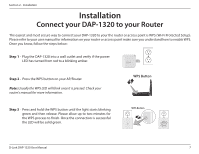
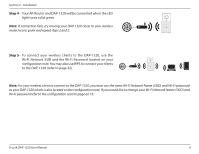
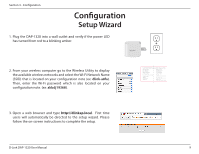
Section 2 - Installation Installation Connect your DAP-1320 to your Router The easiest and most secure way to connect your DAP-1320 to your the router or access point is WPS (Wi-Fi Protected Setup). Please refer to your user manual for information on your router or access point make sure you understand how to enable WPS. Once you know, follow the steps below: Step 1 - Plug the DAP-1320 into a wall outlet and verify if the power LED has turned from red to a blinking amber. DAP-1320 Step 2 - Press the WPS button on your AP/Router. Note: Usually the WPS LED will blink once it is pressed. Check your router's manual for more information. WPS Button Step 3 - Press and hold the WPS button until the light starts blinking green and then release. Please allow up to two minutes for the WPS process to finish. Once the connection is successful the LED will be solid green. WPS Button D-Link DAP-1320 User Manual 7
-
 1
1 -
2
-
3
-
4
-
 5
5 -
 6
6 -
 7
7 -
 8
8 -
 9
9 -
 10
10 -
 11
11 -
 12
12 -
 13
13 -
 14
14 -
 15
15 -
16
-
17
-
18
-
19
-
20
-
21
-
22
-
23
-
24
-
25
-
26
-
27
-
28
-
29
-
30
-
31
-
32
-
33
-
34
-
35
-
36
-
37
-
38
-
39
-
40
-
41
-
42
-
43
-
44
-
45
-
46
-
47
-
48
-
49
-
50
-
51
-
52
-
53
-
54
-
55
-
56
-
57
-
58
-
59
-
60
-
61
-
62
-
63
 |
 |