D-Link DCS-6113 Product Manual - Page 11
Hardware Installation
 |
View all D-Link DCS-6113 manuals
Add to My Manuals
Save this manual to your list of manuals |
Page 11 highlights
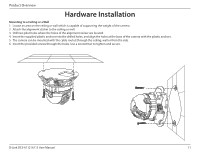
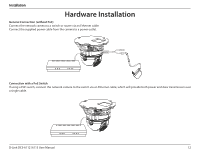
Product Overview Hardware Installation Mounting to a Ceiling or a Wall 1. Locate an area on the ceiling or wall which is capable of supporting the weight of the camera. 2. Attach the alignment sticker to the ceiling or wall. 3. Drill two pilot holes where the holes of the alignment sticker are located. 4. Insert the supplied plastic anchors into the drilled holes, and align the holes at the base of the camera with the plastic anchors. 5. The camera can be mounted with the cable routed through the ceiling, wall or from the side. 6. Insert the provided screws through the holes. Use a screwdriver to tighten and secure. D-Link DCS-6112 /6113 User Manual 11
-
 1
1 -
2
-
3
-
4
-
5
-
 6
6 -
 7
7 -
 8
8 -
 9
9 -
 10
10 -
 11
11 -
 12
12 -
 13
13 -
 14
14 -
 15
15 -
 16
16 -
17
-
18
-
19
-
20
-
21
-
22
-
23
-
24
-
25
-
26
-
27
-
28
-
29
-
30
-
31
-
32
-
33
-
34
-
35
-
36
-
37
-
38
-
39
-
40
-
41
-
42
-
43
-
44
-
45
-
46
-
47
-
48
-
49
-
50
-
51
-
52
-
53
-
54
-
55
-
56
-
57
-
58
-
59
-
60
-
61
-
62
-
63
-
64
-
65
-
66
-
67
-
68
-
69
-
70
-
71
-
72
-
73
-
74
-
75
-
76
-
77
-
78
-
79
-
80
-
81
-
82
-
83
-
84
-
85
 |
 |

11
D-Link DCS-6112 /6113 User Manual
Product Overview
Hardware Installation
Mounting to a Ceiling or a Wall
1. Locate an area on the ceiling or wall which is capable of supporting the weight of the camera.
2. Attach the alignment sticker to the ceiling or wall.
3. Drill two pilot holes where the holes of the alignment sticker are located.
4. Insert the supplied plastic anchors into the drilled holes, and align the holes at the base of the camera with the plastic anchors.
5. The camera can be mounted with the cable routed through the ceiling, wall or from the side.
6. Insert the provided screws through the holes. Use a screwdriver to tighten and secure.