D-Link DCS-6113 Product Manual - Page 20
Adjust the viewing angle, Attaching the Enclosure
 |
View all D-Link DCS-6113 manuals
Add to My Manuals
Save this manual to your list of manuals |
Page 20 highlights
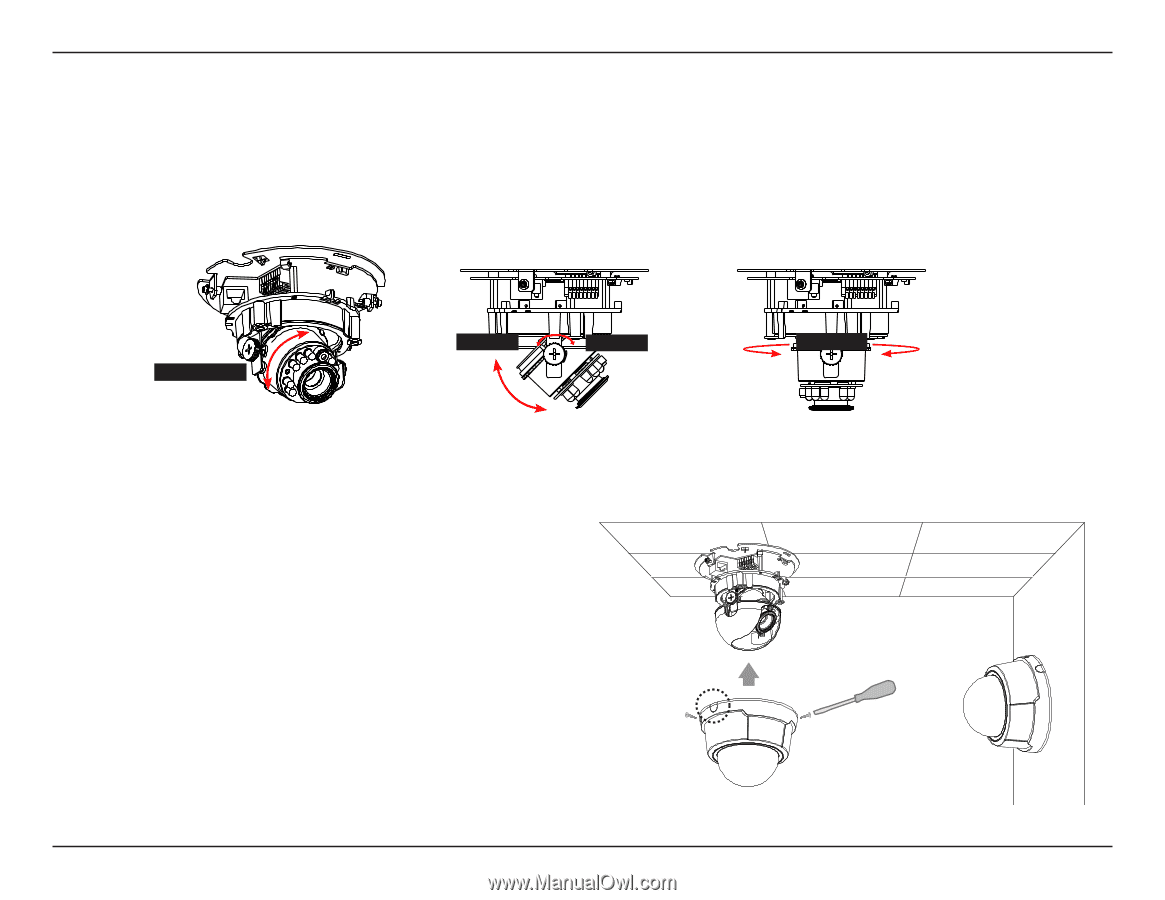
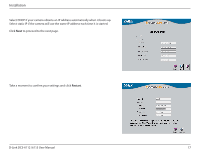
Installation Adjust the viewing angle Loosen the pan screw and turn the lens module left and right until the desired position is achieved; tighten the pan screw once completed. Loosen the tilt screws on both sides of the camera, and turn the lens module up and down until the desired position is achieved; tighten the tilt screws once completed. Loosen the image adjustment screw and turn the lens to adjust the network camera's image until the desired orientation is achieved, tighten the image adjustment screw once completed. Rotate 350° Loosen Tilt 85° Tighten Pan 350° Attaching the Enclosure 1. Align the inner side of the black cover with the notch on both sides of the lens, fix the black Cover. 2. If you choose to the feed the cable through the ceiling or wall, arrange the cable neatly through the cable hole. If you choose to feed the cable from the side, remove plate A. 3. Attach the dome cover to the camera as the direction shown below. With a user friendly mechanism design, the dome cover cannot be attached if the angle does not fit. 4. Finally, make sure all parts of the camera are securely installed. D-Link DCS-6112 /6113 User Manual 20
-
 1
1 -
2
-
3
-
4
-
5
-
6
-
7
-
8
-
9
-
10
-
11
-
12
-
13
-
14
-
 15
15 -
 16
16 -
 17
17 -
 18
18 -
 19
19 -
 20
20 -
 21
21 -
 22
22 -
 23
23 -
 24
24 -
 25
25 -
26
-
27
-
28
-
29
-
30
-
31
-
32
-
33
-
34
-
35
-
36
-
37
-
38
-
39
-
40
-
41
-
42
-
43
-
44
-
45
-
46
-
47
-
48
-
49
-
50
-
51
-
52
-
53
-
54
-
55
-
56
-
57
-
58
-
59
-
60
-
61
-
62
-
63
-
64
-
65
-
66
-
67
-
68
-
69
-
70
-
71
-
72
-
73
-
74
-
75
-
76
-
77
-
78
-
79
-
80
-
81
-
82
-
83
-
84
-
85
 |
 |