DIRECTV HR44 System Manual - Page 97
Picture in Picture
 |
View all DIRECTV HR44 manuals
Add to My Manuals
Save this manual to your list of manuals |
Page 97 highlights
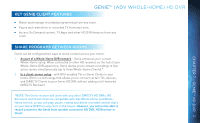
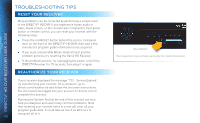
GENIE™ (ADV WHOLE-HOME) HD DVR CONNECTING CLIENTS You may register up to eight Clients per Genie HD DVR; these may be RVU-enabled TVs, or Genie Clients. Before connecting and activating a Client, your Genie HD DVR must be set up, activated, and functioning. To begin, connect, plug in and turn on the Client. Once it detects the Genie HD DVR, it will prompt you to enter a PIN. On your DIRECTV HD DVR, press MENU, then select "Settings & Help", then "Settings". Select "Whole-Home" from the left menu, then select "Add a Client". Note the PIN shown on the "Add a Client" screen, and do not exit the screen! CHAPTER 7 - GENIE™ HD DVR On the Client, enter the PIN you received from the Genie HD DVR using the remote. Select "Done" on the confirmation screen. The Create a Location screen displays. You may add a new location, or replace a location. Select the appropriate option and follow the onscreen instructions. Once the location has been set up, you have a choice of copying settings from another location or accepting the DIRECTV defaults. The following settings are copied from a server or Client to another Client: (The settings from any Client can also be copied to the Genie HD DVR.) Parental Control Settings Favorite Channels Display Settings Clock Language Sound Effects 97
-
 1
1 -
2
-
3
-
4
-
5
-
6
-
7
-
8
-
9
-
10
-
11
-
12
-
13
-
14
-
15
-
16
-
17
-
18
-
19
-
20
-
21
-
22
-
23
-
24
-
25
-
26
-
27
-
28
-
29
-
30
-
31
-
32
-
33
-
34
-
35
-
36
-
37
-
38
-
39
-
40
-
41
-
42
-
43
-
44
-
45
-
46
-
47
-
48
-
49
-
50
-
51
-
52
-
53
-
54
-
55
-
56
-
57
-
58
-
59
-
60
-
61
-
62
-
63
-
64
-
65
-
66
-
67
-
68
-
69
-
70
-
71
-
72
-
73
-
74
-
75
-
76
-
77
-
78
-
79
-
80
-
81
-
82
-
83
-
84
-
85
-
86
-
87
-
88
-
89
-
90
-
91
-
 92
92 -
 93
93 -
 94
94 -
 95
95 -
 96
96 -
 97
97 -
 98
98 -
 99
99 -
 100
100 -
 101
101 -
 102
102 -
103
-
104
-
105
-
106
-
107
-
108
-
109
-
110
-
111
-
112
-
113
-
114
-
115
-
116
-
117
-
118
-
119
-
120
-
121
-
122
-
123
-
124
-
125
-
126
-
127
-
128
-
129
-
130
-
131
-
132
-
133
-
134
-
135
-
136
-
137
-
138
-
139
-
140
-
141
-
142
-
143
-
144
-
145
-
146
-
147
-
148
-
149
-
150
-
151
-
152
-
153
-
154
-
155
-
156
-
157
-
158
-
159
-
160
-
161
-
162
-
163
-
164
-
165
-
166
-
167
-
168
-
169
-
170
-
171
-
172
-
173
-
174
-
175
-
176
 |
 |
