Dell A940 All In One Personal Printer Owner's Manual
Dell A940 All In One Personal Printer Manual
 |
View all Dell A940 All In One Personal Printer manuals
Add to My Manuals
Save this manual to your list of manuals |
Dell A940 All In One Personal Printer manual content summary:
- Dell A940 All In One Personal Printer | Owner's Manual - Page 1
Dell™ AIO Printer A940 Owner's Manual Look Inside For: • Learning about your printer • Using your printer • Maintenance and Troubleshooting www.dell.com/supplies | support.dell.com - Dell A940 All In One Personal Printer | Owner's Manual - Page 2
www.dell.com/supplies | support.dell.com - Dell A940 All In One Personal Printer | Owner's Manual - Page 3
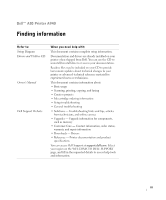
Dell™ AIO Printer A940 Finding information Refer to: Setup Diagram Drivers and Utilities CD Owner's Manual Dell Support Website When you need help with: This document contains complete setup information. Documentation and drivers are already installed on your printer when shipped from Dell. You - Dell A940 All In One Personal Printer | Owner's Manual - Page 4
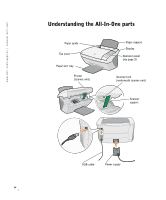
www.dell.com/supplies | support.dell.com Understanding the All-In-One parts Paper guide Top cover Paper exit tray Printer (scanner unit) Paper support Display Operator panel (see page 3) Scanner lock (underneath scanner unit) Scanner support USB cable Power supply iv - Dell A940 All In One Personal Printer | Owner's Manual - Page 5
Use the: Display Operator panel Paper exit tray Paper guide Paper support Power supply Scanner lock Scanner support Printer (scanner unit) Top cover USB cable When you want to: Check the status of the All-In-One. Operate your All-In-One (attached to a computer or unattached). For more information, - Dell A940 All In One Personal Printer | Owner's Manual - Page 6
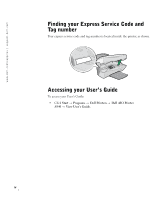
.com/supplies | support.dell.com Finding your Express Service Code and Tag number Your express service code and tag number is located inside the printer, as shown. Accessing your User's Guide To access your User's Guide: • Click Start → Programs → Dell Printers → Dell AIO Printer A940 → View User - Dell A940 All In One Personal Printer | Owner's Manual - Page 7
or loss of data and tells you how to avoid the problem. CAUTION: A CAUTION indicates a potential for property damage, personal injury, or death Rights in Technical Data and Computer Software clause at DFARS 252.227-7013 and in applicable FAR provisions: Dell Computer Corporation, One Dell Way, Round - Dell A940 All In One Personal Printer | Owner's Manual - Page 8
www.dell.com/supplies | support.dell.com Safety information • Use only the power supply provided with this product or the manufacturer's authorized replacement power supply. • Connect the power cord to an electrical outlet that is near the product and easily accessible. • Refer service or repairs, - Dell A940 All In One Personal Printer | Owner's Manual - Page 9
the printer software 7 Accessing the Dell All-In-One Center 7 Accessing Print Properties 8 Using the Dell Photo Editor 9 Using the Dell Printer Solution Center 10 Understanding the paper type sensor 11 2 Using your printer Loading paper 14 Placing your document on the scanner glass - Dell A940 All In One Personal Printer | Owner's Manual - Page 10
a one-page fax with Fax Console 34 Sending a multiple-page fax with Fax Console 34 Receiving faxes with Fax Console 35 Viewing faxes with Fax Console 35 Fax troubleshooting 36 3 Maintenance Ordering supplies 38 Replacing the ink cartridges 39 Aligning the ink cartridges 41 After installing - Dell A940 All In One Personal Printer | Owner's Manual - Page 11
Cleaning the ink cartridge nozzles 42 4 Troubleshooting Setup troubleshooting 44 General troubleshooting 44 Paper misfeeds or multiple sheets feed 45 Envelopes do not feed properly 45 Document does not print 45 Display language is not preferable 46 Printer or scanner is not communicating with - Dell A940 All In One Personal Printer | Owner's Manual - Page 12
Dell Computer Corporation Ink and Toner Cartridges Limited Warranties 82 Ink and Toner Cartridges Limited Warranty (U.S. and Canada Only) 82 Ink and Toner Cartridges Limited Warranty (Latin America Only) 83 Dell Software License Agreement 84 Index 87 xii Contents - Dell A940 All In One Personal Printer | Owner's Manual - Page 13
SECTION 1 Learning about your printer Setting up your printer Understanding the operator panel Understanding the printer software Understanding the paper type sensor 1 - Dell A940 All In One Personal Printer | Owner's Manual - Page 14
internal the printer software to create your projects. modem or be connected to an external modem that is connected to a telephone Setting up your printer line. Follow the instructions on your printer setup documentation to install the hardware and software. For setup troubleshooting, see page - Dell A940 All In One Personal Printer | Owner's Manual - Page 15
the operator panel The operator panel buttons help you scan, copy, fax, and customize documents. The light indicates whether the printer is on, and the display features the printer status, messages, and menus. You can press and hold some buttons to scroll through a list of options on the display - Dell A940 All In One Personal Printer | Owner's Manual - Page 16
.dell.com/supplies | support.dell.com # Press: To: 1 Number of Copies Specify the number (1-99) of copies to make. 2 Reduce/Enlarge Reduce or enlarge your original document by percentage, to Fit to Page, or to poster size. 3 Copy Quality Select a copy quality: Quick, Normal, Better, or Best - Dell A940 All In One Personal Printer | Owner's Manual - Page 17
the scanned image. Select: • Ink Levels to display the ink cartridge ink levels. • Change to see instructions on how to change the ink cartridges. • Align to automatically align the ink cartridges. • Clean to clean the ink cartridges. • Self Test to print a test page. Learning about your printer 5 - Dell A940 All In One Personal Printer | Owner's Manual - Page 18
| support.dell.com From this menu: POWER SAVE CLEAR SETTINGS SET DEFAULTS LANGUAGE You can: Select a time to begin reducing power: • Immediately • After 10 minutes • After 30 minutes (the default) • After 60 minutes • Never Select when (after 2 minutes or never) you would like your printer to - Dell A940 All In One Personal Printer | Owner's Manual - Page 19
helps you edit your photos. • Dell Printer Solution Center-provides maintenance and troubleshooting help. Accessing the Dell All-In-One Center To access the Dell All-In-One Center: • Click Start → Programs → Dell Printers → Dell AIO Printer A940 → Dell All-In-One Center. NOTE: Available from almost - Dell A940 All In One Personal Printer | Owner's Manual - Page 20
www.dell.com/supplies | support.dell.com Accessing Print Properties You can change your printer settings in Print Properties. To open Print Properties: 1 With your document open, click File → on your program or operating system). The Print Properties screen appears. 8 Learning about your printer - Dell A940 All In One Personal Printer | Owner's Manual - Page 21
, contrast, and orientation) of scanned images. There are two ways to open the Dell Photo Editor: • Click Start → Programs → Dell Printers → Dell AIO Printer A940 → Dell Photo Editor. • From the All-In-One Center, send scanned image to Photo Editor. The Dell Photo Editor appears. Learning about your - Dell A940 All In One Personal Printer | Owner's Manual - Page 22
| support.dell.com Using the Dell Printer Solution Center The Dell Printer Solution Center is a guide you can refer to for printer help and to check the current printer status. To open the Dell Printer Solution Center, click Start → Programs → Dell Printers → Dell AIO Printer A940 → Dell Printer - Dell A940 All In One Personal Printer | Owner's Manual - Page 23
• Clean the ink cartridge nozzles. • Align the cartridges. • Solve other problems. • Visit the supplies area online. NOTE: Some links will not work while a job is in progress. • View information about ordering ink or supplies. • View information about contacting Dell Customer Support. • View a list - Dell A940 All In One Personal Printer | Owner's Manual - Page 24
www.dell.com/supplies | support.dell.com To choose the paper size: 1 With your document open, OK. To permanently turn it off: 1 Click Start → Settings → Printers or Start → Printers and Faxes. 2 Right-click the printer icon. 3 Click Properties. 4 Click Printing Preferences. NOTE: To temporarily - Dell A940 All In One Personal Printer | Owner's Manual - Page 25
SECTION 2 Using your printer Loading paper Placing your document on the scanner glass Printing Copying Scanning Editing scanned images Faxing 2 - Dell A940 All In One Personal Printer | Owner's Manual - Page 26
of paper: 1 Place the paper against the right side of the paper support with the print side facing you and the top of the paper feeding into the paper support. NOTE: Do not force paper into the printer. 2 Squeeze and slide the paper guide to the left edge of the paper. 14 Using your - Dell A940 All In One Personal Printer | Owner's Manual - Page 27
are designed for use with inkjet printers. • You squeeze and slide the paper guide to the left edge of the envelope (as shown). NOTE: To avoid smearing ink, remove each transparency or photo from the paper exit tray before the next one exits the printer. Transparencies and photos may require up - Dell A940 All In One Personal Printer | Owner's Manual - Page 28
dell.com/supplies | support.dell.com Before you begin copying, scanning, printing, or sending faxes, refer to the information below about how much paper the printer exit tray can hold. The printer your printer to copy, scan, print, and fax. The following instructions explain how to complete these - Dell A940 All In One Personal Printer | Owner's Manual - Page 29
Placing your document on the scanner glass 1 Open the top cover. 2 Place the item you want to copy face down on the scanner glass. NOTE: Make sure the upper left corner of the front of the item aligns with the arrow 3 Close the scanner lid to avoid dark edges. Using your printer 17 - Dell A940 All In One Personal Printer | Owner's Manual - Page 30
, follow these instructions while you are at your own computer. 1 Click Start → Settings → Printers. 2 Select the printer Dell AIO Printer A940 icon. 3 Click File Sharing. 4 Click the Shared as check box, and then type a name in the Shared Name text box. 5 Click Additional Drivers and select the - Dell A940 All In One Personal Printer | Owner's Manual - Page 31
it is shared. For example, in Windows 2000, a hand is shown underneath the printer icon. • Browse Network Neighborhood. Find the host name of the server and look for the shared name you assigned the printer. Now, follow these instructions while you are at the other person's computer: 1 Click Start - Dell A940 All In One Personal Printer | Owner's Manual - Page 32
www.dell.com/supplies | support.dell.com NOTE: When you print Print repeating images multiple images on one Load paper in the printer before want to print per page, the printer reduces them to fit on the page. Using the operator panel Using the printer software 1 On the operator panel, press - Dell A940 All In One Personal Printer | Owner's Manual - Page 33
to return to Normal Quality. Using the printer software 1 Load A4 or letter size paper. 2 Open the top cover. 3 Place your document or item on the scanner glass. For help, see page 17. 4 Open the Dell All-In-One Center. For help, see page 7. The All-In-One Main Page appears. 5 From the Creative - Dell A940 All In One Personal Printer | Owner's Manual - Page 34
the top cover, and feed in the first sheet. 2 Click Start → Programs → Dell Printers → Dell AIO Printer A940 → Dell Printer Solution Center. 3 Click the How To tab. 4 From the Projects drop down dialog box, select Banners. 5 Click View and follow the instructions to print your banner. NOTE: Once the - Dell A940 All In One Personal Printer | Owner's Manual - Page 35
item you want to print face down on the scanner glass. Make sure the upper left corner of the front of image prints, press Cancel to return to Normal Quality. Personalize fabric with pictures Using your computer 1 Create or open your instructions on the iron-on transfer package. Using your printer 23 - Dell A940 All In One Personal Printer | Owner's Manual - Page 36
www.dell.com/supplies | support.dell.com Copying You can copy using the operator panel or the software. First, load your document. For help, see page 17. Using the operator panel: Using the printer software 1 Make sure your printer is on. 2 Press Number of Copies repeatedly until the number (any - Dell A940 All In One Personal Printer | Owner's Manual - Page 37
on. 2 Press Number of Copies if making multiple copies. 3 Press Color. Using the printer software 1 Make sure your computer and your printer are on. 2 Open the Dell All-In-One Center. For help, see page 7. The All-In-One Main Page appears. 3 From the Copy... section, select Color Document. 4 Select - Dell A940 All In One Personal Printer | Owner's Manual - Page 38
dell.com/supplies | support.dell.com Scanning You can scan using your operator panel and software. First, load your document. For help, see page 17. Using the operator panel: Using the printer software 1 Make sure your printer is on. 2 Press Select Software the scanner glass. the Dell All-In-One - Dell A940 All In One Personal Printer | Owner's Manual - Page 39
can enlarge or reduce patterns or photos using the operator panel or the All-In-One Center on your computer. First, load your document. For help, see page 17. Using the operator panel Using the printer software 1 On the operator panel, press Reduce/Enlarge. 2 Press + until you see the option you - Dell A940 All In One Personal Printer | Owner's Manual - Page 40
the arrow at the bottom right of the scanner. 3 Open the Dell All-In-One Center. For help, see page 7. The All-In-One Main Page appears. 4 From the Creative Tasks section, click Edit text found in a scanned document (OCR). 5 Follow the instructions on your computer screen. 6 When your document has - Dell A940 All In One Personal Printer | Owner's Manual - Page 41
programs, you can customize your image. 1 From the Dell All-In-One Center, scan your image to the image editor of to print). For help, see page 27. • Autofit (scan to print). • Multi-up-A printer software option that lets you print multiple pages of a document on a single sheet of paper. For example - Dell A940 All In One Personal Printer | Owner's Manual - Page 42
line), ISDN (integrated services digital network) and cable modems are not fax modems and are not supported. Your printer must be connected to the computer with a USB cable. USB cable computer connector printer connector Using BVRP fax software Installing BVRP fax software 1 Click the Start - Dell A940 All In One Personal Printer | Owner's Manual - Page 43
3 Check for any entry referring to Classic PhoneTools or FaxTools. If you have either of these entries, skip to "Configuring BVRP fax software." 4 Click on the desktop. The All Programs window closes. 5 Insert the Dell Personal All-In-One Printer A940 Drivers and Utilities CD. An installation window - Dell A940 All In One Personal Printer | Owner's Manual - Page 44
the printer. BVRP fax software launches. 4 Follow the instructions on your computer screen to send your fax. Sending a multiple-page fax with BVRP 1 Click the Start button. 2 Move your mouse pointer over All Programs, then Dell Printers, and then Dell AIO Printer A940. 3 Click Dell All-In-One Center - Dell A940 All In One Personal Printer | Owner's Manual - Page 45
to view sent faxes. Using Fax Console Installing Fax Console 1 Click the Start button. 2 Click Control Panel. 3 Click Add or Remove Programs. 4 Click Add/Remove Windows Components. 5 Click to select Fax Services. 6 Click Next. If prompted, insert the Microsoft Windows XP CD and click OK. Close the - Dell A940 All In One Personal Printer | Owner's Manual - Page 46
6 Select your data/fax modem in printer. The Send Fax Wizard appears. 4 Follow the instructions on your computer screen to send your fax. Sending a multiple-page fax with Fax Console 1 Click the Start button. 2 Move your mouse pointer over All Programs, then Dell Printers, then Dell AIO Printer A940 - Dell A940 All In One Personal Printer | Owner's Manual - Page 47
Dell All-In-One Center. 4 Click See More Scan Settings. 5 Click Display Advanced Scan Settings. 6 Click to select Scan multiple items before output, and click OK. 7 Select Fax from the Send scanned image to drop-down menu. 8 Place the document you want to fax face down under the lid of the printer - Dell A940 All In One Personal Printer | Owner's Manual - Page 48
.dell.com/supplies | support.dell.com Fax troubleshooting If you are having trouble sending or receiving a fax, ensure that: • Your computer is equipped with a working data/fax modem. • An active phone line is connected to the line-in connector of your data/fax modem. • Faxing software is installed - Dell A940 All In One Personal Printer | Owner's Manual - Page 49
SECTION 3 Maintenance Ordering supplies Replacing the ink cartridges Aligning the ink cartridges Cleaning the ink cartridge nozzles 3 - Dell A940 All In One Personal Printer | Owner's Manual - Page 50
www.dell.com/supplies | support.dell.com Ordering supplies To order printer supplies or to locate a dealer near you, contact the Dell Web site at www.dell.com/supplies or www.dell.euro.com/supplies. Item: Black cartridge Color cartridge Part number: 7Y743 7Y745 38 Maintenance - Dell A940 All In One Personal Printer | Owner's Manual - Page 51
Replacing the ink cartridges The Dell AIO Printer A940 uses the following cartridges: Item: Black cartridge Color cartridge Part number: 7Y743 7Y745 1 Make sure the All-In-One is on. 2 Lift the printer (scanner unit) until the scanner support keeps it open. NOTE: For information about ordering - Dell A940 All In One Personal Printer | Owner's Manual - Page 52
5 If you are installing new cartridges, remove the stickers and tape from the bottom of the cartridges. NOTICE: Do NOT touch the gold contact area on the cartridges. 6 Insert the new cartridges, and then snap the lids closed. 7 Lift the printer (scanner unit) and push the scanner support back while - Dell A940 All In One Personal Printer | Owner's Manual - Page 53
instances when you will align your ink cartridges: after installing cartridges and to improve print quality. After installing cartridges After you install new ink cartridges, a message displays on the operator panel. 1 Make sure plain paper is loaded in the paper support. 2 Press Select to print an - Dell A940 All In One Personal Printer | Owner's Manual - Page 54
Dell Printer Solution Center to clean the nozzles. Using the operator panel Using the printer software 1 Load plain paper in the printer. For help, see page 15. 2 Press Options until Cartridges quality, try wiping the ink cartridge nozzles and contacts (refer to your User's Guide), and then print - Dell A940 All In One Personal Printer | Owner's Manual - Page 55
SECTION 4 Troubleshooting Setup troubleshooting General troubleshooting Other help sources 4 - Dell A940 All In One Personal Printer | Owner's Manual - Page 56
have one Dell AIO Printer A940 attached to your computer. • Your operating system is compatible with your printer. The Dell AIO Printer A940 supports Windows XP and Windows 2000. General troubleshooting When your printer has a problem, before contacting Dell Customer Support, check the following - Dell A940 All In One Personal Printer | Owner's Manual - Page 57
printer status: a Click Start → Settings → Printers. b Double-click the Dell A940 icon, and then click Printer. c Make sure no check mark appears next to Pause Printing. • Print a test page: a Click Start → Programs → Dell Printers → Dell AIO Printer A940 → Dell All-In-One Center. Troubleshooting - Dell A940 All In One Personal Printer | Owner's Manual - Page 58
www.dell.com/supplies | support.dell.com b Click the Maintenance tab. c From the Maintenance tab, click Print a test page. NOTE: Photos or Display language is not preferable documents containing graphics may take longer If the language on the printer display is not the language you - Dell A940 All In One Personal Printer | Owner's Manual - Page 59
from a printed source, and your copy has a checkerboard pattern on it, follow these directions: For scanning: 1 Open the Dell All-In-One Center. For help, see page 7. The All-In-One Main Page appears on your computer screen. 2 From the Scan... section, click See More Scan Settings. 3 From the What - Dell A940 All In One Personal Printer | Owner's Manual - Page 60
an error message Use this section to understand printer software error messages on your computer screen and messages on the display of your printer. Message: Paper Jam Cover Open Ink Low Paper Out Unlock Scanner Cartridge Error Other messages Go to page: 49 50 50 51 51 51 53 48 Troubleshooting - Dell A940 All In One Personal Printer | Owner's Manual - Page 61
the printer back on. If you cannot reach the paper because it is too far into the printer: 1 Lift the printer (scanner unit), and then pull the paper out. 2 Lower the printer (scanner unit) to close it. 3 Press Power to turn the printer on, and then send your document to print. Troubleshooting 49 - Dell A940 All In One Personal Printer | Owner's Manual - Page 62
messages appears, you can: • Click OK. • Click the ? to get information about ordering supplies. • Order a new cartridge or locate a dealer near you from the Dell Web site at support.dell.com. For help: - Installing a new cartridge, see page 39. - Ordering supplies, see page 38. 50 Troubleshooting - Dell A940 All In One Personal Printer | Owner's Manual - Page 63
hold the scanner support back. 6 Lower the printer (scanner unit) until it is completely closed. NOTE: If your printer has a paper jam, see page 49 for help. 7 Press Power to turn the printer back on. Cartridge Error messages When you get these messages you may need to: • Install cartridges, see - Dell A940 All In One Personal Printer | Owner's Manual - Page 64
support.dell.com Check the table below for specific instructions: Message: Problem: Do this: Black cartridge missing The black cartridge is not Install a black cartridge installed. (part number 7Y743). Color cartridge missing The color cartridge is not Install a color cartridge installed - Dell A940 All In One Personal Printer | Owner's Manual - Page 65
(scanner unit) until it is completely closed. If you get the error message again, while both cartridges are installed, replace both of the cartridges. Other error messages 1 Turn the printer off. 2 Wait a few seconds, and then turn the printer back on. 3 Send your document to print. Troubleshooting - Dell A940 All In One Personal Printer | Owner's Manual - Page 66
A940 CD. If the CD does not start, click Install. 5 Follow the instructions on your computer screen to install the software. Other help sources If the preceding printer solutions do not solve the problem with your printer: • Refer to the Dell Printer Solution Center software for more troubleshooting - Dell A940 All In One Personal Printer | Owner's Manual - Page 67
5 SECTION 5 Regulatory Notices - Dell A940 All In One Personal Printer | Owner's Manual - Page 68
www.dell.com/supplies | support.dell.com Federal Communications Commission (FCC) compliance information statement The Dell AIO Printer A940 has been installation. This equipment generates, uses and can radiate radio frequency energy and, if not installed and used in accordance with the instructions - Dell A940 All In One Personal Printer | Owner's Manual - Page 69
this compliance information statement should be directed to: Dell Products, L.P. One Dell Way Round Rock, Texas 78682 Industry Canada the directives has been signed by the Director of Manufacturing and Technical Support, Dell International, S.A., Boigny, France. This product satisfies the Class B - Dell A940 All In One Personal Printer | Owner's Manual - Page 70
www.dell.com/supplies | support.dell.com ENERGY STAR The EPA ENERGY STAR Office Equipment program is will cut the energy used by up to 50 percent. Dell is proud to be a participant in this program. As an ENERGY STAR Partner, Dell International, Inc. has determined that this product meets the ENERGY - Dell A940 All In One Personal Printer | Owner's Manual - Page 71
6 SECTION 6 Appendix Contacting Dell Limited Warranties and Return Policy Dell Computer Corporation Ink and Toner Cartridges Limited Warranties Dell Software License Agreement - Dell A940 All In One Personal Printer | Owner's Manual - Page 72
11 Aruba Bahamas Barbados Department Name or Service Area, Website and E-Mail Address General Support General Support Website: www.dell.com.ar Tech Support and Customer Care Sales Tech Support Fax Customer Care Fax General Support General Support General Support Area Codes, Local Numbers, and Toll - Dell A940 All In One Personal Printer | Owner's Manual - Page 73
(City) International Access Code Country Code City Code Department Name or Service Area, Website and E-Mail Address Belgium (Brussels) Website: support.euro.dell.com International Access Code: 00 E-mail: [email protected] Country Code: 32 City Code: 2 E-mail for French Speaking Customers - Dell A940 All In One Personal Printer | Owner's Manual - Page 74
Name or Service Area, Website and E-Mail Address Denmark (Copenhagen) Website: support.euro.dell.com International Access Code: 00 Country Code: 45 E-mail Support (portable computers): [email protected] E-mail Support (desktop computers): [email protected] E-mail Support (servers - Dell A940 All In One Personal Printer | Owner's Manual - Page 75
: 00 Country Code: 49 City Code: 6103 Department Name or Service Area, Website and E-Mail Address Website: support.euro.dell.com E-mail: support.euro.dell.com/fr/fr/emaildell/ Home and Small Business Technical Support Customer Care Switchboard Switchboard (calls from outside of France) Sales Fax - Dell A940 All In One Personal Printer | Owner's Manual - Page 76
: 1 Department Name or Service Area, Website and E-Mail Address Website: support.euro.dell.com E-mail: support.euro.dell.com/gr/en/emaildell/ Technical Support Gold Technical Support Switchboard Sales Fax General Support General Support Technical Support Sales Website: support.euro.dell.com E-mail - Dell A940 All In One Personal Printer | Owner's Manual - Page 77
Jamaica Latin America Department Name or Service Area, Website and E-Mail Address Website: support.euro.dell.com E-mail: support.euro.dell.com/it/it/emaildell/ Home and Small Business Technical Support Customer Care Fax Switchboard Corporate Technical Support Customer Care Fax Switchboard General - Dell A940 All In One Personal Printer | Owner's Manual - Page 78
Support Sales Customer Service Main Netherlands Antilles Netherlands (Amsterdam) International Access Code: 00 Country Code: 31 City Code: 20 General Support Website: support.euro.dell.com E-mail (Technical Support): (Enterprise): [email protected] (Latitude): nl_latitude_support@dell - Dell A940 All In One Personal Printer | Owner's Manual - Page 79
Phone City Code: 22 Customer Care Sales Customer Service Fax Reception Desk Fax Switchboard Portugal Website: support.euro.dell.com International Access Code: 00 E-mail: support.euro.dell.com/pt/en/emaildell/ Country Code: 351 Technical Support Customer Care Sales Puerto Rico St. Kitts - Dell A940 All In One Personal Printer | Owner's Manual - Page 80
St. Vincent and the Grenadines General Support Singapore (Singapore) Technical Support International Access Code: 005 Customer Service (Penang, Malaysia) Country Code: 65 Transaction Sales Corporate Sales Spain (Madrid) Website: support.euro.dell.com International Access Code: 00 E-mail - Dell A940 All In One Personal Printer | Owner's Manual - Page 81
Department Name or Service Area, Website and E-Mail Address Website: support.euro.dell.com E-mail: [email protected] E-mail Support for Latitude and Inspiron: [email protected] E-mail Support for OptiPlex: [email protected] E-mail Support for Servers: [email protected] Technical - Dell A940 All In One Personal Printer | Owner's Manual - Page 82
Access Code: 00 Country Code: 44 City Code: 1344 Department Name or Service Area, Website and E-Mail Address Area Codes, Local Numbers, and Toll-Free Numbers Website: support.euro.dell.com Customer Care website: support.euro.dell.com/uk/en/ECare/Form/Home.asp E-mail: dell_direct_support - Dell A940 All In One Personal Printer | Owner's Manual - Page 83
) Customer Service and Technical Support toll-free: 1-800-456-3355 Employee Purchase Program (EPP) Customers toll-free: 1-800-234-1490 Dell Sales toll-free: 1-800-289-3355 or toll-free: 1-800-879-3355 Dell Outlet Store (Dell refurbished computers) toll-free: 1-888-798-7561 Software and - Dell A940 All In One Personal Printer | Owner's Manual - Page 84
of software • Non-Dell-branded and Solution Provider Direct products and accessories • Problems that result from: - External causes such as accident, abuse, misuse, or problems with electrical power - Servicing not authorized by Dell - Usage that is not in accordance with product instructions - Dell A940 All In One Personal Printer | Owner's Manual - Page 85
Medium, Large, or Global Commercial Customers, Healthcare Customers, and Value Added Resellers (VARs): Technical Support and Customer Service Government and Education Customers: Technical Support and Customer Service Dell-Branded Memory U.S. Only 1-800-624-9896 1-800-624-9897 1-800-822-8965 1-800 - Dell A940 All In One Personal Printer | Owner's Manual - Page 86
www.dell.com/supplies | support.dell.com NOTE: Before you ship the product(s) to us, make sure to back up the data on the hard drive(s) and any other storage device(s) in the product(s). Remove any confidential, proprietary, or personal information and removable media such as floppy disks, CDs, or - Dell A940 All In One Personal Printer | Owner's Manual - Page 87
slip or invoice. To return applications software or an operating system that has been installed by Dell, you must return the entire the packing slip or invoice. To return products, e-mail or call Dell customer service to receive a Credit Return Authorization Number within the return policy period - Dell A940 All In One Personal Printer | Owner's Manual - Page 88
of the software • Non-Dell branded and Solution Provider Direct products and accessories • Problems that result from: - External causes such as accident, abuse, misuse, or problems with electrical power - Servicing not authorized by Dell - Usage that is not in accordance with product instructions - Dell A940 All In One Personal Printer | Owner's Manual - Page 89
who purchased through an Employee Purchase Program: Technical Support Customer Service Dell-Branded Memory Canada Only 1-800-847-4096 1-800 not responsible for any of your confidential, proprietary or personal information; lost or corrupted data; or damaged or lost removable media. During the - Dell A940 All In One Personal Printer | Owner's Manual - Page 90
storage device(s) in the product(s). We are not responsible for lost or corrupted data. What if I purchased a service contract? If your service contract is with Dell, service will be provided to you under the terms of the service contract. Please refer to that contract for details on how to obtain - Dell A940 All In One Personal Printer | Owner's Manual - Page 91
, and all of the manuals, floppy disk(s), CD(s), power cables, and other items included with a product must be returned with it. For customers who want to return, for refund or credit only, either application or operating system software that has been installed by Dell, the whole system must - Dell A940 All In One Personal Printer | Owner's Manual - Page 92
invoice; you are responsible for those. To return products, you must call Dell Customer Service at 1-800-387-5759 to receive a Credit Return Authorization Number. You must ship the Dell Software and Peripherals products back to Dell in their original manufacturer's packaging (which must be in as-new - Dell A940 All In One Personal Printer | Owner's Manual - Page 93
/or any rights resulting from other contracts concluded by the end user with Dell and/or any other seller. Dell World Trade LP One Dell Way, Round Rock, TX 78682, USA Dell Computadores do Brasil Ltda (CNPJ No. 72.381.189/0001-10)/ Dell Commercial do Brasil Ltda (CNPJ No. 03 405 822/0001-40) Avenida - Dell A940 All In One Personal Printer | Owner's Manual - Page 94
www.dell.com/supplies | support.dell.com Dell Computer Corporation Ink and Toner Cartridges Limited Warranties The following sections describe the limited warranty for ink and toner cartridges for the U.S., Canada, and Latin America. Refer to the appropriate limited warranty accordingly. Ink and - Dell A940 All In One Personal Printer | Owner's Manual - Page 95
material or manufacturing process for the life of the cartridge. For the original purchaser of genuine Dell-branded ink cartridges, Dell warrants that the cartridges will be free from defects resulting from material or manufacturing process for one year beginning from the date of delivery. If this - Dell A940 All In One Personal Printer | Owner's Manual - Page 96
with the Dell product, for which there is no separate license agreement between you and the manufacturer or owner of the software (collectively the "Software"). By opening or breaking the seal on the Software packet(s), installing or downloading the Software, or using the Software that has - Dell A940 All In One Personal Printer | Owner's Manual - Page 97
are limited to ninety (90) days from the date you receive the Software. Some jurisdictions do not allow limits on the duration of an implied resulted from accident, abuse, misapplication, or service or modification by someone other than Dell. Any replacement disk is warranted for the remaining - Dell A940 All In One Personal Printer | Owner's Manual - Page 98
212 and 48 C.F.R. 227.7202-1 through 227.7202-4, all U.S. Government end users acquire the software and documentation with only those rights set forth herein. Contractor/manufacturer is Dell Products, L.P., One Dell Way, Round Rock, Texas 78682. General This license is effective until terminated. It - Dell A940 All In One Personal Printer | Owner's Manual - Page 99
Software, 4 C Cancel, 4 cards loading, 15 Cartridge Error, 51 cartridges aligning, 41 cleaning, 42 installing, 37 ordering, 38 part numbers, 39 removing, 40 replacing, 37, 39 cleaning ink cartridge nozzles using operator panel, 42 using the Dell Printer Solution Center, 42 cleaning, ink cartridge - Dell A940 All In One Personal Printer | Owner's Manual - Page 100
Information, 11 How To, 10 Maintenance, 11 Troubleshooting, 10 using, 10 display, v E edit document text (OCR), 28 envelopes loading, 15 error messages Cartridge Error, 51 Cover Open, 50 Ink Low, 50 other, 53 Paper Jam, 49 Paper Out, 51 Unlock Scanner, 51 F Fax, 4 faxing, 30 G glossy paper loading - Dell A940 All In One Personal Printer | Owner's Manual - Page 101
removing ink cartridges, 40 repeating images, 20 right arrow, 4 scanner lid, v scanner lock, v scanner support, v scanning, 24 operator panel, 26 placing document, 17 software, 29 scanning multiple images, 28 Select, 4 setup, 2 software, 7 Dell All-In-One Center, 7 Dell Photo Editor, 9 Dell Printer - Dell A940 All In One Personal Printer | Owner's Manual - Page 102
transparencies loading, 15 troubleshooting, 43 Cartridge Error, 51 general, 44 out of paper, 51 Paper Jam, 49 print quality, 46 setup, 44 U uninstalling printer software, 54 Unlock Scanner, 51 using Print Properties, 8 W warranty, 72 90 Index
-
 1
1 -
 2
2 -
 3
3 -
 4
4 -
 5
5 -
 6
6 -
 7
7 -
8
-
9
-
10
-
11
-
12
-
13
-
14
-
15
-
16
-
17
-
18
-
19
-
20
-
21
-
22
-
23
-
24
-
25
-
26
-
27
-
28
-
29
-
30
-
31
-
32
-
33
-
34
-
35
-
36
-
37
-
38
-
39
-
40
-
41
-
42
-
43
-
44
-
45
-
46
-
47
-
48
-
49
-
50
-
51
-
52
-
53
-
54
-
55
-
56
-
57
-
58
-
59
-
60
-
61
-
62
-
63
-
64
-
65
-
66
-
67
-
68
-
69
-
70
-
71
-
72
-
73
-
74
-
75
-
76
-
77
-
78
-
79
-
80
-
81
-
82
-
83
-
84
-
85
-
86
-
87
-
88
-
89
-
90
-
91
-
92
-
93
-
94
-
95
-
96
-
97
-
98
-
99
-
100
-
101
-
102
 |
 |

www.dell.com/supplies | support.dell.com
Dell™ AIO Printer A940
Owner’s Manual
Look Inside For:
• Learning about your printer
• Using your printer
• Maintenance and Troubleshooting