Dell A940 All In One Personal Printer Owner's Manual - Page 33
Reduce/Enlarge, Select, Color, Black, Cancel, Print an image as a multi- poster, Preview Now
 |
View all Dell A940 All In One Personal Printer manuals
Add to My Manuals
Save this manual to your list of manuals |
Page 33 highlights
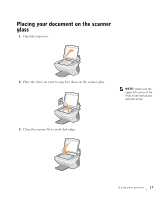
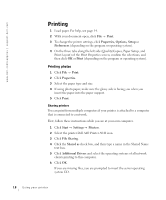
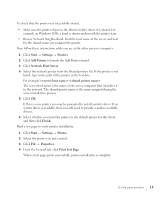
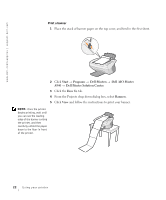
2 Open the top cover. 3 Place your document or item on the scanner glass. For help, see page 17. 4 Close the top cover. 5 On the operator panel, press Reduce/Enlarge. 6 Press + until you see the number of pages to be used for your poster on the display. For example, 2x2 Poster means the image you scan will be enlarged so that it fits on four pages. 7 Press Select. 8 To begin copying, press Color or Black. 9 To create your poster, attach the printed pages so that the image is as continuous and seamless as possible. 10 After your image prints, press Cancel to return to Normal Quality. Using the printer software 1 Load A4 or letter size paper. 2 Open the top cover. 3 Place your document or item on the scanner glass. For help, see page 17. 4 Open the Dell All-In-One Center. For help, see page 7. The All-In-One Main Page appears. 5 From the Creative Tasks section, click Print an image as a multi-page poster. 6 Click Preview Now to view your scanned image. 7 Adjust the dotted lines to fit around the portion of the image you want to print. 8 Click Printer Settings to select your paper size. 9 Click OK. 10 When you are finished customizing your document, click Print Now. Using your printer 21
-
 1
1 -
2
-
3
-
4
-
5
-
6
-
7
-
8
-
9
-
10
-
11
-
12
-
13
-
14
-
15
-
16
-
17
-
18
-
19
-
20
-
21
-
22
-
23
-
24
-
25
-
26
-
27
-
 28
28 -
 29
29 -
 30
30 -
 31
31 -
 32
32 -
 33
33 -
 34
34 -
 35
35 -
 36
36 -
 37
37 -
 38
38 -
39
-
40
-
41
-
42
-
43
-
44
-
45
-
46
-
47
-
48
-
49
-
50
-
51
-
52
-
53
-
54
-
55
-
56
-
57
-
58
-
59
-
60
-
61
-
62
-
63
-
64
-
65
-
66
-
67
-
68
-
69
-
70
-
71
-
72
-
73
-
74
-
75
-
76
-
77
-
78
-
79
-
80
-
81
-
82
-
83
-
84
-
85
-
86
-
87
-
88
-
89
-
90
-
91
-
92
-
93
-
94
-
95
-
96
-
97
-
98
-
99
-
100
-
101
-
102
 |
 |
