Dell Alienware 18 Owner's Manual - Page 107
Replacing the Wireless Mini-Card, Procedure
 |
View all Dell Alienware 18 manuals
Add to My Manuals
Save this manual to your list of manuals |
Page 107 highlights
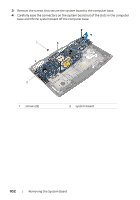
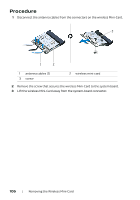
Replacing the Wireless Mini-Card WARNING: Before working inside your computer, read the safety information that shipped with your computer and follow the steps in "Before You Begin" on page 11. For additional safety best practices information, see the Regulatory Compliance Homepage at dell.com/regulatory_compliance. Procedure 1 Align the notch on the wireless Mini-Card with the tab on the system-board connector. CAUTION: Use firm and even pressure to slide the wireless Mini-Card into place. If you use excessive force, you may damage the connector. CAUTION: The connectors are keyed to ensure correct insertion. If you feel resistance, check the connectors on the wireless Mini-Card and on the system board, and realign the wireless Mini-Card. CAUTION: To avoid damage to the wireless Mini-Card, never place cables under the wireless Mini-Card. 2 Insert the wireless Mini-Card connector at a 45-degree angle into the system-board connector. 3 Press the other end of the wireless Mini-Card down into the slot on the system board and replace the screws that secure the wireless Mini-Card to the system board. 4 Connect the antenna cables to the connectors on the wireless Mini-Card. The following table provides the antenna cable color scheme for the wireless Mini-Card supported by your computer. Connectors on the wireless Mini-Card Antenna Cable Color Scheme WLAN + Bluetooth (2 or 3 cables) Main WLAN + Bluetooth (white triangle) Auxiliary WLAN + Bluetooth (black triangle) Auxiliary WLAN + Bluetooth (black triangle) white black grey Replacing the Wireless Mini-Card | 107
-
 1
1 -
2
-
3
-
4
-
5
-
6
-
7
-
8
-
9
-
10
-
11
-
12
-
13
-
14
-
15
-
16
-
17
-
18
-
19
-
20
-
21
-
22
-
23
-
24
-
25
-
26
-
27
-
28
-
29
-
30
-
31
-
32
-
33
-
34
-
35
-
36
-
37
-
38
-
39
-
40
-
41
-
42
-
43
-
44
-
45
-
46
-
47
-
48
-
49
-
50
-
51
-
52
-
53
-
54
-
55
-
56
-
57
-
58
-
59
-
60
-
61
-
62
-
63
-
64
-
65
-
66
-
67
-
68
-
69
-
70
-
71
-
72
-
73
-
74
-
75
-
76
-
77
-
78
-
79
-
80
-
81
-
82
-
83
-
84
-
85
-
86
-
87
-
88
-
89
-
90
-
91
-
92
-
93
-
94
-
95
-
96
-
97
-
98
-
99
-
100
-
101
-
 102
102 -
 103
103 -
 104
104 -
 105
105 -
 106
106 -
 107
107 -
 108
108 -
 109
109 -
 110
110 -
 111
111 -
 112
112 -
113
-
114
-
115
-
116
-
117
-
118
-
119
 |
 |