Dell E521 Owner's Manual - Page 105
Replacing the Computer Cover
 |
UPC - 015561600385
View all Dell E521 manuals
Add to My Manuals
Save this manual to your list of manuals |
Page 105 highlights
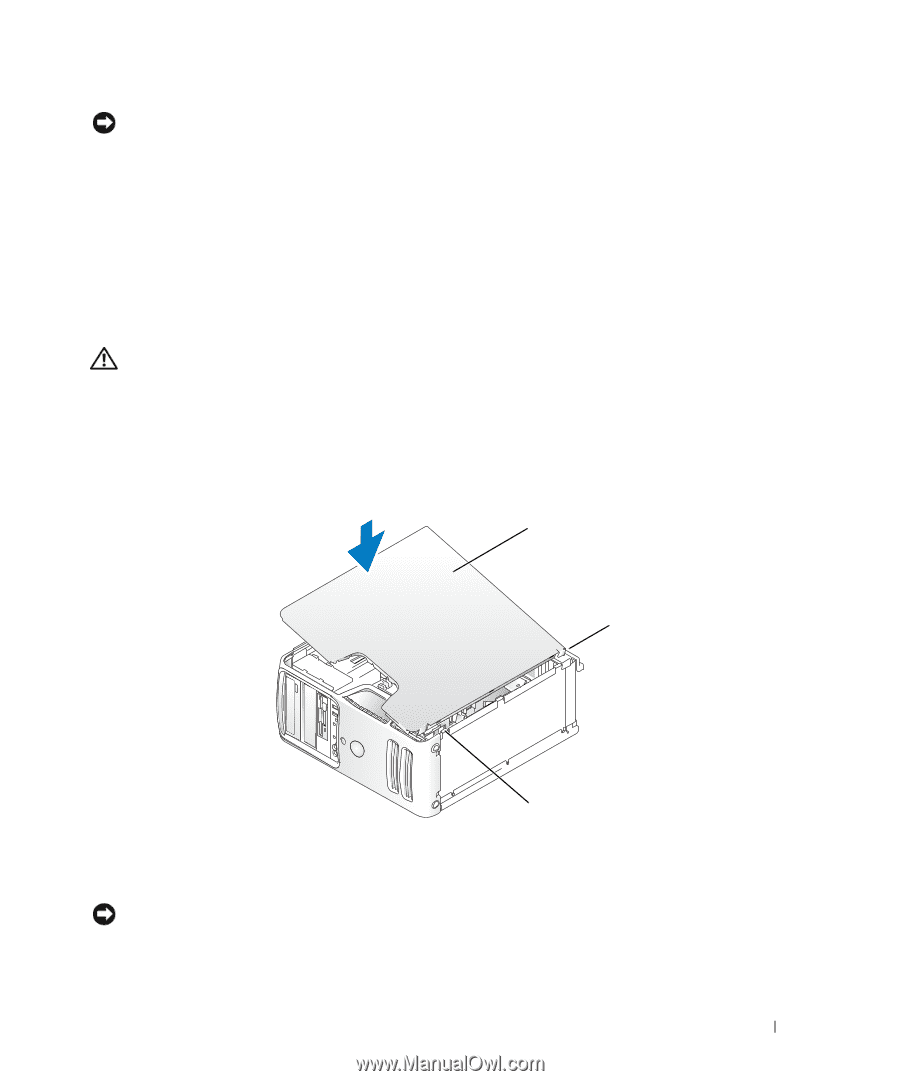
NOTICE: To connect a network cable, first plug the cable into the network device and then plug it into the computer. 8 Connect your computer and devices to electrical outlets, and then turn them on. 9 Enter system setup (see "System Setup" on page 111) and restore the settings you recorded in step 1. Then go to the Maintenance section and clear the low battery and other errors associated with the battery replacement in the Event Log. 10 Properly dispose of the old battery. See the Product Information Guide for battery disposal information. Replacing the Computer Cover CAUTION: Before you begin any of the procedures in this section, follow the safety instructions located in the Product Information Guide. 1 Ensure that all cables are connected, and fold cables out of the way. 2 Ensure that no tools or extra parts are left inside the computer. 3 Align the bottom of the cover with the tabs located along the bottom edge of the computer. 4 Using the tabs as leverage, rotate the cover downward and press down to close it. 1 2 3 1 computer cover 2 back of computer 3 bottom hinge tabs 5 Ensure that the cover is seated correctly before moving it to the upright position. NOTICE: To connect a network cable, first plug the cable into the network device and then plug it into the computer. 6 Connect your computer and devices to electrical outlets, and turn them on. Removing and Installing Parts 105
-
 1
1 -
2
-
3
-
4
-
5
-
6
-
7
-
8
-
9
-
10
-
11
-
12
-
13
-
14
-
15
-
16
-
17
-
18
-
19
-
20
-
21
-
22
-
23
-
24
-
25
-
26
-
27
-
28
-
29
-
30
-
31
-
32
-
33
-
34
-
35
-
36
-
37
-
38
-
39
-
40
-
41
-
42
-
43
-
44
-
45
-
46
-
47
-
48
-
49
-
50
-
51
-
52
-
53
-
54
-
55
-
56
-
57
-
58
-
59
-
60
-
61
-
62
-
63
-
64
-
65
-
66
-
67
-
68
-
69
-
70
-
71
-
72
-
73
-
74
-
75
-
76
-
77
-
78
-
79
-
80
-
81
-
82
-
83
-
84
-
85
-
86
-
87
-
88
-
89
-
90
-
91
-
92
-
93
-
94
-
95
-
96
-
97
-
98
-
99
-
 100
100 -
 101
101 -
 102
102 -
 103
103 -
 104
104 -
 105
105 -
 106
106 -
 107
107 -
 108
108 -
 109
109 -
 110
110 -
111
-
112
-
113
-
114
-
115
-
116
-
117
-
118
-
119
-
120
-
121
-
122
-
123
-
124
-
125
-
126
-
127
-
128
-
129
-
130
-
131
-
132
-
133
-
134
-
135
-
136
-
137
-
138
-
139
-
140
-
141
-
142
-
143
-
144
-
145
-
146
-
147
-
148
-
149
-
150
-
151
-
152
-
153
-
154
-
155
-
156
-
157
-
158
 |
 |