Dell Latitude ATG D620 User Guide - Page 53
Before You Begin, Hinge Cover
 |
View all Dell Latitude ATG D620 manuals
Add to My Manuals
Save this manual to your list of manuals |
Page 53 highlights
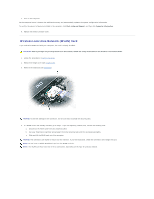
NOTICE: To avoid electrostatic discharge, ground yourself by using a wrist grounding strap or by periodically touching an unpainted metal surface (such as the back panel) on the computer. 1. Follow the instructions in Before You Begin. 2. Turn the computer right-side up and open it. 1 hinge cover 2 3. Remove the hinge cover (see Hinge Cover). keyboard 1 keyboard tabs (5) 2 screws (3) 3 palm rest 4 keyboard connector on system board 5 keyboard cable connector 6 pull-tab NOTICE: The keycaps on the keyboard are fragile, easily dislodged, and time-consuming to replace. Be careful when removing and handling the keyboard. 4. Remove the three screws across the top of the keyboard. NOTE: Lift the keyboard carefully in step 5 to ensure that you do not pull on the keyboard cable. 5. Rotate the keyboard up 90-degrees and lay it on the palm rest to gain access to the keyboard connector.
-
 1
1 -
2
-
3
-
4
-
5
-
6
-
7
-
8
-
9
-
10
-
11
-
12
-
13
-
14
-
15
-
16
-
17
-
18
-
19
-
20
-
21
-
22
-
23
-
24
-
25
-
26
-
27
-
28
-
29
-
30
-
31
-
32
-
33
-
34
-
35
-
36
-
37
-
38
-
39
-
40
-
41
-
42
-
43
-
44
-
45
-
46
-
47
-
 48
48 -
 49
49 -
 50
50 -
 51
51 -
 52
52 -
 53
53 -
 54
54 -
 55
55 -
 56
56 -
 57
57 -
 58
58 -
59
-
60
-
61
-
62
-
63
-
64
-
65
-
66
-
67
-
68
-
69
-
70
-
71
-
72
-
73
-
74
-
75
-
76
-
77
-
78
-
79
-
80
-
81
-
82
-
83
-
84
-
85
-
86
-
87
-
88
-
89
-
90
-
91
-
92
-
93
-
94
-
95
-
96
-
97
-
98
-
99
-
100
-
101
-
102
 |
 |
