Dell PowerConnect W-IAP175P Installation Guide - Page 12
Grounding, Installing Antennas, Weatherproofing Connections, Required Items and Tools
 |
View all Dell PowerConnect W-IAP175P manuals
Add to My Manuals
Save this manual to your list of manuals |
Page 12 highlights
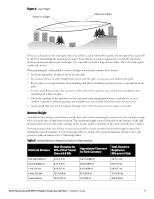
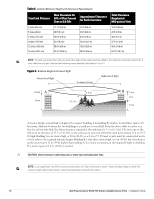
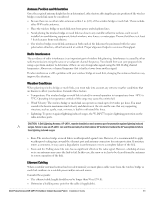
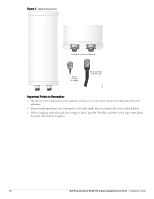
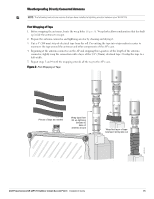
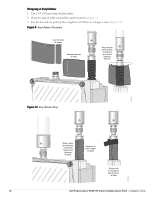
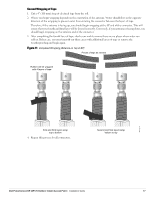
Determine if conduits, bracing, or other structures are required for safety or protection of the cable. For lightning protection at the power injector end of the cable, consider using a lightning arrestor immediately before the cable enters the building Grounding It is important that the wireless bridge or mesh link, cables, and any supporting structures are properly grounded. Each W-IAP175 access point includes a grounding screw for attaching a ground wire. CAUTION: Be sure that grounding is available and that it meets local and national electrical codes. Ground the access point first using the external ground stud on the unit before making any other connection. Installing Antennas 1. Before connecting the antennas, identify which of your antennas are 2.4 GHz and which are 5 GHz. On the W-IAP175, the 2.4 GHz antennas must be installed the R1 radio interfaces and the 5.0 GHz must be installed on the R0 radio interfaces. 2. After identifying which antennas will go where, install them by placing the antenna connector over the corresponding connector and the AP and turning the connector clockwise until hand tight. Repeat this process for each antenna. 3. Place the included metal weatherproof caps over any unused antenna interfaces by turning them clockwise until hand tight. Weatherproofing Connections Weatherproofing your antenna and/or cable connections on your outdoor AP is essential to reliability and longevity of your product. This process prevents water from entering the AP or antennas through the connectors. A good weatherproofing job consists of three wrappings: 1. electrical tape 2. butyl rubber 3. electrical tape The first wrapping of tape should be at least two layers, followed by a single wrap of butyl rubber, and four-layer wrap of electrical tape. This provides good protection from water, heat, and other potential hazards that could damage your AP or antennas. Additionally, wrap your connections such that water is always directed down and away from connections. Required Items and Tools 3/4" (19 mm) Vinyl Electrical Tape Butyl Rubber Tape Knife or Box Cutter Types of Connections The following sections provide guidance on weatherproofing directly connected antennas (Figure 6) and cable connections (Figure 7). The same materials are needed for weatherproofing both types of connections but the procedure is slightly different. For weatherproofing directly connected antennas, see "Weatherproofing Directly 12 Dell PowerConnect W-IAP175 Outdoor Instant Access Point | Installation Guide
-
 1
1 -
2
-
3
-
4
-
5
-
6
-
 7
7 -
 8
8 -
 9
9 -
 10
10 -
 11
11 -
 12
12 -
 13
13 -
 14
14 -
 15
15 -
 16
16 -
 17
17 -
18
-
19
-
20
-
21
-
22
-
23
-
24
-
25
-
26
-
27
-
28
-
29
-
30
-
31
-
32
 |
 |
