Dell PowerConnect W-IAP175P Installation Guide - Page 27
Connecting a Power Cable to the W-IAP175AC, Cable Connection Steps
 |
View all Dell PowerConnect W-IAP175P manuals
Add to My Manuals
Save this manual to your list of manuals |
Page 27 highlights
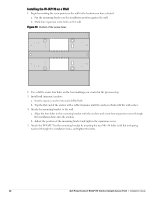
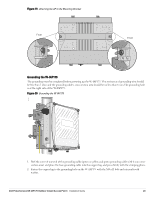
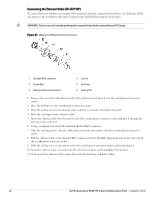
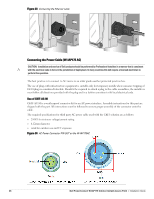
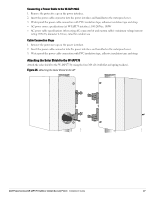
Connecting a Power Cable to the W-IAP175AC 1. Remove the protective cap on the power interface. 2. Insert the power cable connector into the power interface and hand-fasten the waterproof cover. 3. Water-proof the power cable connection with PVC insulation tape, adhesive insulation tape and strap. AC power source specifications (at W-IAP175 interface): 100-240Vac, 100W AC power cable specifications (when using AC connector kit and custom cable): minimum voltage/current rating 250V/1A, diameter 6-12mm, rated for outdoor use Cable Connection Steps 1. Remove the protective cap on the power interface. 2. Insert the power cable connector into the power interface and hand-fasten the waterproof cover. 3. Water-proof the power cable connection with PVC insulation tape, adhesive insulation tape and strap. Attaching the Solar Shield to the W-IAP175 Attach the solar shield to the W-IAP175 by using the four M4 x16 (with flat and spring washers). Figure 25 Attaching the Solar Shield to the AP AP175_08 AP175_07 Dell PowerConnect W-IAP175 Outdoor Instant Access Point | Installation Guide 27
-
 1
1 -
2
-
3
-
4
-
5
-
6
-
7
-
8
-
9
-
10
-
11
-
12
-
13
-
14
-
15
-
16
-
17
-
18
-
19
-
20
-
21
-
 22
22 -
 23
23 -
 24
24 -
 25
25 -
 26
26 -
 27
27 -
 28
28 -
 29
29 -
 30
30 -
 31
31 -
 32
32
 |
 |
