Dell PowerEdge 2400 Rack Installation Guide - Page 24
Removing the Feet, Installation, and Troubleshooting Guide
 |
View all Dell PowerEdge 2400 manuals
Add to My Manuals
Save this manual to your list of manuals |
Page 24 highlights
plastic screws (4) rubber feet (4) bottom of chassis Figure 1-10. Removing the Feet 3. From the outside of the chassis, pry each foot from the chassis. 4. Turn the computer over and lay it on the bottom side. 5. Remove the front bezel and the left- and right-side computer covers. See Chapter 7, "Checking Inside the Computer", in the computer's Installation and Troubleshooting Guide for instructions on removing the bezel and computer covers. 6. Remove the two screws at the front edge of the top cover (see Figure 1-11). (Retain the screws for later use.) 7. Slide the top cover about one-half of an inch toward the front of the computer, and lift it away. 1-12 Dell PowerEdge 2400 Systems Rack Installation Guide
-
 1
1 -
2
-
3
-
4
-
5
-
6
-
7
-
8
-
9
-
10
-
11
-
12
-
13
-
14
-
15
-
16
-
17
-
18
-
 19
19 -
 20
20 -
 21
21 -
 22
22 -
 23
23 -
 24
24 -
 25
25 -
 26
26 -
 27
27 -
 28
28 -
 29
29 -
30
-
31
-
32
 |
 |

1-12
Dell PowerEdge 2400 Systems Rack Installation Guide
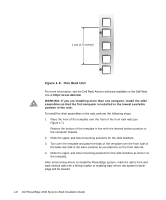
Figure 1-10.
Removing the Feet
3.
From the outside of the chassis, pry each foot from the chassis.
4.
Turn the computer over and lay it on the bottom side.
5.
Remove the front bezel and the left- and right-side computer covers.
See Chapter 7,
“
Checking Inside the Computer
”
, in the computer
’
s
Installation
and Troubleshooting Guide
for instructions on removing the bezel and computer
covers.
6.
Remove the two screws at the front edge of the top cover (see Figure 1-11).
(Retain the screws for later use.)
7.
Slide the top cover about one-half of an inch toward the front of the computer,
and lift it away.
bottom of chassis
rubber feet (4)
plastic screws (4)