Dell PowerEdge 2400 Rack Installation Guide - Page 26
Installing the Computer, Installing the Rack Adapter and Shoulder Screws
 |
View all Dell PowerEdge 2400 manuals
Add to My Manuals
Save this manual to your list of manuals |
Page 26 highlights
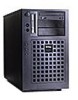
shoulder screws (3) rack adapter 8-32 x 0.313-inch screws (2) Figure 1-12. Installing the Rack Adapter and Shoulder Screws 11. Install the rack adapter on the computer (see Figure 1-12). Secure the rack adapter to the computer with two 8-32 x 0.313-inch Phillips-head screws. Installing the Computer To install the computer in the rack, perform the following steps. WARNING: If you are installing more than one computer, install the first computer in the lowest available position in the rack. Never pull more than one component out of the rack at a time. 1. Pull the two interior slide assemblies out of the rack until they lock in the extended position. CAUTION: Because of the size and weight of the computer, never attempt to install the computer in the slide assemblies by yourself. 2. Lift the computer into position. Place one hand on the front-bottom side of the computer and the other hand on the back-bottom side of the computer. 1-14 Dell PowerEdge 2400 Systems Rack Installation Guide
-
 1
1 -
2
-
3
-
4
-
5
-
6
-
7
-
8
-
9
-
10
-
11
-
12
-
13
-
14
-
15
-
16
-
17
-
18
-
19
-
20
-
 21
21 -
 22
22 -
 23
23 -
 24
24 -
 25
25 -
 26
26 -
 27
27 -
 28
28 -
 29
29 -
 30
30 -
 31
31 -
32
 |
 |
