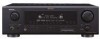
Denon AVR 787 Owners Manual - English - Page 14
Enter, System Setup - no sound
 |
UPC - 081757507172
View all Denon AVR 787 manuals
Add to My Manuals
Save this manual to your list of manuals |
Page 14 highlights
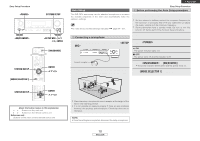
ENGLISH Easy Setup Procedure e Perform the Auto Setup procedure 1 Press SYSTEM SETUP. 2 Press D H to select "Auto Setup", then press ENTER. 3 Press D H to select "Auto Setup", then press ENTER. The message "Connect Microphone" is displayed if no microphone is connected. If so, connect the auto setup microphone. 1 Surround Back: Assign to use as surround back speaker. ZONE2: Assign to use as "ZONE2" speakers. Front A, Front B: Assign to use the "Front A" or "Front B" speakers with bi-amp connections. When assigned to "Front" or "ZONE2", skip the surround back channel measurement. During the auto setup procedure, test tones are not output to "ZONE2". 2 3 • "System Setup" menu is not displayed when using headphones. t Switching the front speaker Press D H to select "Front Sp", then press F G to select the speaker. Front A Front B Front A+B Easy Setup Procedure NOTE: • Do not change the speaker connections or subwoofer volume after making the measurements. • Do not turn off the power while the data is being stored. Cautions during measurements: • Loud test tones are output during the measurements. Be careful for example when small children are nearby. • Proper measurements may not be possible if there are obstacles between the speaker and the setup microphone. • During the measurements, do not stand between or near the speakers and setup microphone. • To avoid influencing the measurements, turn off the power of air- conditioners or any other equipment producing sound in the room. Perform the measurements with the room as quiet as possible. • Measurement is cancelled when VOLUME is operated while the Auto Setup is performed. r Assigning power amplifiers The surround back output can be assigned to the "Front" or "ZONE2" output. Press D H to select "Power Amp Assign", then press F G to set. y Starting Auto Setup Press D H to select "Start", then press F. • Start the measurements. Measurement of each channel is performed as follows: FL FR 1 2 C SW SL SR SBL SBR 1: The subwoofer speaker is measured twice. 2: Not displayed when "ZONE2" and "FRONT" are set at "Setting the Power Amplifier Assignment" ( page 53). • After each channel is measured, "Calculating" appears. • The display switches to the Auto Setup check screen automatically. 11 ENGLISH ¢ About automatic retry To confirm the results of the measurements, remeasurement is automatically performed. Remeasurement is performed up to two times. During this time, "Retry1" or "Retry2" is displayed on the screen.
-
 1
1 -
2
-
3
-
4
-
5
-
6
-
7
-
8
-
 9
9 -
 10
10 -
 11
11 -
 12
12 -
 13
13 -
 14
14 -
 15
15 -
 16
16 -
 17
17 -
 18
18 -
 19
19 -
20
-
21
-
22
-
23
-
24
-
25
-
26
-
27
-
28
-
29
-
30
-
31
-
32
-
33
-
34
-
35
-
36
-
37
-
38
-
39
-
40
-
41
-
42
-
43
-
44
-
45
-
46
-
47
-
48
-
49
-
50
-
51
-
52
-
53
-
54
-
55
-
56
-
57
-
58
-
59
-
60
-
61
-
62
-
63
-
64
-
65
-
66
-
67
-
68
-
69
-
70
-
71
-
72
-
73
-
74
 |
 |
