Denon AVR 787 Owners Manual - English - Page 16
Connecting Other Sources
 |
UPC - 081757507172
View all Denon AVR 787 manuals
Add to My Manuals
Save this manual to your list of manuals |
Page 16 highlights
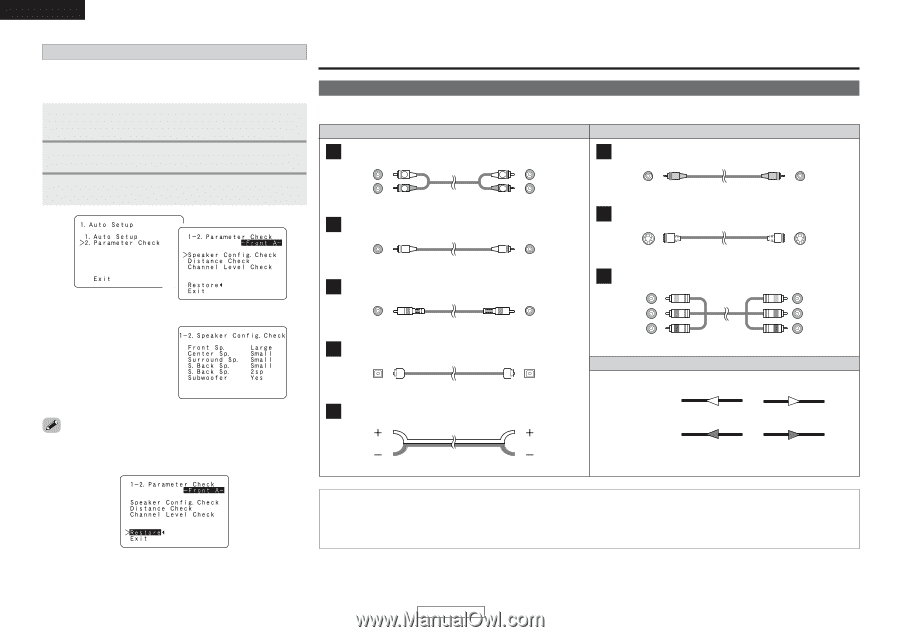
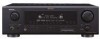
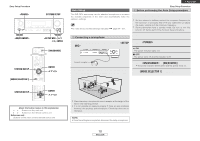
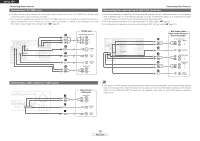
ENGLISH Easy Setup Procedure Check the parameter • The results of the measured items can be checked. • This item is displayed, after the measurement result of the "Auto Setup" is decided. 1 Press D H to select "Parameter Check", then press ENTER. Connecting Other Sources Cable indications The hookup diagrams on the subsequent pages assume the use of the following optional connection cables (not supplied). Audio cable Video cable 2 Press D H to select the item, then press ENTER. 3 Press ENTER. 1 2 A Analog connections (Stereo) (White) (Red) L L R R Pin-plug cable B Analog connections (Monaural, for subwoofer) F Video connections (Yellow) Video cable (75 Ω/ohms video pin-plug cable) G S-Video connections h (Press ENTER.) Pin-plug cable C Digital connections (Coaxial) (Orange) Coaxial cable (75 Ω/ohms pin-plug cable) D Digital connections (Optical) S-Video cable H Component video connections (Green) (Blue) (Red) Component video cable Signal direction (Y) (PB/CB) (PR/CR) Example: Speaker Configuration Check • To reset: Press D H to select "Restore" at the "Parameter Check" screen, then press F. Optical fiber cable E Speaker connections Speaker cable Audio signal IN OUT OUT IN Video signal IN OUT OUT IN NOTE: • Do not plug in the power supply cord until all connections have been completed. • When making connections, also refer to the operating instructions of the other components. • Be sure to connect the left and right channels properly (left with left, right with right). • Do not bundle power cords together with speaker cables. Doing so could result in humming or noise. 13 ENGLISH
-
 1
1 -
2
-
3
-
4
-
5
-
6
-
7
-
8
-
9
-
10
-
 11
11 -
 12
12 -
 13
13 -
 14
14 -
 15
15 -
 16
16 -
 17
17 -
 18
18 -
 19
19 -
 20
20 -
 21
21 -
22
-
23
-
24
-
25
-
26
-
27
-
28
-
29
-
30
-
31
-
32
-
33
-
34
-
35
-
36
-
37
-
38
-
39
-
40
-
41
-
42
-
43
-
44
-
45
-
46
-
47
-
48
-
49
-
50
-
51
-
52
-
53
-
54
-
55
-
56
-
57
-
58
-
59
-
60
-
61
-
62
-
63
-
64
-
65
-
66
-
67
-
68
-
69
-
70
-
71
-
72
-
73
-
74
 |
 |