Denon AVR 787 Owners Manual - English - Page 54
Setting the Video Convert, Setting the Audio Delay, Setting the Component In Assignment
 |
UPC - 081757507172
View all Denon AVR 787 manuals
Add to My Manuals
Save this manual to your list of manuals |
Page 54 highlights
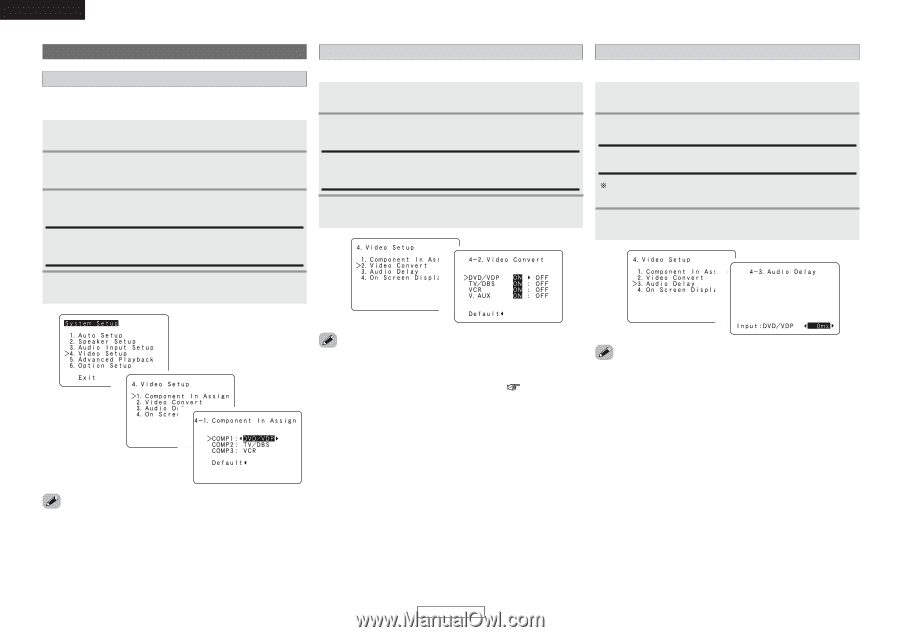
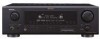
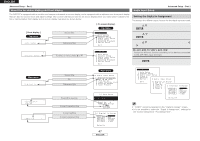
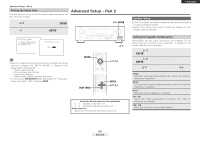
ENGLISH Advanced Setup - Part 1 Video Setup Setting the Video Convert Setting the Component In Assignment This assigns the different input sources for the component video input terminals. 1 Press D H to select "Video Setup", then press ENTER. This sets whether or not to use the video conversion function. 1 Press D H to select "Video Convert", then press ENTER. 2 Press D H to select the input source, then press F G to set. 2 Press D H to select "Component In Assign", then press ENTER. ON, OFF: Select "ON" to use the video conversion function, "OFF" if you do not want to use it. 3 3 Press D H to select the input terminals, then press F G to set. Press ENTER. DVD/VDP, TV/DBS, VCR, V.AUX: Assign the different input sources to "COMP1", "COMP2" or 1 "COMP3". 2 4 Press ENTER. Advanced Setup - Part 1 Setting the Audio Delay Adjust the time delay between the video and audio signals. 1 Press D H to select "Audio Delay", then press ENTER. 2 Press F G to set. 0 ms ~ 200 ms: Adjust the time delay. With a movie source, for example, adjust so that the movement of the actors' lips is synchronized with the sound. 3 Press ENTER. 1 2 1 2 3 • Down-converting from the component video signal to the S-Video and composite video signal is not possible, so when not using the component video monitor output terminal connect the player using the S-Video or composite video input terminal ( page 14). • When a non-standard video signal from a game machine or some other source is input, the video conversion function might not operate. If this happens, please set the conversion mode to "OFF". • When the video conversion function has been used, information such as that of text broadcasts which has been added to the video signal might not be output. If this happens, please set the conversion mode to "OFF". • By default, this menu is not displayed when no digital signals are being input. • To make this setting for the component video signal, select the delay time and turn the on screen display off, then check that the timing of the component video and audio match. • The audio delay setting does not apply when playing in the EXT. IN mode or in the analog input direct mode or stereo mode (Front speaker setting "Large" and TONE DEFEAT "ON"). • It is not possible to make the "Component In Assignment" settings for the function assigned at "iPod Assignment". 51 ENGLISH
-
 1
1 -
2
-
3
-
4
-
5
-
6
-
7
-
8
-
9
-
10
-
11
-
12
-
13
-
14
-
15
-
16
-
17
-
18
-
19
-
20
-
21
-
22
-
23
-
24
-
25
-
26
-
27
-
28
-
29
-
30
-
31
-
32
-
33
-
34
-
35
-
36
-
37
-
38
-
39
-
40
-
41
-
42
-
43
-
44
-
45
-
46
-
47
-
48
-
 49
49 -
 50
50 -
 51
51 -
 52
52 -
 53
53 -
 54
54 -
 55
55 -
 56
56 -
 57
57 -
 58
58 -
 59
59 -
60
-
61
-
62
-
63
-
64
-
65
-
66
-
67
-
68
-
69
-
70
-
71
-
72
-
73
-
74
 |
 |