Dewalt DW074KD Instruction Manual - Page 13
LASER MAINTENANCE, Field Calibration Check Fig. 14-16 - self leveling
 |
View all Dewalt DW074KD manuals
Add to My Manuals
Save this manual to your list of manuals |
Page 13 highlights
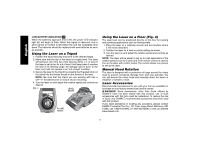
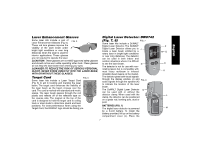
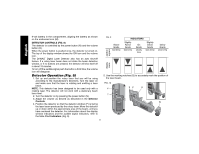
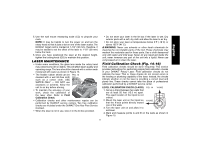
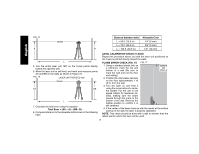
English 5. Use the wall mount measuring scale (CC) to pinpoint your mark. NOTE: It may be helpful to turn the power on and turn the rotary head so that it puts a dot on one of the laser scales. The DEWALT target card is marked at 1-1/2" (38 mm), therefore, it may be easiest to set the offset of the laser to 1-1/2" (38 mm) below the track. 6. Once you have positioned the laser at the desired height, tighten the locking knob (GG) to maintain this position. LASER MAINTENANCE • Under some conditions, the glass lens inside the rotary head may collect some dirt or debris. This will affect beam quality and operating range. The lens should be cleaned with a cotton swab moistened with water as shown in Figure 13. • The flexible rubber shield can be FIG. 13 cleaned with a wet lint-free cloth such as a cotton cloth. USE WATER ONLY - DO NOT use cleansers or solvents. Allow the unit to air dry before storing. • To maintain the accuracy of your work, check the calibration of the laser often. Refer to Field Calibration Check. • Calibration checks and other maintenance repairs can be performed by DEWALT service centers. Two free calibration checks are included under the DEWALT One Year Free Service Contract. • When the laser is not in use, store it in the kit box provided. • Do not store your laser in the kit box if the laser is wet. Dry exterior parts with a soft, dry cloth and allow the laser to air dry. • Do not store your laser at temperatures below 0˚F (-18˚C) or above 105˚F (41˚C). WARNING: Never use solvents or other harsh chemicals for cleaning the non-metallic parts of the tool. These chemicals may weaken the materials used in these parts. Use a cloth dampened only with water and mild soap. Never let any liquid get inside the unit; never immerse any part of the unit into a liquid. Never use compressed air to clean the laser. Field Calibration Check (Fig. 14-16) Field calibration checks should be done frequently. This section provides instructions for performing simple field calibration checks of your DEWALT Rotary Laser. Field calibration checks do not calibrate the laser. That is, these checks do not correct errors in the leveling or plumbing capability of the laser. Instead, the checks indicate whether or not the laser is providing a correct level and plumb line. These checks cannot take the place of professional calibration performed by a DEWALT service center. LEVEL CALIBRATION CHECK (X-AXIS) FIG. 14 Y-AXIS 1. Set up a tripod between two walls that are at least 50 feet (15.3 m) apart. The exact location of the tripod is not critical. 2. Mount the laser unit on the tripod so X-AXIS that the X-axis points directly toward one of the walls. 3. Turn the laser unit on and allow it to self-level. 4. Mark and measure points A and B on the walls as shown in Figure 15. 11
-
 1
1 -
2
-
3
-
4
-
5
-
6
-
7
-
 8
8 -
 9
9 -
 10
10 -
 11
11 -
 12
12 -
 13
13 -
 14
14 -
 15
15 -
 16
16 -
 17
17 -
 18
18 -
19
-
20
-
21
-
22
-
23
-
24
-
25
-
26
-
27
-
28
-
29
-
30
-
31
-
32
-
33
-
34
-
35
-
36
-
37
-
38
-
39
-
40
-
41
-
42
-
43
-
44
-
45
-
46
-
47
-
48
 |
 |