Dewalt DW074KD Instruction Manual - Page 8
Using the Laser on a Tripod, Using the Laser on a Floor Fig. 4, Manual Head Rotation, Laser
 |
View all Dewalt DW074KD manuals
Add to My Manuals
Save this manual to your list of manuals |
Page 8 highlights
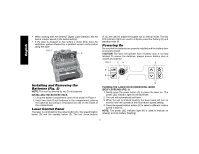
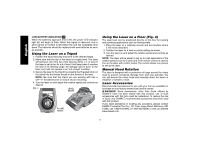
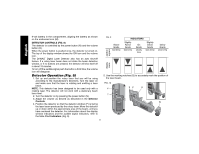
English LOW BATTERY INDICATION When the batteries approach end of life, the power LED indicator light (H) will begin to flash. When this signal is observed, only a short period of runtime is left before the unit will completely shut down. The batteries should be replaced with new batteries as soon as possible. Using the Laser on a Tripod 1. Position the tripod securely and set it to the desired height. 2. Make sure that the top of the tripod is roughly level. The laser will self-level only if the top of the tripod is within ± 5˚ of level. If the laser is set up too far out of level, it will beep when it reaches the limit of its leveling range. No damage will be done to the laser, but it will not operate in an "out of level" condition. 3. Secure the laser to the tripod by screwing the threaded knob on the tripod into the female thread on the bottom of the laser. NOTE: Be sure that the tripod you are working with has a 5/8"-11 threaded screw to ensure secure mounting. 4. Turn the laser on and adjust the rotation speed and controls as desired. FIG. 4 LEVEL MODE PLUMB MODE Using the Laser on a Floor (Fig. 4) The laser level can be positioned directly on the floor for leveling and plumbing applications such as framing walls. 1. Place the laser on a relatively smooth and level surface where it will not be disturbed. 2. Position the laser for a level or plumb setting as shown. 3. Turn the laser on and adjust the rotation speed and controls as desired. NOTE: The laser will be easier to set up for wall applications if the rotation speed is set to 0 rpms and if the remote control is used to line up the laser with control marks. The remote allows one person to set up the laser. Manual Head Rotation The laser is designed with a protective roll cage around the rotary head to prevent accidental damage from work site activities. You can still access the rotary head and manually direct the beam to establish or transfer a mark. Laser Accessories Recommended accessories for use with your tool are available for purchase at your factory-owned local service center. WARNING: Since accessories, other than those offered by DEWALT, have not been tested with this product, use of such accessories with this tool could be hazardous. To reduce the risk of injury, only DEWALT, recommended accessories should be used with this product. If you need assistance in locating any accessory, please contact DEWALT Industrial Tool Co., 701 East Joppa Road, Baltimore, MD 21286, call 1-800-4-DEWALT (1-800-433-9258) or visit our website www.dewalt.com. 6
-
 1
1 -
2
-
 3
3 -
 4
4 -
 5
5 -
 6
6 -
 7
7 -
 8
8 -
 9
9 -
 10
10 -
 11
11 -
 12
12 -
 13
13 -
14
-
15
-
16
-
17
-
18
-
19
-
20
-
21
-
22
-
23
-
24
-
25
-
26
-
27
-
28
-
29
-
30
-
31
-
32
-
33
-
34
-
35
-
36
-
37
-
38
-
39
-
40
-
41
-
42
-
43
-
44
-
45
-
46
-
47
-
48
 |
 |
