Epson BrightLink Pro 1450Ui Installation Guide - Control Pad and Touch Unit - Page 18
Connect the cable, Adjust the angle
 |
View all Epson BrightLink Pro 1450Ui manuals
Add to My Manuals
Save this manual to your list of manuals |
Page 18 highlights
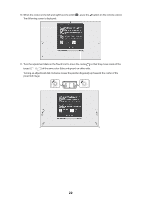
English F Connect the cable Connect the Touch Unit connection cable that is connected to the projector to the port on the Touch Unit. G Adjust the angle Adjust the angle of the laser light coming from the Touch Unit so that the Touch Unit can detect the position of your fingers. Make sure to calibrate the interactive pen(s) before adjusting the angle. Press the User button on the remote control and select Yes to perform an auto-calibration. Refer to the projector's User's Guide for detailed instructions on calibrating the pen(s). 1. Select Easy Interactive Function from the Extended menu. 17
-
 1
1 -
2
-
3
-
4
-
5
-
6
-
7
-
8
-
9
-
10
-
11
-
12
-
 13
13 -
 14
14 -
 15
15 -
 16
16 -
 17
17 -
 18
18 -
 19
19 -
 20
20 -
 21
21 -
 22
22 -
 23
23 -
24
-
25
-
26
-
27
-
28
-
29
-
30
-
31
-
32
-
33
-
34
-
35
-
36
-
37
-
38
-
39
-
40
-
41
-
42
-
43
-
44
-
45
-
46
-
47
-
48
-
49
-
50
-
51
-
52
-
53
-
54
-
55
-
56
-
57
-
58
-
59
-
60
-
61
-
62
-
63
-
64
-
65
-
66
-
67
-
68
-
69
-
70
-
71
-
72
-
73
-
74
-
75
-
76
-
77
-
78
-
79
-
80
-
81
-
82
-
83
-
84
-
85
-
86
-
87
-
88
-
89
-
90
 |
 |

17
English
F
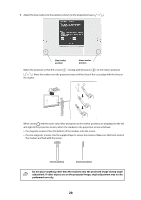
Connect the cable
Connect the Touch Unit connection cable that is connected to the projector to the port on the
Touch Unit.
G
Adjust the angle
Adjust the angle of the laser light coming from the Touch Unit so that the Touch Unit can detect the
position of your fingers.
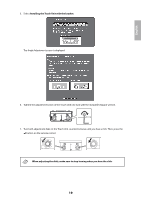
1.
Select
Easy Interactive Function
from the
Extended
menu.
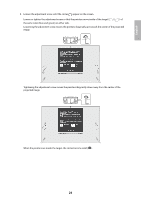
Make sure to calibrate the interactive pen(s) before adjusting the angle. Press the User
button on the remote control and select Yes to perform an auto-calibration. Refer to
the projector’s
User’s Guide
for detailed instructions on calibrating the pen(s).