Epson LQ 670 Product Information Guide - Page 12
Using Continuous Paper - printer documentation
 |
View all Epson LQ 670 manuals
Add to My Manuals
Save this manual to your list of manuals |
Page 12 highlights
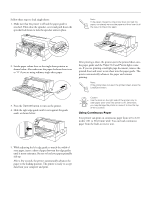
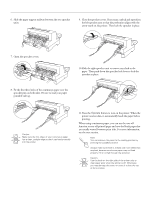
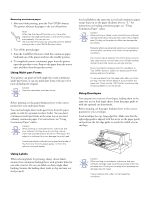
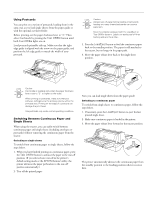
EPSON LQ-670 Follow these steps to load single sheets: 1. Make sure that the printer is off and the paper guide is attached. Then close the sprocket covers and push down the sprocket lock levers to lock the sprocket units in place. Note: If the platen rotates but the printer does not load the paper, completely remove the paper and then insert it all the way into the printer again. 2. Set the paper release lever to the single-sheet position as shown below. Also make sure the paper thickness lever is set to "0" if you are using ordinary single-sheet paper. After printing a sheet, the printer ejects the printed sheet onto the paper guide and the Paper Out and Pause lights come on. If you are printing a multiple-page document, remove the printed sheet and insert a new sheet into the paper guide. The printer automatically advances the paper and resumes printing. Note: If the printer does not eject the printed sheet, press the Load/Eject button. 3. Press the Operate button to turn on the printer. 4. Slide the right edge guide until it rests against the guide mark, as shown below. Caution: Use the knob on the right side of the printer only to clear paper jams when the printer is off. Otherwise, you may damage the printer or cause it to lose the topof-form position. Using Continuous Paper Your printer can print on continuous paper from 4.0 to 12.0 inches (101 to 304.8 mm) wide. You can load continuous paper from the built-in tractor unit. 5. While adjusting the left edge guide to match the width of your paper, insert a sheet of paper between the edge guides until it meets resistance. Be sure to load your paper printable side up. After a few seconds, the printer automatically advances the paper to the loading position. The printer is ready to accept data from your computer and print. 12 - EPSON LQ-670 3/97
-
 1
1 -
2
-
3
-
4
-
5
-
6
-
 7
7 -
 8
8 -
 9
9 -
 10
10 -
 11
11 -
 12
12 -
 13
13 -
 14
14 -
 15
15 -
 16
16 -
 17
17 -
18
-
19
-
20
-
21
-
22
 |
 |
